Protocol for Creation of Mold on Silicon Wafer at Nano3 Facility at UC San Diego:

  • Protocol adapted from Nano3 PDMS Molding Course.

Location for Items and Instruments in the Photolithography Lab at Nano3:

  • The main walkway between the two sides (Room 1413 and Room 1417) of the Photolithography lab has a Steel rack. In this rack you will find the following items provide by Nano3:
    • SU-8 2100: HAZARDOUS READ SDS
    • Empty Dark Brown Nalgene Bottles for Photoresist storage.
    • Labels for the Nalgene Bottles
  • You can find the following Solvents provided by Nano3 in the Flammables cabinet in Room 1413:
    • Acetone: HAZARDOUS READ SDS
    • Isopropanol (Propan-2-ol)
    • SU-8 Developer: HAZARDOUS READ SDS
  • You can find the following in Room 1417:
    • Heavy Duty Aluminium Foil.
    • Kapton (Polyimide) Tape.
    • A Level Magnetically attached to the Fume Hood above the Hotplates.
    • Hotplates
    • Wafer Spinners
    • One Open style Fume Hood with a Waste Bottle for Organic Solvents.
    • A fume hood with a sash, ultrasound cleaner, wafer spinner and Compressed Nitrogen Gun.
    • A Fume hood where SU-8 Developer can be used for Developing your wafer.
    • Disposable Gloves rack
    • Hazardous Waste Bin
    • Clean Room Wipes: Both paper and cloth
  • You can find the following in Room 1413:
    • EVG 620 Mask Aligner
    • A second Fume Hood where SU-8 Developer can be used for Developing your wafer.
    • Second Open style Fume Hood with a Waste Bottle for Organic Solvents.
    • Disposable Gloves rack
    • Hazardous Waste Bin
    • Clean Room Wipes: Both paper and cloth

Seal the inner layer of your gloves.

  • Chemicals can easily come in contact with your skin if you don't seal the inner layer of your gloves.
  • Use Tape to Seal the Inner layer of your gloves to the sleeves of your cleanroom Smock.
  • Put on a Second layer of Gloves above the sealed layer.
  • Execute the Cell Below to Watch a Video of the Process.
In [1]:
%%HTML
<iframe width="800" height="600" src="https://www.youtube.com/embed/MGIrGmxYp94?si=On4IS5O388sNBHaT" title="YouTube video player" frameborder="0" allow="accelerometer; autoplay; clipboard-write; encrypted-media; gyroscope; picture-in-picture; web-share" referrerpolicy="strict-origin-when-cross-origin" allowfullscreen></iframe>

Preparation

  • You need Prior Authorization to use the EVG620 and the Dektak XT. Make sure you have the prior authorizations and training well in advance.
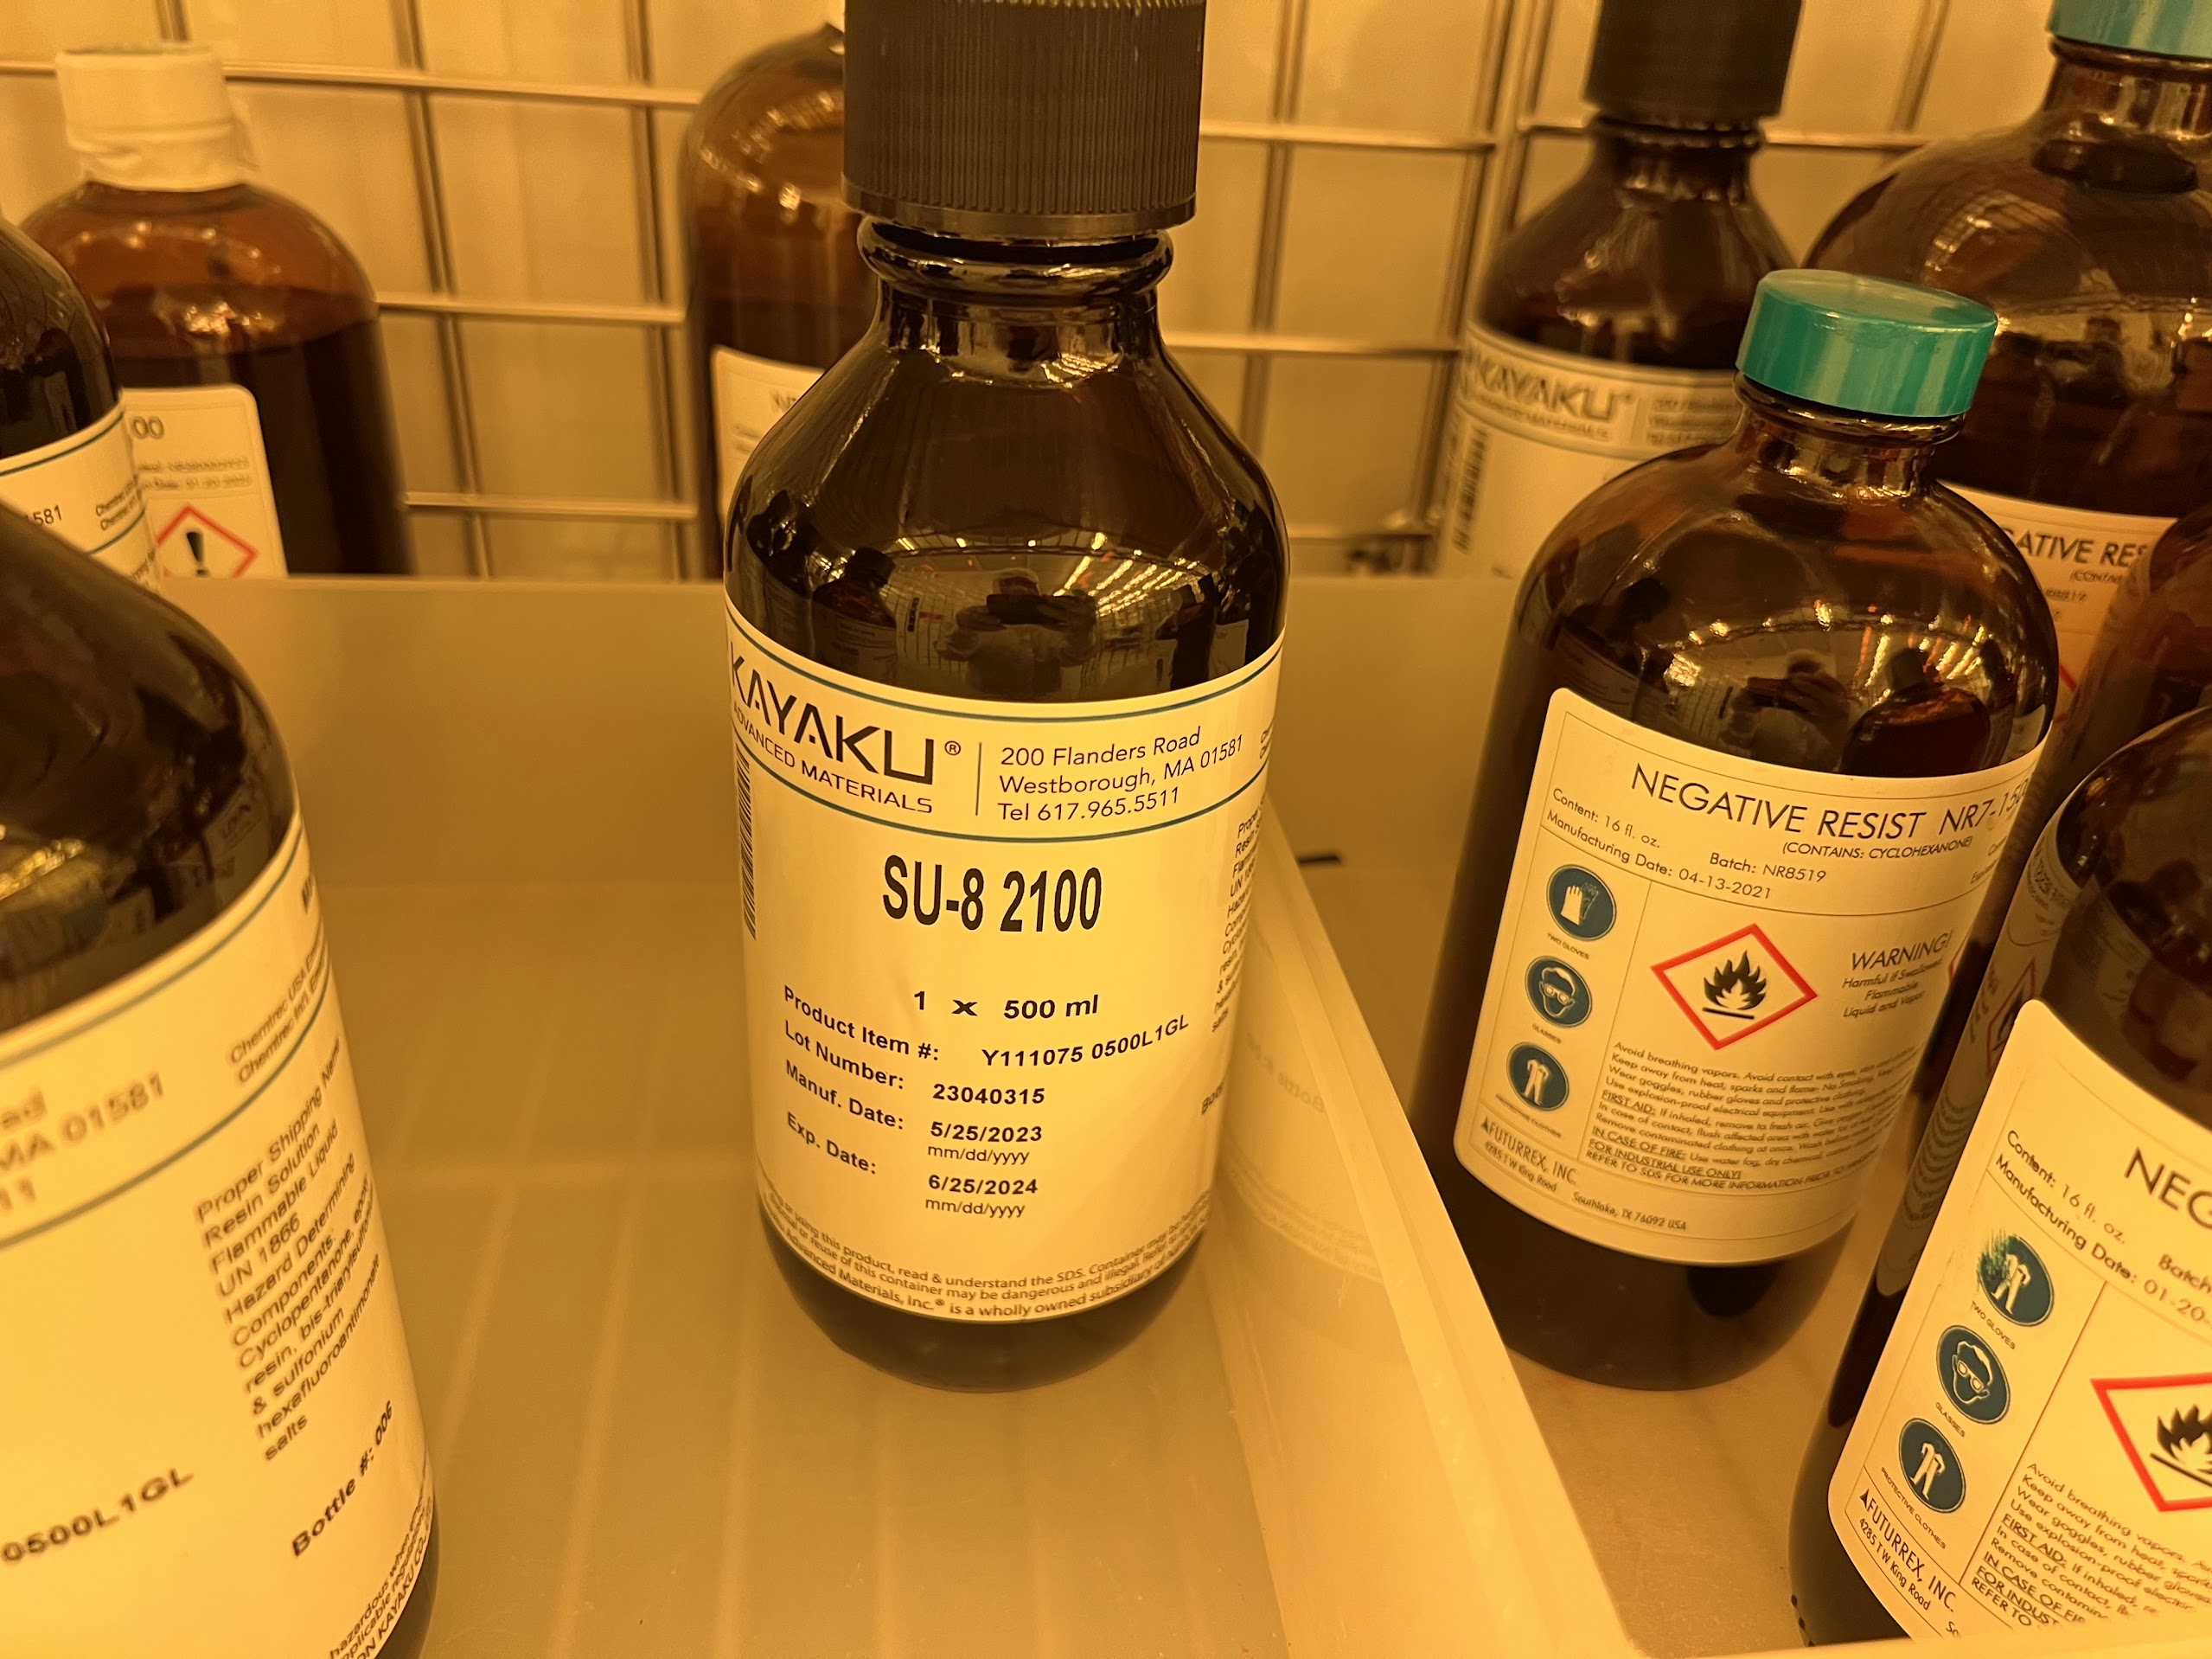
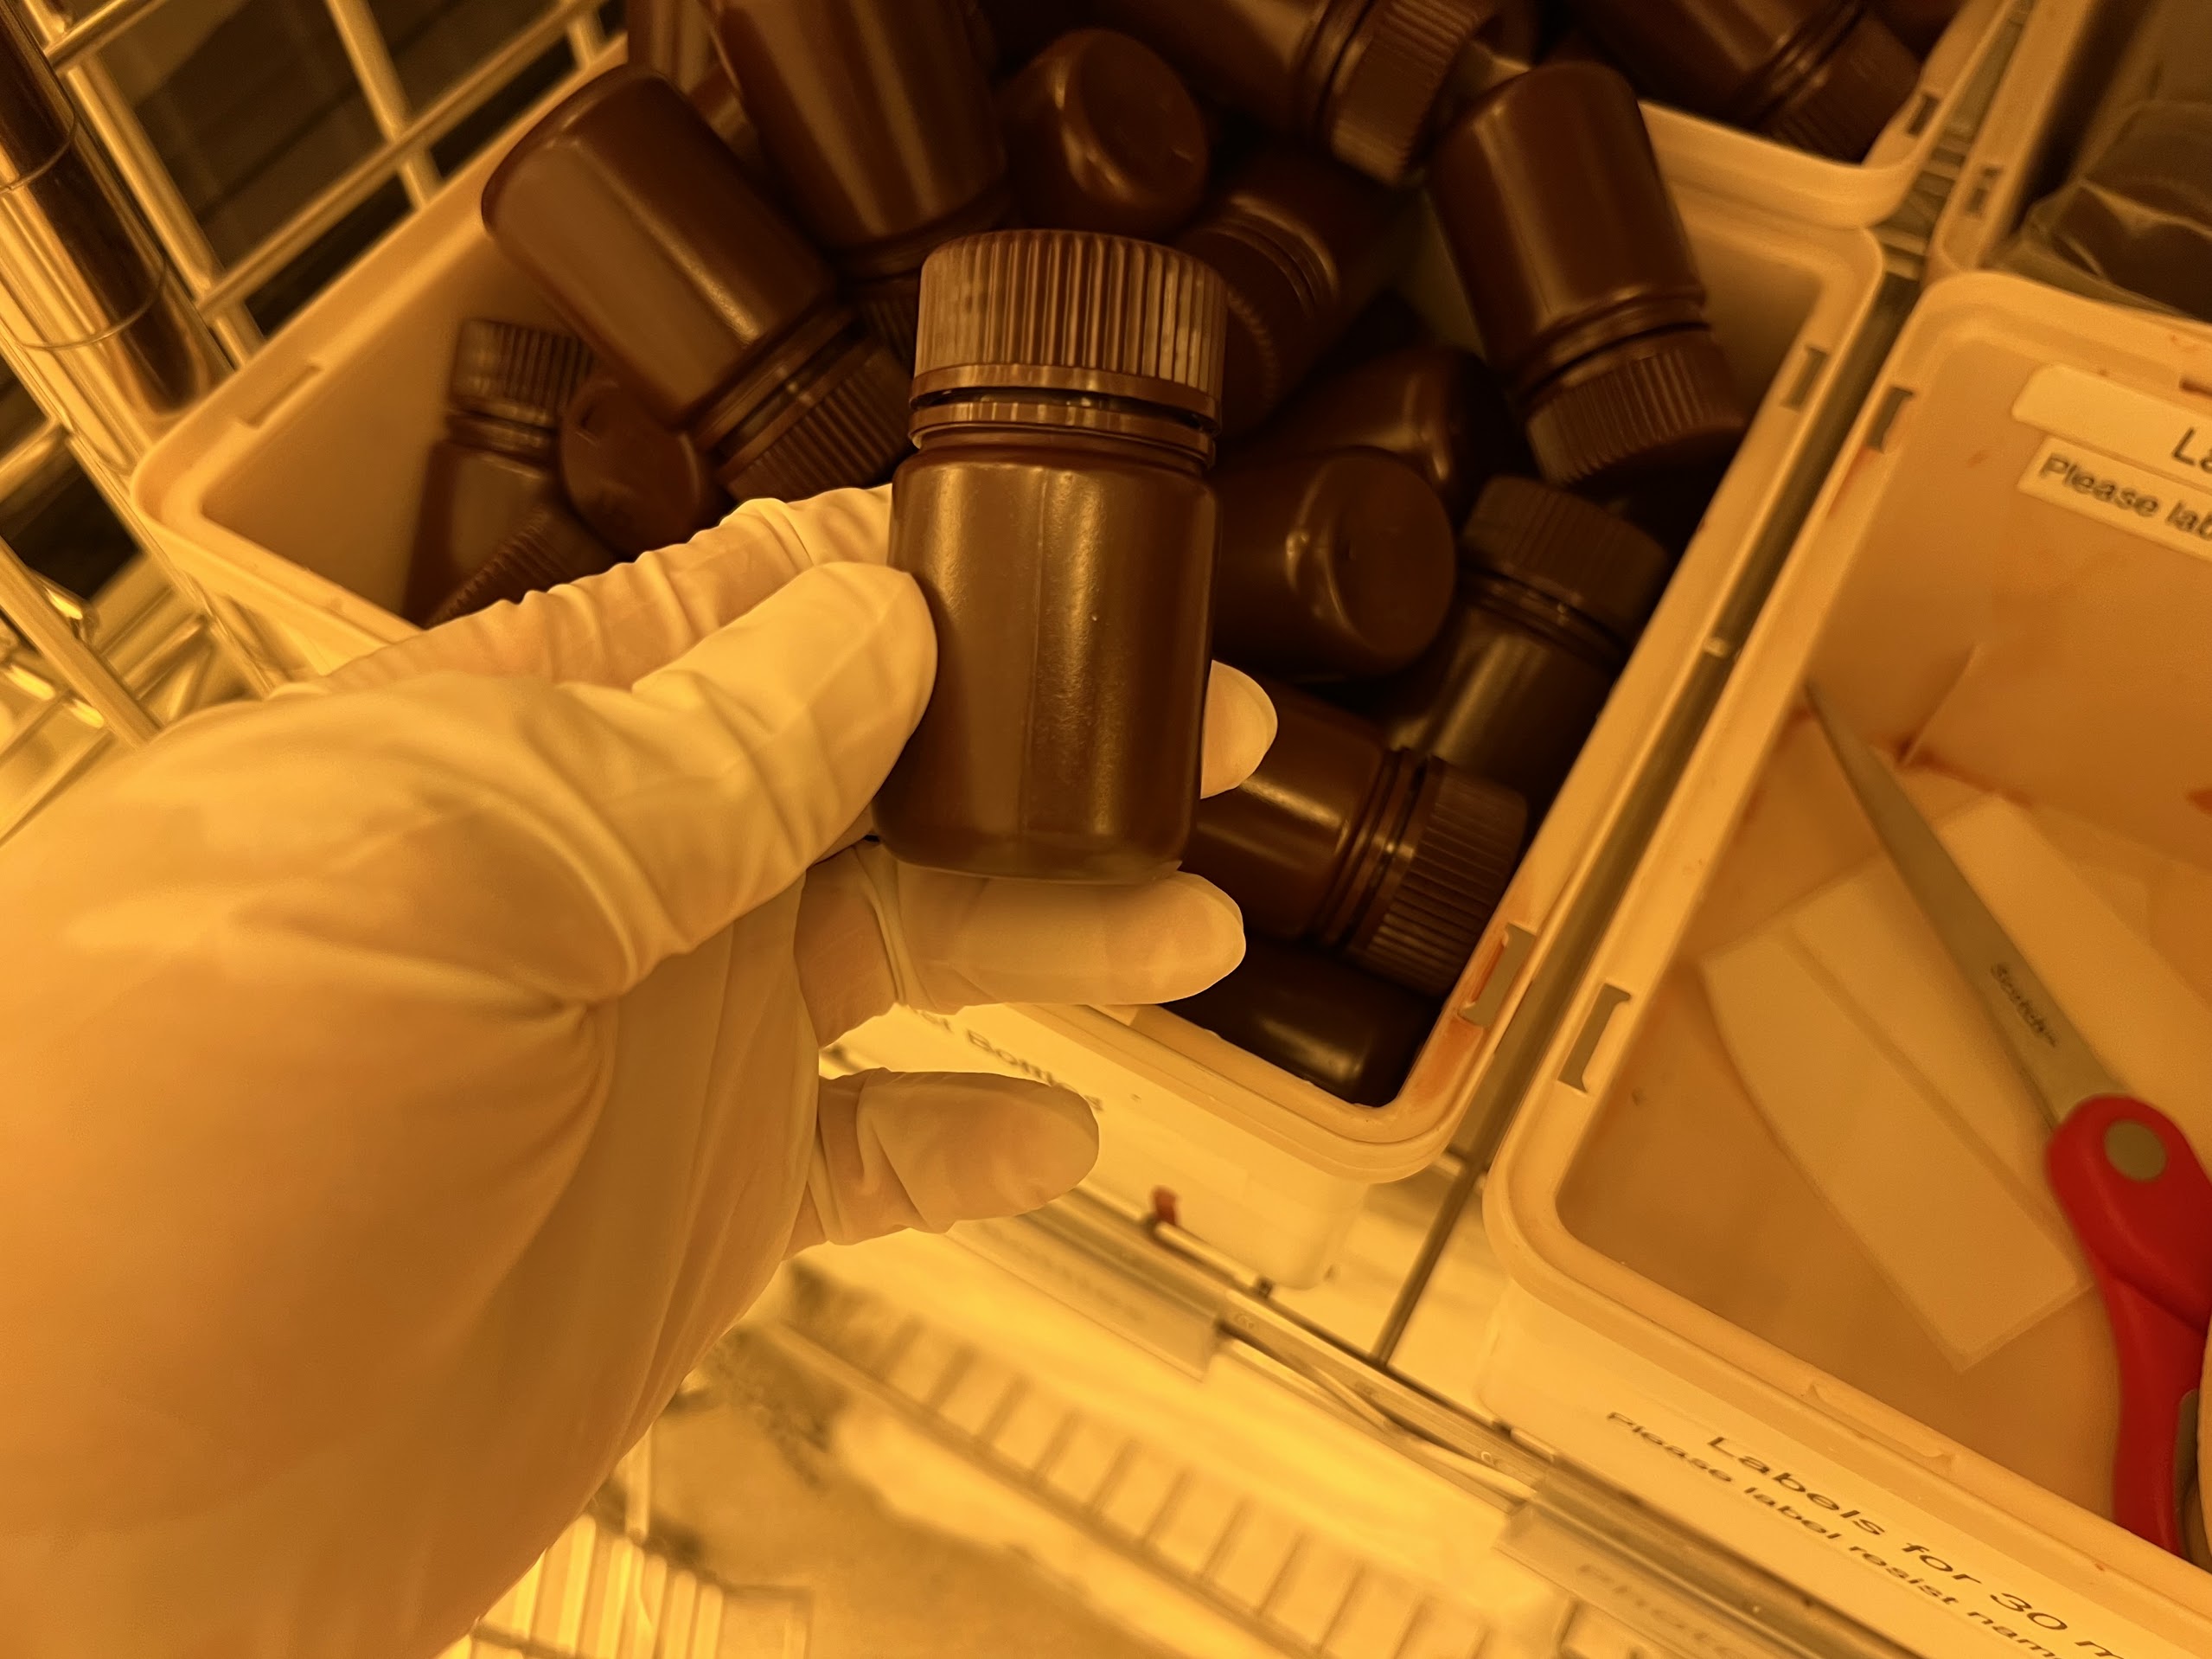
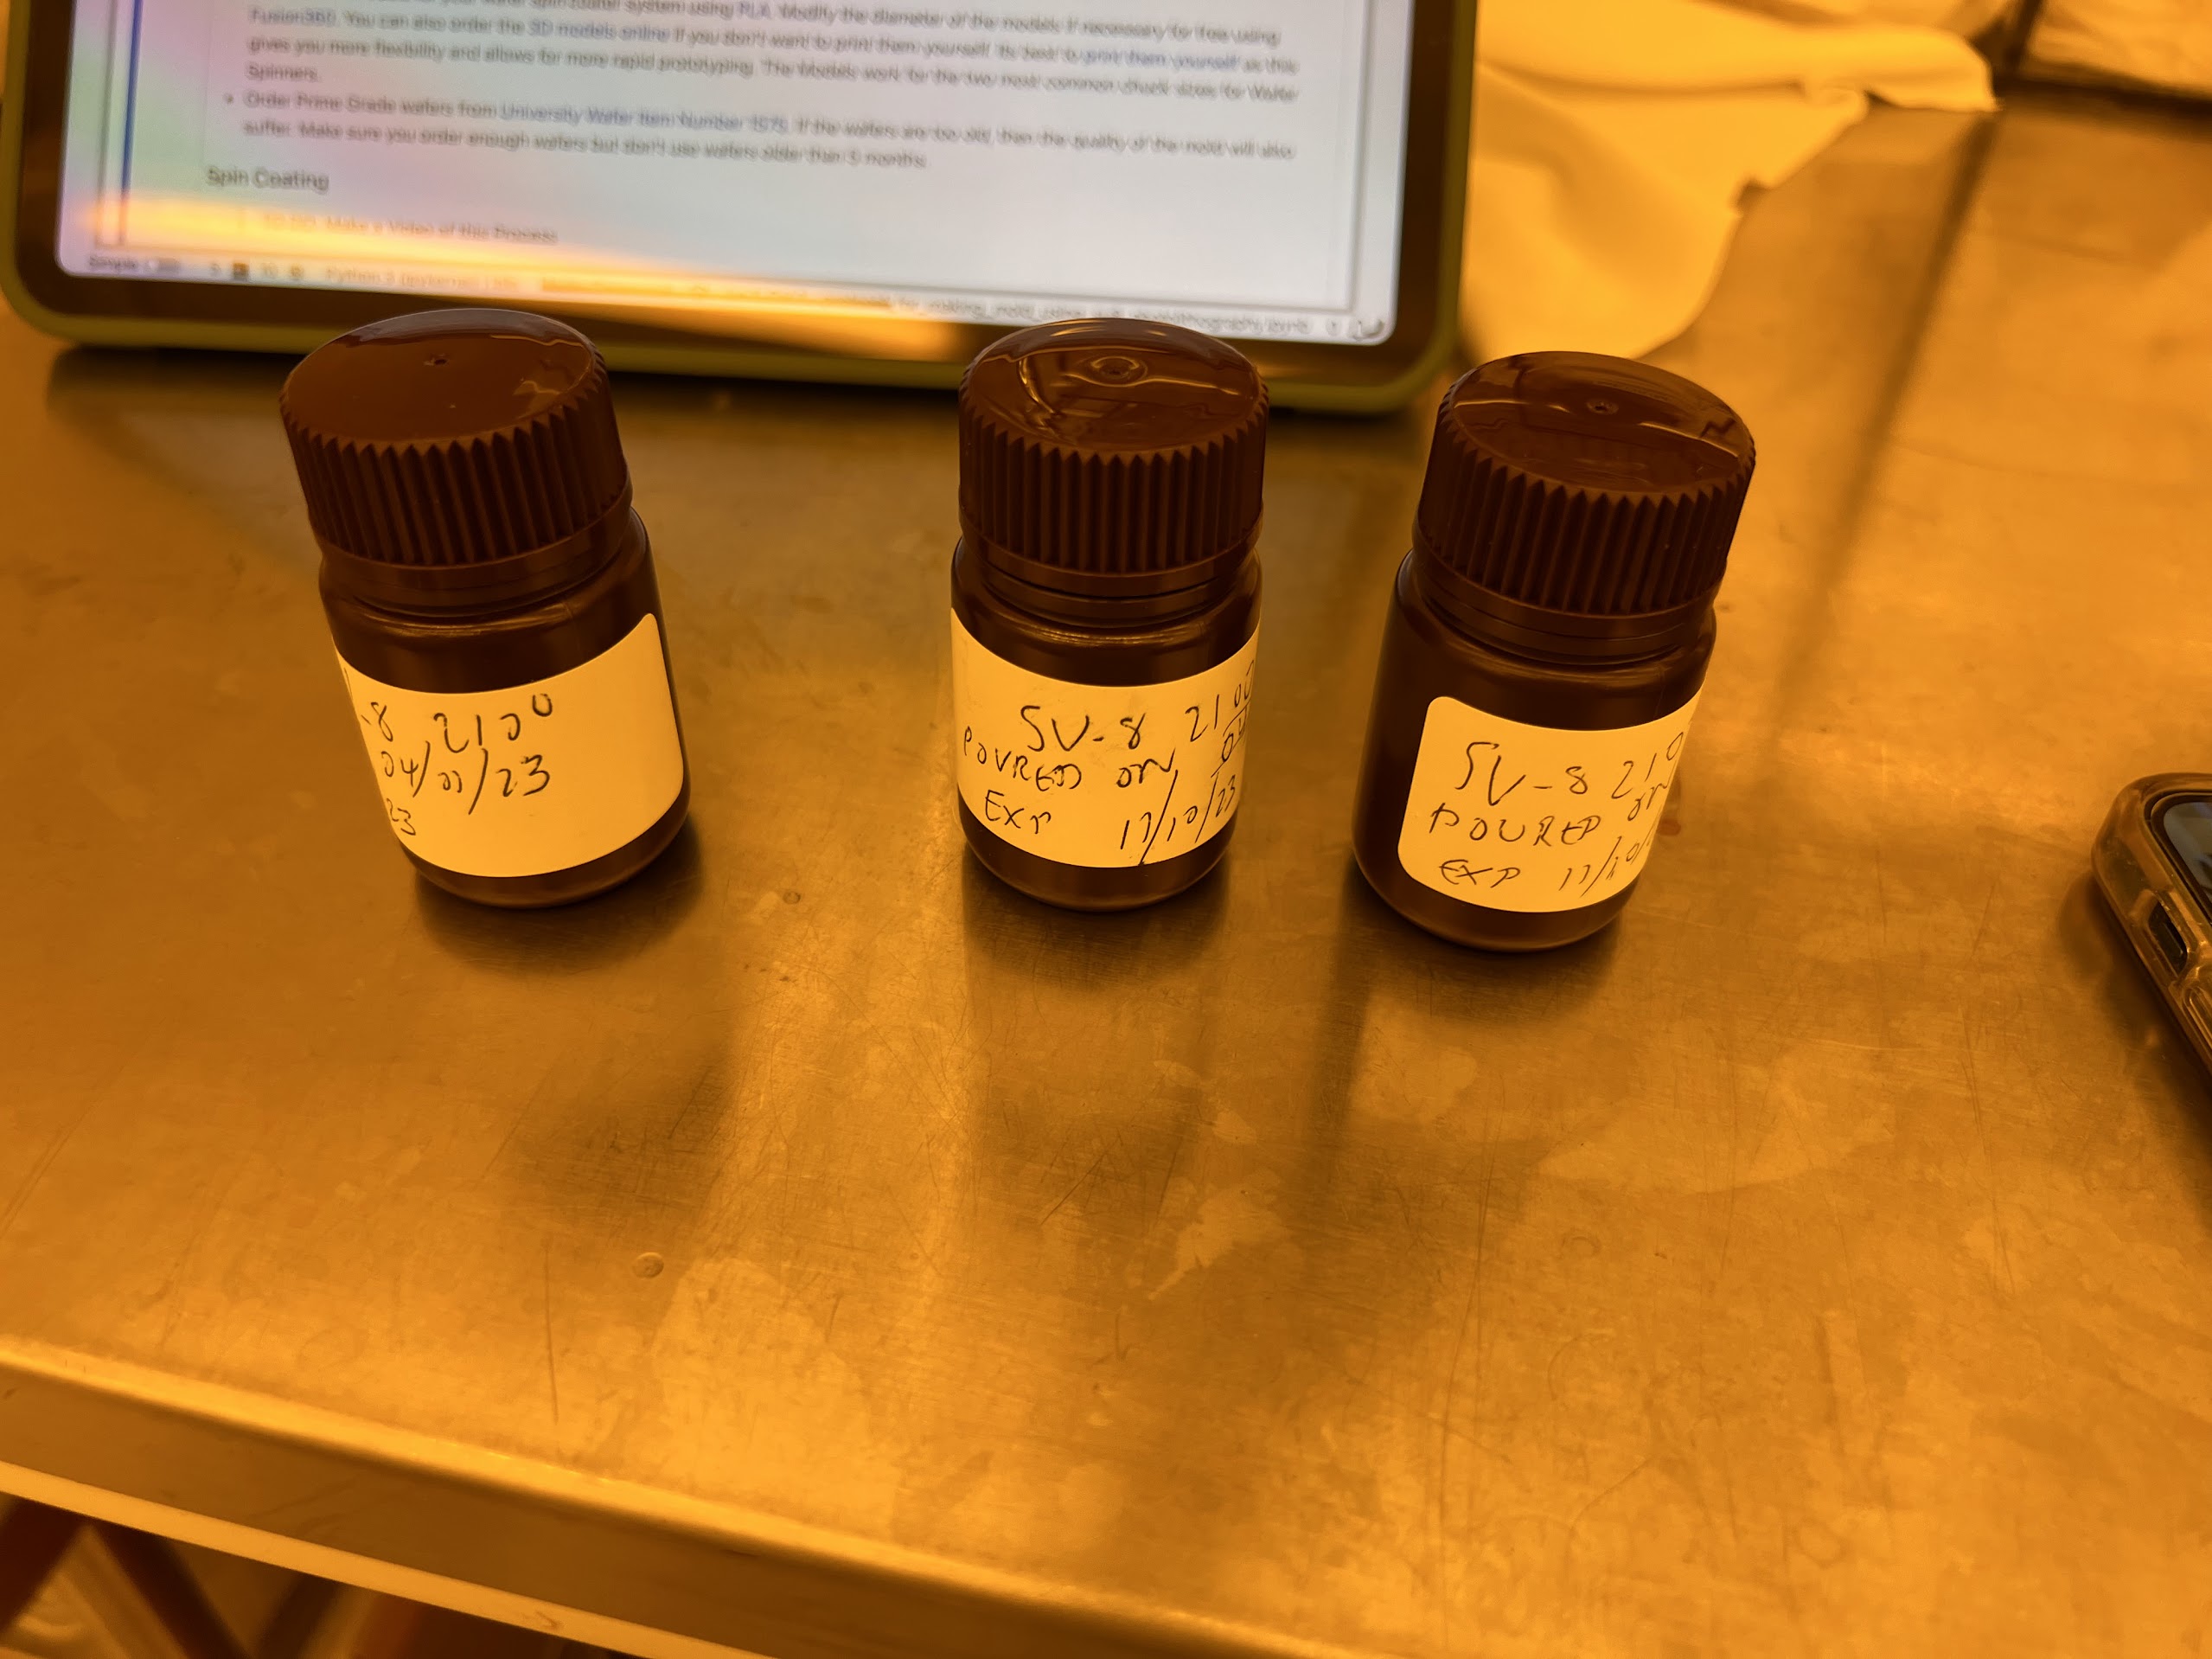
  • At least three weeks before you begin the mold making process you should pour SU-8 2100 into Dark Nalgene bottles.
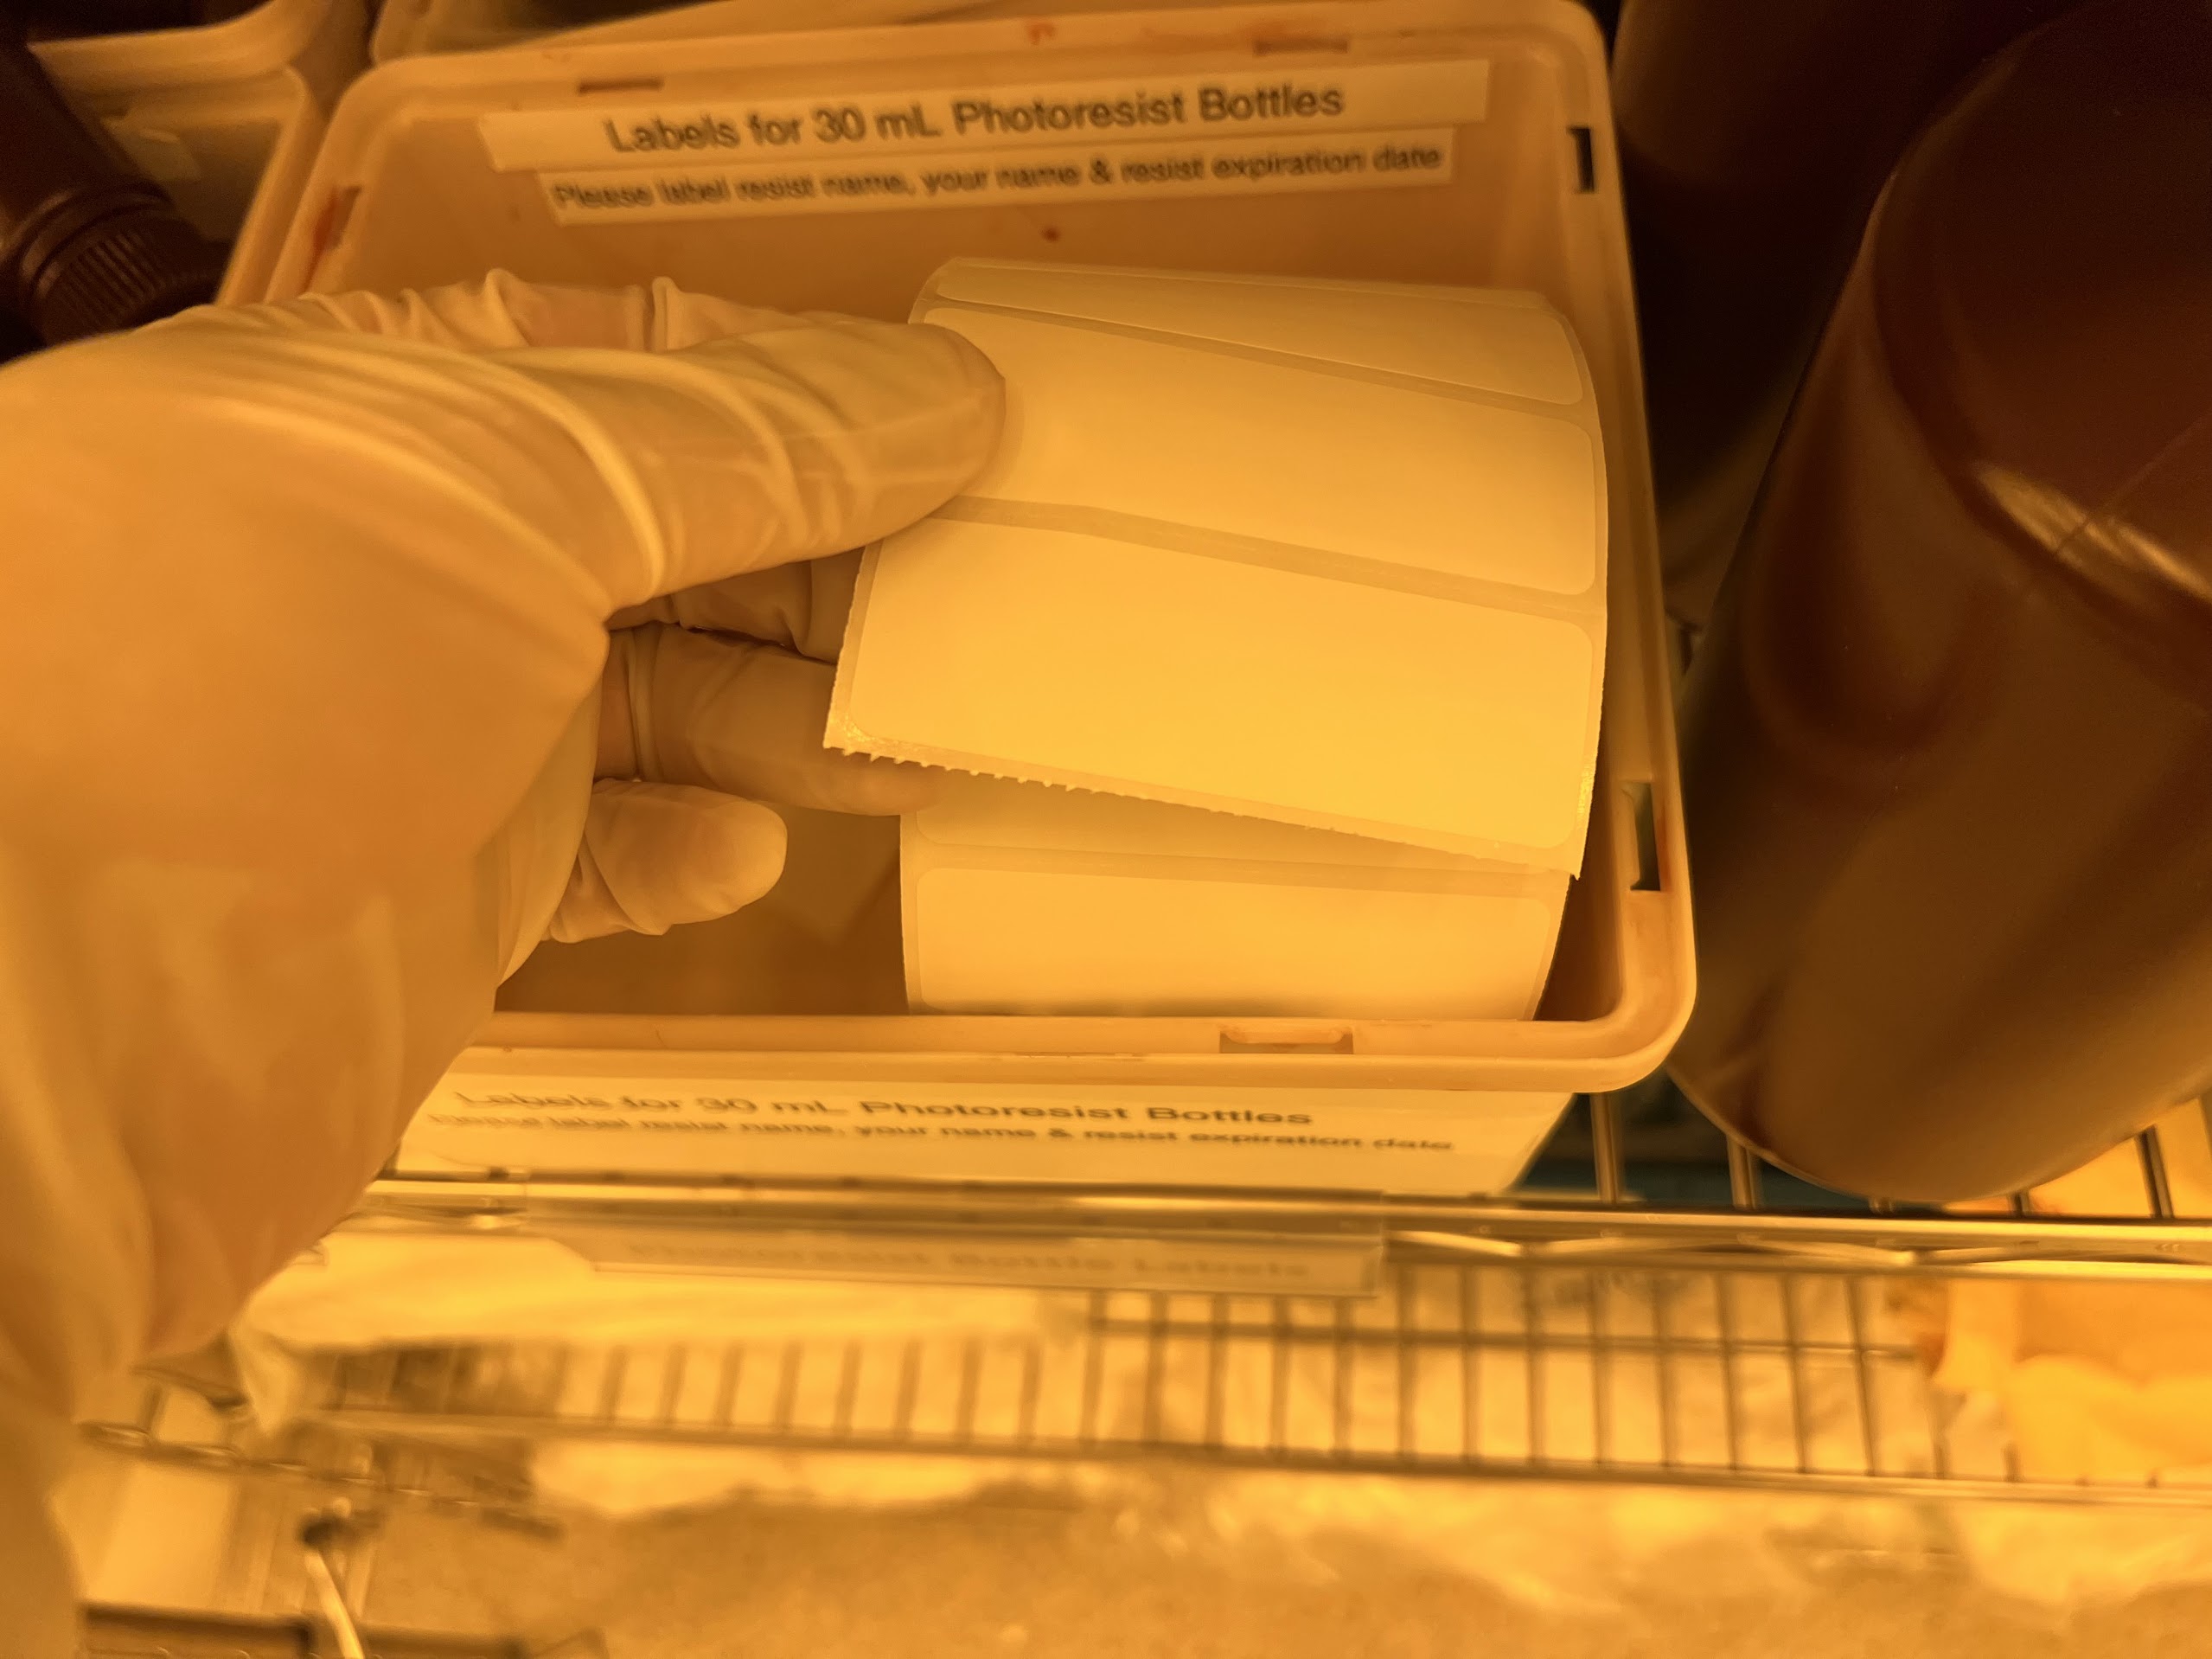
    • Label the Nalgene bottles with the date you poured the resist and the expiry date.
    • It’s important to do this early because SU-8 2100 is a very thick resist and can easily trap air bubbles which will make the Photoresist spin coat very uneven after pouring it onto the silicon wafer.
    • Air bubbles in the resist will lead to significant variation in the depth of the microfluidic channels downstream. Three weeks is generally enough time for these bubbles to disappear. You will get much higher quality molds if you do this in advance.
    • Fill about 2/3 of each Nalgene Bottle with SU-8 2100.
    • Try not to spill any resist on the lip of the bottle or into the cap. This resist can dry and form flakes that can ruin your photoresit coating.
    • Clean any resist on the lip or cap with a Cloth Cleanroom wipe soaked in Acetone.
    • Don't let any Acetone into the main SU-8 Bottle or Nalgene Bottle by accident.
    • Clean any resist spilled on the main SU-8 Bottle or Nalgene bottle on the sides with a Cloth Cleanroom wipe Soaked in Acetone.
    • Execute the Cell Below to Watch a video of the Process.


In [2]:
%%HTML
<iframe width="800" height="600" src="https://www.youtube.com/embed/DtM_YYoQ6QQ?si=j1A8ad-imf4P7Aml" title="YouTube video player" frameborder="0" allow="accelerometer; autoplay; clipboard-write; encrypted-media; gyroscope; picture-in-picture; web-share" allowfullscreen></iframe>
  • Make sure you clean any spilled photoresist from the main SU-8 Bottle with Cloth cleanroom wipes soaked in Acetone. Dried Photoresist can make the bottle Hard to Open.
In [3]:
%%HTML
<iframe width="800" height="600" src="https://www.youtube.com/embed/T-_N4qQJcMA?si=7JAcaYELEs2TmvNT" title="YouTube video player" frameborder="0" allow="accelerometer; autoplay; clipboard-write; encrypted-media; gyroscope; picture-in-picture; web-share" allowfullscreen></iframe>
  • Make a reservation for the EVG 620 for 3 hours using the FOM Reservation System in advance.
  • Order the Photolithography mask by emailing cam@artnetpro.com the CAD File for the Microfluidic chip. Ask them to print at 25400 DPI Emulsion Down.
  • Print the 3D models for your wafer spin coater system using PLA. Modify the diameter of the models if necessary for free using Fusion360. You can also order the 3D models online if you don’t want to print them yourself. Its best to print them yourself as this gives you more flexibility and allows for more rapid prototyping. The Models work for the two most common chuck sizes for Wafer Spinners.
  • Order Prime Grade wafers from University Wafer Item Number 1575. If the wafers are too old, then the quality of the mold will also suffer. Make sure you order enough wafers but don’t use wafers older than 5 months.

Spin Coating Setup

  • Select three wafer hotplates in Room 1413 and clean any residual photoresist using cleanroom wipes and acetone. Use the Scraper blades to scrape any leftover resist off.
  • Use a Level and to make sure two of the three hotplates are completely horizontal.
    • This is important to avoid the thick resist from flowing during the baking steps.
    • Check the level along the width and breadth of the hotplate by turning your level by 90 degrees.
    • Adjust the leg screws on the Hotplates to make them level.


  • Next you need to setup up your cooling surface.
    • Put the four Adjustable legs under the Aluminum sheet.
    • Then use your level to check the Aluminum sheet is completely level along both X and Y directions using your level. Adjust the legs if necessary.


  • Set the two levelled hotplates to 95°C and 65°C. Set the third hotplate to 180°C.
  • Wait for the temperatures to stabilize and verify the temperature using the Infrared thermometer.


  • Log on to the EVG 620 using FOM.
  • Dehydration Bake of Wafer before Spin Coat:
    • Now take one wafer out of your wafer carrier using the Wafer Tweezers.
    • Visually inspect for dust particles. Use a compressed nitrogen gun to blow any dust off.
    • Also inspect the bottom for any particles.
    • Carefully place this wafer on the 180°C hotplate.
    • Use both Wafer Tweezers and the second pair of Tweezers as support to prevent the wafer from flying off.
    • Set a Timer for 10 minutes.
    • Execute the cell below to Watch a video of the process.
In [4]:
%%HTML
<iframe width="800" height="600" src="https://www.youtube.com/embed/AFq13kJhgIs?si=ZMuJH2bu97Ne4jOj" title="YouTube video player" frameborder="0" allow="accelerometer; autoplay; clipboard-write; encrypted-media; gyroscope; picture-in-picture; web-share" allowfullscreen></iframe>
  • Use Both Tweezers to prevent the Wafer from Flying off
    • A layer of air beneath the Silicon Wafer makes it slide on the Hotplate as you put it on.
    • Use Both Tweezers to keep the Silicon Wafer on the Hotplate till the air gap goes away.
    • Avoid Touching the Top Polished side of the wafer as this can introduce scratches and unwanted particles.
    • Clean unscratached wafers produce better molds.
In [5]:
%%HTML
<iframe width="800" height="600" src="https://www.youtube.com/embed/7_1Rn9AQp6s?si=1SNWm8PalLAZ7E94" title="YouTube video player" frameborder="0" allow="accelerometer; autoplay; clipboard-write; encrypted-media; gyroscope; picture-in-picture; web-share" allowfullscreen></iframe>
  • After 10 minutes remove the wafer using the wafer tweezers and the second pair of tweezers as support.
  • Place on the cooling surface for 5 minutes. Use the second pair of tweezers as support again.
  • Next, we need to spin-coat the wafer with SU-8 2100.
In [6]:
%%HTML
<iframe width="800" height="600" src="https://www.youtube.com/embed/WT9xPyiXvQ4?si=GUskXOXAX09XZ0qV" title="YouTube video player" frameborder="0" allow="accelerometer; autoplay; clipboard-write; encrypted-media; gyroscope; picture-in-picture; web-share" allowfullscreen></iframe>

Spin Coating with SU-8 2100 Photoresist

  • Take out one of the bottles you poured three weeks ago.
  • Clean the wafer spinner with acetone and cloth cleanroom wipes before use. Make sure there is no sticky photoresist residue on the chuck or the spinner surface.
  • Fold a large piece of the Heavy Duty Aluminum foil to create a pocked for Catching excess photoresist.
    • Make sure the Aluminum foil doesn't impede the movement of the Chuck or the Wafer.
    • Execute Cell below to Watch a Video of the Process.

✶WARNING: Make sure the Aluminum foil doesn't get tangled with the wafer. Make sure there is some distance between the Aluminum foil and the wafer after loading it. The Aluminum foil should also not be easily detached by the wind generated by the spining wafer.

In [7]:
%%HTML
<iframe width="800" height="600" src="https://www.youtube.com/embed/a3a4FQ85768?si=srbhOFwk8wzMCeQf" title="YouTube video player" frameborder="0" allow="accelerometer; autoplay; clipboard-write; encrypted-media; gyroscope; picture-in-picture; web-share" allowfullscreen></iframe>
  • It’s important to use the Spin coater with a lid. During the spin steps a lot of foamy photoresist residue can fly around and land on your wafer. This will make the photoresist coating uneven.
  • Cover the lid for the wafer spinner with Aluminium foil as well.
    • Punch a hole in the center to allow some air flow.
    • Execute Cell Below to Watch the Video.
In [8]:
%%HTML
<iframe width="800" height="600" src="https://www.youtube.com/embed/4cIgLX1iMq8?si=pxp-WyFSQCM03tTg" title="YouTube video player" frameborder="0" allow="accelerometer; autoplay; clipboard-write; encrypted-media; gyroscope; picture-in-picture; web-share" allowfullscreen></iframe>
  • Save and load the following program for the Spinner:
    • Spin Step 1: 500RPM for 10 seconds, acceleration 100RPM/s
    • Spin Step 2: 3100RPM for 30 seconds, acceleration 300RPM/s
  • Load the wafer on the chuck and use the 3D-printed alignment tool to center the wafer onto the chuck. Apply vacuum and do a spin test to make sure the wafer is Center aligned.
In [9]:
%%HTML
<iframe width="800" height="600" src="https://www.youtube.com/embed/gTgpvaySXp8?si=Y6G_dsaKtCD0hvH9" title="YouTube video player" frameborder="0" allow="accelerometer; autoplay; clipboard-write; encrypted-media; gyroscope; picture-in-picture; web-share" allowfullscreen></iframe>
  • Pour the Photoresist onto the Wafer:
    • Next open your small Nalgene bottle with the SU-8 2100.
    • Make sure there are no particles on the lip of the bottle.
    • Use a cloth cleanroom wipe soaked in Acetone to remove them.
    • These dried photoresist particles can coat your wafer and make an uneven pattern.
    • You can also pour from the side of the bottle that doesn't have any dried Photoresist particles on the lip.
    • Slowly pour the photoresist, keeping the bottle very close to the surface of the wafer without touching the wafer with the lip of the bottle.
    • Once the photoresist makes an approximately 2.5-inch puddle, move the photoresist container radially to the side and close the bottle.
    • Avoid the resist from folding over on itself by keeping the bottle close to the surface of the wafer and making a radial movement as shown in the video below.
    • If you did everything right, there should be no bubbles and no particles in the photoresist puddle.
    • Execute the Cell Below to Watch a video.
In [10]:
%%HTML
<iframe width="800" height="600" src="https://www.youtube.com/embed/YtrFbsIotOY?si=a4xtYTucB2yWYKoQ" title="YouTube video player" frameborder="0" allow="accelerometer; autoplay; clipboard-write; encrypted-media; gyroscope; picture-in-picture; web-share" allowfullscreen></iframe>
  • Close the lid and quickly run the spin program that you saved on the spinner.
    • Execute the Cell Below to Watch a Video.

✶CAUTION: Very high spin speed for the wafer. Don't touch the wafer while it is spining.

In [11]:
%%HTML
<iframe width="800" height="600" src="https://www.youtube.com/embed/PVrDaXJjRP4?si=fgfQlx-jiuZ_QT15" title="YouTube video player" frameborder="0" allow="accelerometer; autoplay; clipboard-write; encrypted-media; gyroscope; picture-in-picture; web-share" allowfullscreen></iframe>
  • The wafer will have a nice flat coating with an edge bead. This is normal. The photolithography mask has been designed with this edge bead in mind.
  • Using one hand remove the wafer from the spinner. Spread your hand out to hold the wafer securely. Your gloves will become sticky and covered in photoresist on this hand.
  • Now add acetone to some cloth cleanroom wipes and wipe the bottom of the wafer.
    • Wipe in radial movements. Start wiping from the center and then move out radially towards the edge of the wafer.
    • Make sure not to get any acetone on the top of the wafer as this can ruin the photoresist coat easily.
    • If you use too much acetone small droplets can easily accidently find their way on the top surface of the wafer.
    • Do this process quickly and don't tilt the wafer for too long or the photoresist layer might start flowing from one side of the wafer to another. This flow can lead to uneven photoresist thickness.
    • Keep the Wafer away from the Acetone by raising it above your head while you are soaking the Cloth wipe in Acetone.
    • Now we need to soft bake.
  • Using your hands place the coated wafer on the 65°C hotplate. Set a timer for 5 minutes.
In [12]:
%%HTML
<iframe width="800" height="600" src="https://www.youtube.com/embed/HGHHAM2j9k4?si=PbIHRywJfulw-w1L" title="YouTube video player" frameborder="0" allow="accelerometer; autoplay; clipboard-write; encrypted-media; gyroscope; picture-in-picture; web-share" allowfullscreen></iframe>

Soft Bake

  • Replace the outer gloves you are wearing:
    • First remove your outer gloves and throw them into the Hazardous waste bin.
    • Put on a new pair of outer gloves.
    • Generally, its good practice to replace your gloves when you have any chemical or solvent on it.
  • Using the Wafer Tweezer transfer the coated wafer to the 95°C hotplate. Use the second pair of tweezers for support to prevent the wafer from flying off.
  • Set a timer for 20 minutes.
In [13]:
%%HTML
<iframe width="800" height="600" src="https://www.youtube.com/embed/0LYKhkiX_mo?si=eDAN4WzEIwlR20lu" title="YouTube video player" frameborder="0" allow="accelerometer; autoplay; clipboard-write; encrypted-media; gyroscope; picture-in-picture; web-share" allowfullscreen></iframe>
  • Clean and dry your Wafer tweezers with Acetone soaked cleanroom cloth wipes.
  • Using Wafer tweezers remove the wafer from the 95°C hotplate.
  • Put the wafer on the level cooling surface. Use the second pair of tweezers for support to prevent the wafer from flying off.
  • Set a timer for 5 minutes.
  • Now your soft baked wafer is ready for exposure.
In [14]:
%%HTML
<iframe width="800" height="600" src="https://www.youtube.com/embed/fvBcsPTOCS4?si=Jxy6wVbwDE_YsYkj" title="YouTube video player" frameborder="0" allow="accelerometer; autoplay; clipboard-write; encrypted-media; gyroscope; picture-in-picture; web-share" allowfullscreen></iframe>

Optional: How to Stick your Printed Photomask onto a Empty Glass Sheet for Exposure:

  • If you don't want to stick your transparency onto a glass sheet you can always order a Glass Photomask.
  • Take the transparency you received from Artnet pro out.
  • Also take the 5 inch glass sheet out and place both on a cloth cleanroom wipe.
  • Prepare a Storage Case for this Glass Sheet:
    • Take the 6 inch storage case out and make a small concentric square inside the storage case using the EPDM Foam Strip.
    • Make this square pattern both on the top and bottom inside surface of the storage case.
  • Clean and blow dry one side of the glass sheet using Cleanroom cloth wipes.
  • Prepare the Photomask for the EVG 620:
    • Cut the transparency down in size such that the center of the circle is aligned with the center of the glass sheet.
    • Now tape the top of the transparency to the glass sheet using Kapton Tape.
    • The Kapton tape should not touch the edges of the glass sheet.
    • Tape the transparency with the emulsion side(printed side) facing towards you. If you tape it the wrong side, then your pattern on the wafer will be quite blurry.
    • Lift the transparency on the opposite side without any tape and clean the surface in contact with the glass using a cloth cleanroom wipe. Also clean the glass surface.
      • You can also use IPA or Compressed Nitrogen to Clean if necessary.
    • Now carefully tape the opposite end of the transparency. Visually inspect for any remaining particles of dust or debris before you put the tape on.
    • Now clean the top emulsion side of the transparency with a cloth cleanroom wipe. Also clean the untapped side of the carrier glass sheet.
    • Your Photomask is now ready for Exposure.
Transparency Taped to Glass Sheet: Tape should not touch or go over the edges of the glass Final Product Stored inside its Storage Container

Exposure using the EVG 620

  • Login to the EVG 620. Password and Username should be written on a sheet in the logbook for the EVG620.
  • Once you login the machine initializes.
In [15]:
%%HTML
<iframe width="800" height="600" src="https://www.youtube.com/embed/T0ajl49NggY?si=akiLSGBLmjMxSLnP" title="YouTube video player" frameborder="0" allow="accelerometer; autoplay; clipboard-write; encrypted-media; gyroscope; picture-in-picture; web-share" allowfullscreen></iframe>
  • According to the Datasheet, total UV exposure for the wafer of around 100μm Thickness should be 240 mJ/cm2. For the EVG 620 the lamp is 13mW. So, the total exposure time is about 18.5 seconds. Do the calculation for your specific instrument or tell the instrument you want 240mJ/cm2.
  • You need to load a User Recipe to get started. I use:
    • Vacuum Contact
    • 4 inch Chuck setting.
    • 7 inch mask holder setting.
    • 240mJ/cm2
    • See a picture of the Recipe below:


  • Click on Run.
  • The emulsion side of the transparency taped onto the glass sheet should be facing down.
  • You want the emulsion side(printed side) to be in contact with your soft baked wafer.
In [16]:
%%HTML
<iframe width="800" height="600" src="https://www.youtube.com/embed/pOgf-TrG1xk?si=lML-6MjrWPcEcd4R" title="YouTube video player" frameborder="0" allow="accelerometer; autoplay; clipboard-write; encrypted-media; gyroscope; picture-in-picture; web-share" allowfullscreen></iframe>
  • Make sure there are no particles on or in the Mask.
    • Check the Top, the bottom and the area between the Transparency and Glass.
  • Then insert the Mask into the EVG620 for Wedge Compensation.
In [17]:
%%HTML
<iframe width="800" height="600" src="https://www.youtube.com/embed/W5sR5XYigE8?si=LY4Z_3tBdsPUaLPo" title="YouTube video player" frameborder="0" allow="accelerometer; autoplay; clipboard-write; encrypted-media; gyroscope; picture-in-picture; web-share" allowfullscreen></iframe>
  • Blow away any dried Photoresist particles on the Soft baked wafer using a Compressed Nitrogen Gun.
  • Next load the soft baked wafer using the Wafer tweezers into the EVG620
    • Use the Raised Edges in the Chuck to Align the wafer along its Primary Flat.
    • Avoid touching the coated part of the wafer, try to handle it by only pushing along its edge.
In [18]:
%%HTML
<iframe width="800" height="600" src="https://www.youtube.com/embed/kjeypGli10g?si=0hLTFJWns-3NCwip" title="YouTube video player" frameborder="0" allow="accelerometer; autoplay; clipboard-write; encrypted-media; gyroscope; picture-in-picture; web-share" allowfullscreen></iframe>
  • Align the Wafer with the Boundary of the Printed Pattern on the Photomask using the Alignment Knobs.
  • Expose the wafer.

✶CAUTION: Strong UV Radiation. Don't look at the EVG 620 UV Lamp Directly during Exposure. You can use appropriate eye protection if you HAVE to look.

In [19]:
%%HTML
<iframe width="800" height="600" src="https://www.youtube.com/embed/eNljA1rdWkg?si=IQpTUSADiMN0Q4ls" title="YouTube video player" frameborder="0" allow="accelerometer; autoplay; clipboard-write; encrypted-media; gyroscope; picture-in-picture; web-share" allowfullscreen></iframe>

Post-Exposure Bake

  • Remove the exposed wafer from the EVG620 using Wafer Tweezers.
  • Put the wafer on the 65°C hotplate using the Wafer Tweezers. Use the second pair of tweezers for support to prevent the wafer from flying off.
  • Set a timer for 5 minutes.
In [20]:
%%HTML
<iframe width="800" height="600" src="https://www.youtube.com/embed/3d-IJIkYWjg?si=LTZD9rfwzyaxK_5X" title="YouTube video player" frameborder="0" allow="accelerometer; autoplay; clipboard-write; encrypted-media; gyroscope; picture-in-picture; web-share" allowfullscreen></iframe>
  • Clean and dry your Wafer tweezers with Acetone soaked cleanroom cloth wipes.
  • If you did everything correctly you should see a pattern emerging on the wafer within 15 seconds of putting it on the 65°C hotplate.
  • Using the Wafer Tweezer transfer the coated wafer to the 95°C hotplate. Use the second pair of tweezers for support to prevent the wafer from flying off.
  • Set a timer for 10 minutes.
In [22]:
%%HTML
<iframe width="800" height="600" src="https://www.youtube.com/embed/v4SIq8XYA4Y?si=dZDFY1QKmRYKUOvH" title="YouTube video player" frameborder="0" allow="accelerometer; autoplay; clipboard-write; encrypted-media; gyroscope; picture-in-picture; web-share" allowfullscreen></iframe>
  • Clean and dry your Wafer tweezers with Acetone soaked cleanroom cloth wipes.
  • Using Wafer tweezers remove from the wafer from hotplate.
  • Put the wafer on the level cooling surface. Use the second pair of tweezers for support to prevent the wafer from flying off.
  • Set a timer for 5 minutes.
In [23]:
%%HTML
<iframe width="800" height="600" src="https://www.youtube.com/embed/DCO2jsNcNJ8?si=273mBVIvsJyoG-lt" title="YouTube video player" frameborder="0" allow="accelerometer; autoplay; clipboard-write; encrypted-media; gyroscope; picture-in-picture; web-share" allowfullscreen></iframe>

Remove the Mask from the EVG620

  • Exit the Program to Remove the Mask from the EVG620.
  • Zero all the Adjustment Knobs.
  • Store the Mask in its Storage container with the pattern facing up.
  • Park your Tray on the EVG620, close the window and then Logoff on FOM.
  • Watch the Video Below.
In [24]:
%%HTML
<iframe width="800" height="600" src="https://www.youtube.com/embed/6mA7CZMi8t4?si=XnY1qVd06Ov1ST24" title="YouTube video player" frameborder="0" allow="accelerometer; autoplay; clipboard-write; encrypted-media; gyroscope; picture-in-picture; web-share" allowfullscreen></iframe>

Developing the Wafer

  • Now you need to remove the photoresist from the regions which were not exposed. This is called developing the wafer.
  • You will need three Crystallizing glass dishes,cloth cleanroom wipes, a SU-8 Developer squeeze bottle and a Isopropanol squeeze bottle. The Squeeze bottles can generally be found somewhere in one of the Fume hoods in Room 1413 or 1417.
  • Put the three glass dishes inside the Fume hood where SU-8 Developer can be used for Developing your wafer.
    • Clean these Glass Dishes with a Cloth Cleanroom wipe to remove any particles. Use Compressed Nitrogen Gun if necessary.
  • Gently Pour SU-8 Developer into two glass dishes. Pour about 1cm deep SU-8 Developer.
    • Avoid splashing.

✶CAUTION: Do not get any developer on your body or skin. Also avoid any getting on your gloves. Immediately take the outer glove off and replace it with another glove if you accidently get some on it. Gentle swirling should avoid any SU-8 developer from spilling and splashing. Avoid breathing in the fume by keeping your head away from the Fume hood and the SU-8 Developer. Read the SDS.

In [25]:
%%HTML
<iframe width="800" height="600" src="https://www.youtube.com/embed/B1SAtc-LgWQ?si=VVTJCcjgzP9QVjlg" title="YouTube video player" frameborder="0" allow="accelerometer; autoplay; clipboard-write; encrypted-media; gyroscope; picture-in-picture; web-share" allowfullscreen></iframe>
  • Now place the Exposed wafer inside the First glass dish with SU-8 Developer gently using Wafer Tweezers.
  • Gently swirl the glass dish for 8 minutes. Alternate between clockwise and anticlockwise rotation every few minutes.

✶CAUTION: Do not get any developer on your body or skin. Also avoid any getting on your gloves. Immediately take the outer glove off and replace it with another glove if you accidently get some on it. Gentle swirling should avoid any SU-8 developer from spilling and splashing. Avoid breathing in the fume by keeping your head away from the Fume hood and the SU-8 Developer. Read the SDS.

In [26]:
%%HTML
<iframe width="800" height="600" src="https://www.youtube.com/embed/zCClmz4TKX4?si=5Lmwi2IfhQ-2QMJl" title="YouTube video player" frameborder="0" allow="accelerometer; autoplay; clipboard-write; encrypted-media; gyroscope; picture-in-picture; web-share" allowfullscreen></iframe>
  • After 8 minutes all the unexposed photoresist should have dissolved in the SU-8 developer.
  • Now transfer the wafer to the second glass dish with SU-8 Developer gently using Wafer Tweezers. Swirl for 2 minutes.
In [27]:
%%HTML
<iframe width="800" height="600" src="https://www.youtube.com/embed/I7LkQ-fq9hA?si=M4FZrhYecTN6xVd0" title="YouTube video player" frameborder="0" allow="accelerometer; autoplay; clipboard-write; encrypted-media; gyroscope; picture-in-picture; web-share" allowfullscreen></iframe>
  • Now hold the wafer above the second dish with your wafer tweezers and irrigate the wafer with the SU-8 Developer Squeeze bottle for 1 minute.
  • Now hold the wafer over the third empty glass dish using wafer tweezers without it touching the dish.
  • Irrigate the wafer with Isopropanol using a Squeeze bottle.
    • Wash the wafer till all the SU-8 developer has been removed.
    • Wash both sides.
    • Don't forget the liquid hiding behind the wafer tweezers.
  • Now blow dry the wafer inside the fume hood using a compressed Nitrogen/Air gun over cloth cleanroom wipes.
    • Don't forget the liquid hiding behind the wafer tweezers.
In [28]:
%%HTML
<iframe width="800" height="600" src="https://www.youtube.com/embed/1foa0WU8tL4?si=eS2mBn0I2_7zkH3Y" title="YouTube video player" frameborder="0" allow="accelerometer; autoplay; clipboard-write; encrypted-media; gyroscope; picture-in-picture; web-share" allowfullscreen></iframe>
  • Put this Dried and Developed Wafer back into the Wafer Carrier using Wafer Tweezers.
  • Clean up. Make sure you properly dispose of any waste. Use the Organic Solvents Waste bottle for SU-8 Developer and Isopropanol waste. Check the waste tag before you pour.
  • When you pour the Waste into the Bottle make sure any spills along the sides of the Dish are also caught by the Funnel directing liquid into the Waste Bottle.
    • You don't want the Solvent Waste to enter the Regular Drainage system.
  • Place a lot of Paper Cleanroom Wipes on the Fume Hood Surface. You will wash your Glass Dishes and then place them on these Paper wipes to prevent liquid going into the Fume Hood.
  • Dry and Wipe the Inside of the Glass Dishes with Paper Towels and then Store them in their designated Storage area.
  • Also store all remaining items in their designated storage area.
In [29]:
%%HTML
<iframe width="800" height="600" src="https://www.youtube.com/embed/umSVRF06bZc?si=IzjGkwPWoa3sqE58" title="YouTube video player" frameborder="0" allow="accelerometer; autoplay; clipboard-write; encrypted-media; gyroscope; picture-in-picture; web-share" allowfullscreen></iframe>

Metrology With DektakXT

  • Your mold is now ready. We just need to check the height.
  • Logon to the DektakXT on FOM.
  • Use the DektakXT surface profilometer to check the height of our wafer features. 5mg force with Hills and Valleys setting.
  • Your wafers should be between 104μm to 109μm in height. Try to hit this target range. As height is important for the inertial ordering effect of the microfluidic chip design and for stable droplet formation without jetting.
  • Watch the Video below on How to Take a Measurement
In [30]:
%%HTML
<iframe width="800" height="600" src="https://www.youtube.com/embed/xmLz0N2-xhA?si=iZ8jexnO03Wo7QHt" title="YouTube video player" frameborder="0" allow="accelerometer; autoplay; clipboard-write; encrypted-media; gyroscope; picture-in-picture; web-share" allowfullscreen></iframe>
  • Logoff DektakXT from FOM before you leave.