Protocol for suspending ChronoSeq/Dropseq Beads stored in Ethanol to 1X Lysis Buffer

Storage of ChronoSeq or Dropseq beads

  • You should receive your beads suspended in Ethanol.
  • Store these beads in a new box at -20°C before you start your experiments or for long term storage. Label the box with the Date you received the beads, the bead type and the batch number.

Prepare Lysis Buffer Stock

  • We suggest preparing 3.33X Lysis Buffer Stock using this protocol, before you get started.

Best Practices:

  1. Remember to put back the reagents back to their storage location at 4°C or -20°C once you are done with using them.
  2. Get fresh new microtips/sterile-disposable pipettes after each step, unless mentioned otherwise.
    • Important to avoid cross-contamination.

Equipment Used:

  • Our lab uses the refrigerated Sorval ST8R Centrifuge. You can find CAD files to print some of the parts here.
    • We bought the 50ml Inserts and Printed the Rest.
    • You can modify the CAD files to print the 50ml Inserts as well.
    • Use PLA or TPU for the prints.
  • Microcentrifuge we used was the Fisherbrand™ accuSpin™ Micro 17/17R Microcentrifuge
  • CELLTREAT Pipette Controller
    • Replacement Filters
  • Labnet Vortex
  • Eppendorf Pipettes 6-Pack
  • Pipette Tips:
    • Genesee Scientific 200/20μl Tips
    • Rainin 1000μl Tips
    • Genesee Scientific 10μl Tips
  • Larger Volume Pipettes:
    • 5ml Pipette
    • 10ml Pipette
    • 25ml Pipette
    • 50ml Pipette
  • Disposable Sterile Falcon Tubes:
    • 50ml Tubes
    • 15ml Tubes
  • Disposable Sterile 250ml GL45 Bottles, Individually Wrapped

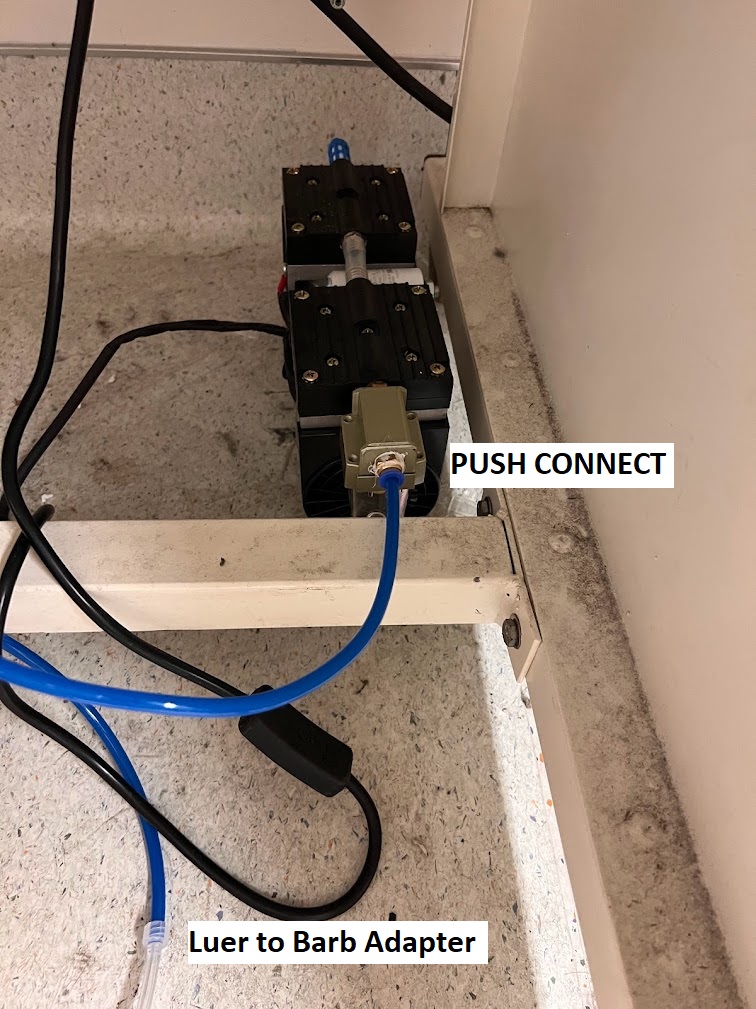
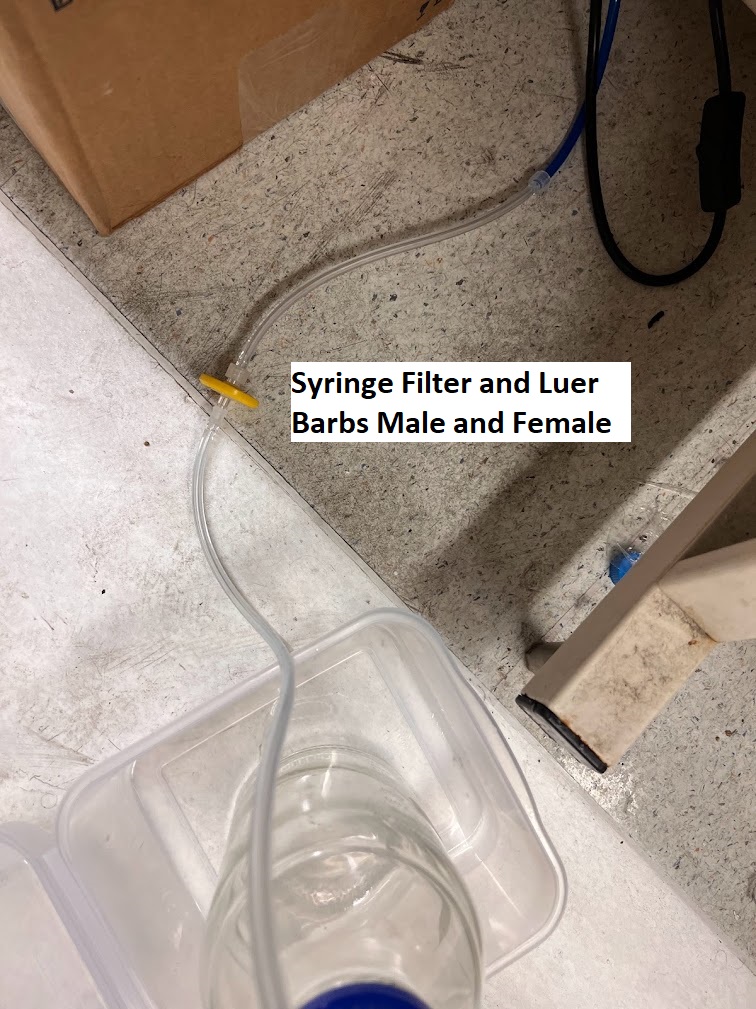
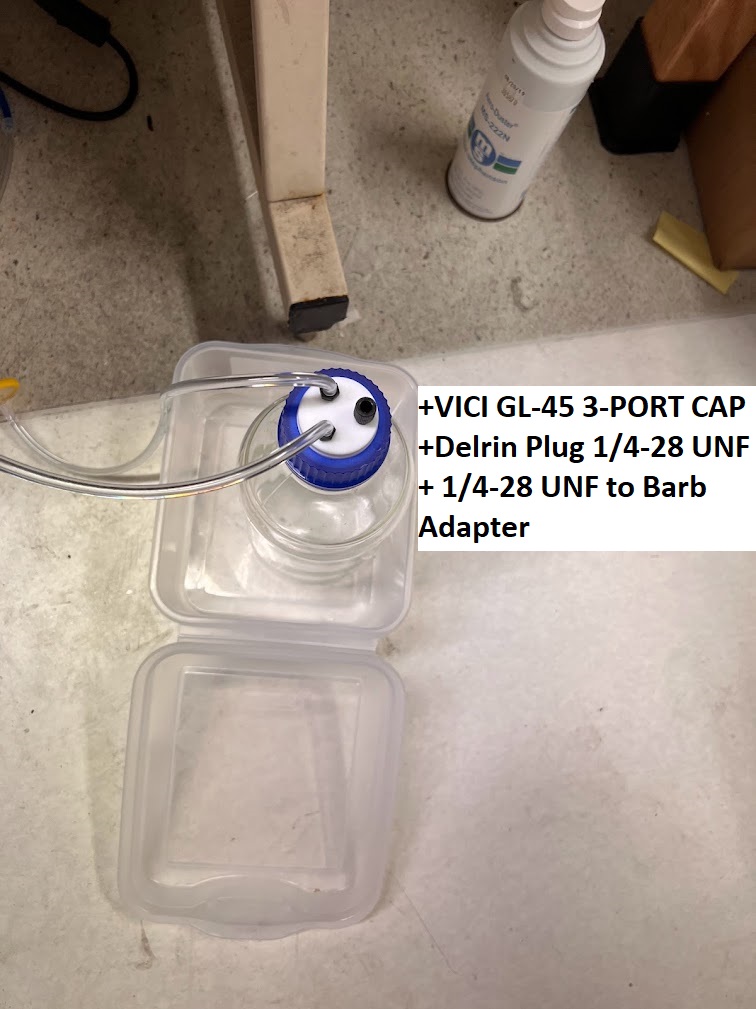
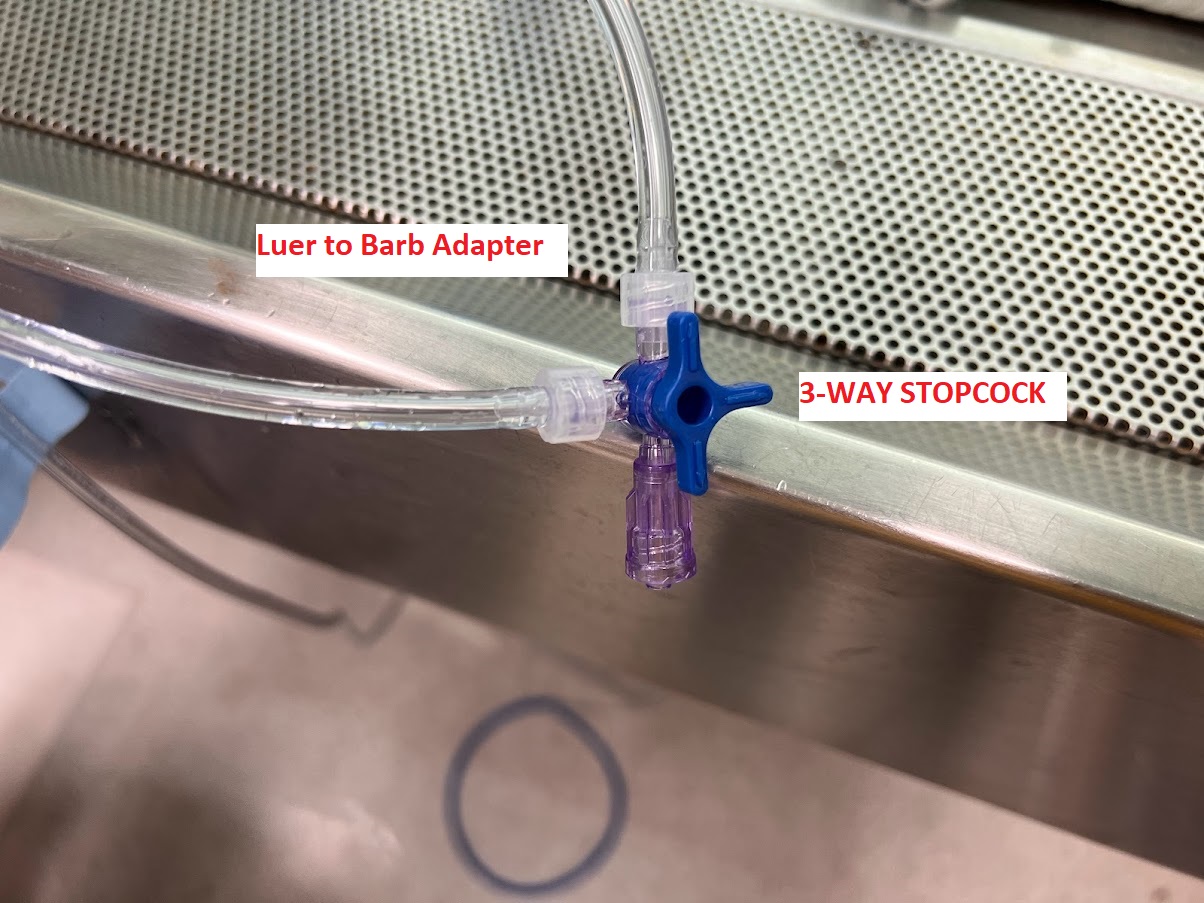
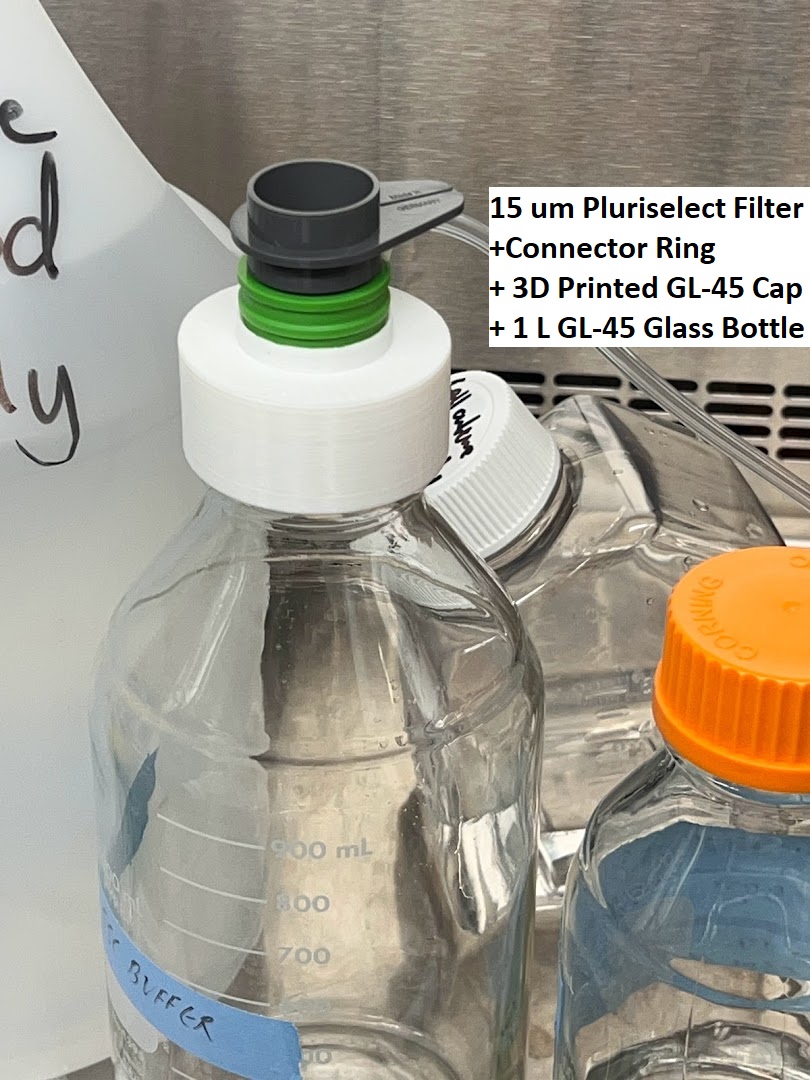
Vacuum System Setup and Assembly

  • Assemble the Vacuum setup shown in the images below. You will need the following:
    • 1 litre GL-45 Glass Bottle
    • Pluriselect Connector Ring (Green Color)
    • 3D Printed Cap for GL-45 Bottle
    • 15μm Pluriselect Filter (Dark Gray Color)
    • Vacuum Pump
    • Push Connect fitting kit
    • Luer Lock Barb Male Adapter
    • Luer Lock Barb Female Adapter
    • 3-Way Stop-Cock
    • VICI 3 Port Bottle Cap
    • 0.45μm Syringe Filter
    • Delrin Plug 1/4-28 UNF
    • Tygon Tubing 3/32" ID x 7/32" OD x 1/16" Wall
    • 1/4-28 UNF to Barb Adapter
    • Adjustable Wrench


Use Teflon Tape from Fittings Kit to get a better seal if necessary:


In [1]:
%%HTML
<iframe width="800" height="600" src="https://www.youtube.com/embed/ZLpKiHjuOIU" title="YouTube video player" frameborder="0" allow="accelerometer; autoplay; clipboard-write; encrypted-media; gyroscope; picture-in-picture; web-share" allowfullscreen></iframe>
  • Use Compressed Air to Remove any particles from the 50ml Falcon Tubes used for all the steps below.
    • Remove the Particles before moving onto the next step.
    • Execute the Cell Below to Watch a Video of the Process.
In [2]:
%%HTML
<iframe width="800" height="600" src="https://www.youtube.com/embed/BZua7OioLm0?si=6kGb2lyEvrFbnQA4" title="YouTube video player" frameborder="0" allow="accelerometer; autoplay; clipboard-write; encrypted-media; gyroscope; picture-in-picture; web-share" referrerpolicy="strict-origin-when-cross-origin" allowfullscreen></iframe>

Processing Protocol for Suspending ChronoSeq Beads in 1X Lysis Buffer

  • Turn on the UV for the Cell Culture Hood and wait 15 minutes.
  • Now turn the airflow for the Cell Culture Hood on and then turn off the UV.
  • It is important to only process one Seq-Number/Timepoint at a time. Mixing the Beads defeats the purpose of ChronoSeq experiments, as you lose the time-series information you were trying to capture. Therefore be careful to keep only one Seq-Number/Timepoint in the Cell Culture Hood.
  • If you are suspending Dropseq beads only and there are no timepoints, then you should process only 6 million beads at a time.
    • One Vial from Chemgenes generaly contains 6 million beads:
      • These Dropseq beads can be combined into a single Falcon Tube only after they have been suspended in 1X Lysis buffer separately.
      • Dropseq Beads from different manufacturers should not be mixed together.
      • Only one Vial should be processed at a time because a large bead concentration can block the 70μm Pluriselect Strainer in later steps. Having only one Vial ensures this filter will not get blocked.
    • One Vial from LGC Genomics may contain more than 6 million beads.
      • In this case please prepare a Falcon Tube with 5ml of Ethanol as described below.
      • Split the beads in the vial into smaller aliquots stored in additional vials or Tubes.
      • The pipette tip(s) for making these aliquots should not be discarded.
      • Wash these pipette tips in the Falcon Tube with 5ml of Ethanol to avoid loosing any beads.
      • Read the steps below to get an idea on how to do this.
      • Remember to work in the Cell Culture Hood/ Biosafety Cabinet.
  • Using a 40μm Cell Strainer, prepare 10ml 100% Ethanol for each Seq-Number/Timepoint you will prepare. For example, if you are preparing 4 Seq-Numbers/Timepoints then you should filter 40ml of Ethanol with a 40μm Cell Strainer and then Transfer 10ml to three different 50ml Falcon Tubes. The Ethanol Bottle should only be opened inside the Cell Culture Hood. Make sure you label the Bottle to make sure this is clear. Moreover, this Ethanol should only be used for processing these beads.
  • Label each Falcon Tube from above with the Seq-Number/Timepoint it will be used for washing.
  • Now attach the 15μm Pluriselct Filter (Dark Gray Color) to the Connector ring.
  • Make sure the Vacuum Pump is turned on. There is a switch on the pump.
  • Using the 3-Way Stopcock Turn on the Vacuum for the Pluriselect Connector Ring.
  • Use only Sterile/Particle-Free Rainin 1000μl Tips for these next steps. Make sure you use these tips only inside the Cell Culture Hood. Label the Box for the Tips to make sure this is clear.


In [3]:
%%HTML
<iframe width="800" height="600" src="https://www.youtube.com/embed/QNo502RRKGo" title="YouTube video player" frameborder="0" allow="accelerometer; autoplay; clipboard-write; encrypted-media; gyroscope; picture-in-picture; web-share" allowfullscreen></iframe>
  • Set a P1000 to 500μl and pipette up 500μl of Ethanol for your Seq-Number/Timepoint. Use the Ethanol from the Tube you labeled with the same Seq-Number/Timpoint you made earlier.
  • Without Touching any part of the Storage Tube for this Seq-Number add 500μl from Above.
  • Get rid of this tip.
  • Set your P1000 to 1000μl.
  • Using a Fresh Tip evenly suspend the Beads in the Storage Tube.
  • Using the Same Tip, Transfer the Beads to the 15μm Pluriselect Filter. Do not discard the tip and spill any beads.
  • Immerse this tip in the Ethanol for this Seq Number/Timepoint and pipette up and down. This transfers the beads stuck in the tip to the ethanol.
  • Using the same tip Pipette up 1000ul of Ethanol from this Tube.
  • Transfer this 1000μl of Ethanol to the Original Storage Tube for this Seq-Number/Timepoint.
  • Shake the Storage Tube
  • Pipette up the 1000μl inside the Storage tube and transfer it to the 15μm Pluriselect Filter.
  • Repeat the previous 4 Steps one more time.
  • Now transfer the remaining Ethanol to the 15μm Pluriselect Filter using a 10ml Pipette.
In [4]:
%%HTML
<iframe width="800" height="600" src="https://www.youtube.com/embed/zTEp-HeeR7c" title="YouTube video player" frameborder="0" allow="accelerometer; autoplay; clipboard-write; encrypted-media; gyroscope; picture-in-picture; web-share" allowfullscreen></iframe>
  • Turn the Vacuum off using the 3-Way Stopcock.
  • Using a fresh 5ml Pipette pipette up 3ml of Distilled water. This Distilled Water bottle should ONLY be opened inside the Cell Culture Hood. Label the bottle to make sure this is clear.
  • Using this 3ml of Water, irrigate the inner wall of the 15μm Filter to dislodge any beads stuck there. Get rid of the Pipette.
  • Turn the Vacuum on. Wait 5 Seconds.
  • Turn off the Vacuum. You have now successfully washed the beads with Water.
  • Repeat the previous 4 Steps one more time.
  • Slightly loosen the 15μm Pluriselect Filter from the Connector Ring.
  • Get a fresh 50ml Falcon Tube and remove the cap.
  • Place the 50ml Tube upside down on the 15μm Filter.
  • Remove the 15μm filter from the connector ring while holding the 50ml Tube in place.
  • Flip the 50ml tube and 15μm filter together 180 degrees such that the 50ml tube is now rightside up. Watch Video above for more clarity.
  • Now using a Fresh 5ml Pipette transfer 5ml of Distilled water to the opposite side of the 15μm Filter to get the Beads into the 50ml Tube.
  • Repeat the previous step one more time. You should have approximately 10ml of Water and beads in the tube now.
  • Close the 50ml Tube and Spin it down using a Centrifudge at 1500xg for 1 minute.
In [5]:
%%HTML
<iframe width="800" height="600" src="https://www.youtube.com/embed/wVz7loY29Z0" title="YouTube video player" frameborder="0" allow="accelerometer; autoplay; clipboard-write; encrypted-media; gyroscope; picture-in-picture; web-share" allowfullscreen></iframe>
  • Now back inside the Cell Culture Hood, estimate the Volume of the Bead Suspension in Water using a Fresh 10ml Pipette.
  • Using a Fresh 5ml Pipette, add more water to make the Final Volume 14mls.
In [6]:
%%HTML
<iframe width="800" height="600" src="https://www.youtube.com/embed/6bGM96RGP_I" title="YouTube video player" frameborder="0" allow="accelerometer; autoplay; clipboard-write; encrypted-media; gyroscope; picture-in-picture; web-share" allowfullscreen></iframe>
  • Using a 10ml Pipette add 6ml of 3.33X Lysis buffer to the 14ml of beads. Mix well using the same pipette. We now have 20ml beads suspended in 1X Lysis buffer.
  • Filter the beads twice using 70μm Pluriselect Filters (white color).
    • Agitate the Beads if necessary to make sure they are evenly suspended before filtering.
    • Use two separate filters.
    • You have two options:
      • You can either stack the filters on top of each other in a Single Falcon Tube
      • Or you can add a fresh filter on two separate Falcon Tubes.
      • Pour by hand over the filters without spilling.
  • Spin down the beads. 1000xg for 1.5 Minutes with Soft Decceleration 21°C Temperature.
  • Remove 10ml of Lysis Buffer without disturbing the beads. Use a 10ml Pipette.
  • Set a P200 to 20μl.
    • Using a P200 instead of P20 increases the chance of getting evenly distibuted beads inside the Hemocytometer (see below).
  • Swirl the 50ml Tube to get a Uniform Concentration of beads. Be careful to not create a lot of bubbles.
    • Spin the beads down at 2500xg for 1 minutes to get rid of the bubbles if there are too many of them.
  • Using Sterile/Particle-Free 200μl Tips, quickly take a sample and transfer it to a Fuchs-Rosenthal Hemocytometer.

Important Note: If you wait too long before transfering the beads then the beads can settle down to the bottom of the tip. Therefore transfer the beads quickly to the Hemocytometer. Make sure the beads are evenly distributed throughout the Hemocytometer chamber. Count 5 Squares. 5 squares gives you the Number of Beads per μl.

  • Execute the cell below to watch a video of the process.
In [7]:
%%HTML
<iframe width="800" height="600" src="https://www.youtube.com/embed/yMaHxovHWb0?si=uNE_igubxHAKcujK" title="YouTube video player" frameborder="0" allow="accelerometer; autoplay; clipboard-write; encrypted-media; gyroscope; picture-in-picture; web-share" referrerpolicy="strict-origin-when-cross-origin" allowfullscreen></iframe>
  • Estimate the Final Volume using a 10ml Pipette.
  • Calculate the Final Volume needed to get beads at a Final concentration of 450beads/μl.
  • Spin down the beads. 1000xg for 1.5 Minutes with Soft Decceleration 21°C Temperature.
  • Remove/Add lysis buffer to get the final desired concentration of 450beads/μl.
    • If you are adding lysis buffer make sure you filter it with a 40μm Cell Strainer before adding.
  • Remember to add the following Labels to this Final Tube:
    • Date
    • The Timepoint/Seq-number/Bead-Type
    • The concentration of beads: 450 beads/μl
    • Media in which the beads are suspended: 1X Lysis buffer
    • Manufacturer and Lot Number(s)
    • Final volume of beads in the Tube.
  • Store the Orignal Storage Tubes (from the Manufacturer) for the Beads back into the box in -20°C.
  • Store the Final Tube of beads suspended in 1X Lysis buffer at 4°C.
  • Get the next Seq-Number/Timepoint for processing.
  • You can now start with the next Seq-Number/Timepoint.
  • Once you have processed all the Seq-Numbers/Timepoints, store the Ethanol on my Bench and not inside the Cell Culture Hood.
  • Put everything back in its correct place and make sure the caps are screwed on tight for the liquids.
  • Switch off the Vacuum pump.
  • Turn off the Cell Culture Hood.

This is a STOPPING STEP. You can store these beads in 1X Lysis Buffer at 4°C.

Protocol for Preparing Tubes for Priming and Timepoints/Injections (Optional)

IMPORTANT: Follow this protocol only if your Beads can directly be used without any modifications needed. Otherwise you will need to modify your beads using this protocol before they are ready for injection.

  • You should work inside the Cell Culture hood to avoid introduction of Dust particles or Debris.

✶ Important Note: Do not mix different types of beads such as ChronoSeq and Dropseq beads. Also don't mix different timepoints together. It is important you process them separately.

  • For each separate timepoint/bead type (such as Dropseq beads):
    • Label a Sterile/Particle-Free 50ml Falcon Tube with the Bead-Type/Timepoint, the date, the batch and the bead Reservoir Number it will be loaded into for the ChronoSeq Device.
    • Shake the beads each time to make sure the beads have a uniform concentration then, transfer 1ml of Beads each to Separate 50ml Falcon Tubes. Use Sterile/Particle-Free Rainin 1000μl Pipette tips.
    ✶ Important Note:Try be be as close to 1ml of Beads as possible. Less than 0.8ml of Beads can introduce bubbles into the Chrono-Seq device and cause blockages.
    • Put the Beads inside the refrigerator at 4°C before the experiment.
    • Prepare remaining tubes for Priming the Chronoseq device. The first section of this protocol has instructions.
    • Remember to spin down the beads before you load them into the Chrono-Seq device.