Tagmentation input calculation:

Note: During the Tagmentation process additional sequencing adapters are added and the library size is further reduced for Illumina Sequencers. Tagmentation is sensitive to the input DNA concentraion and the average length of DNA fragments used. Therefore to get consistent Post-tagmentation average library sizes between 570-620bp we developed an equation to help you calculate the input DNA amount.

For Estimated Center in bp<=1350: $$ Input\ DN A\ in\ ng = 1.37692 - 0.000576923\times{Estimated\ Center\ in\ bp} $$

For Estimated Center in bp >1350 we always use 0.6ng as input.

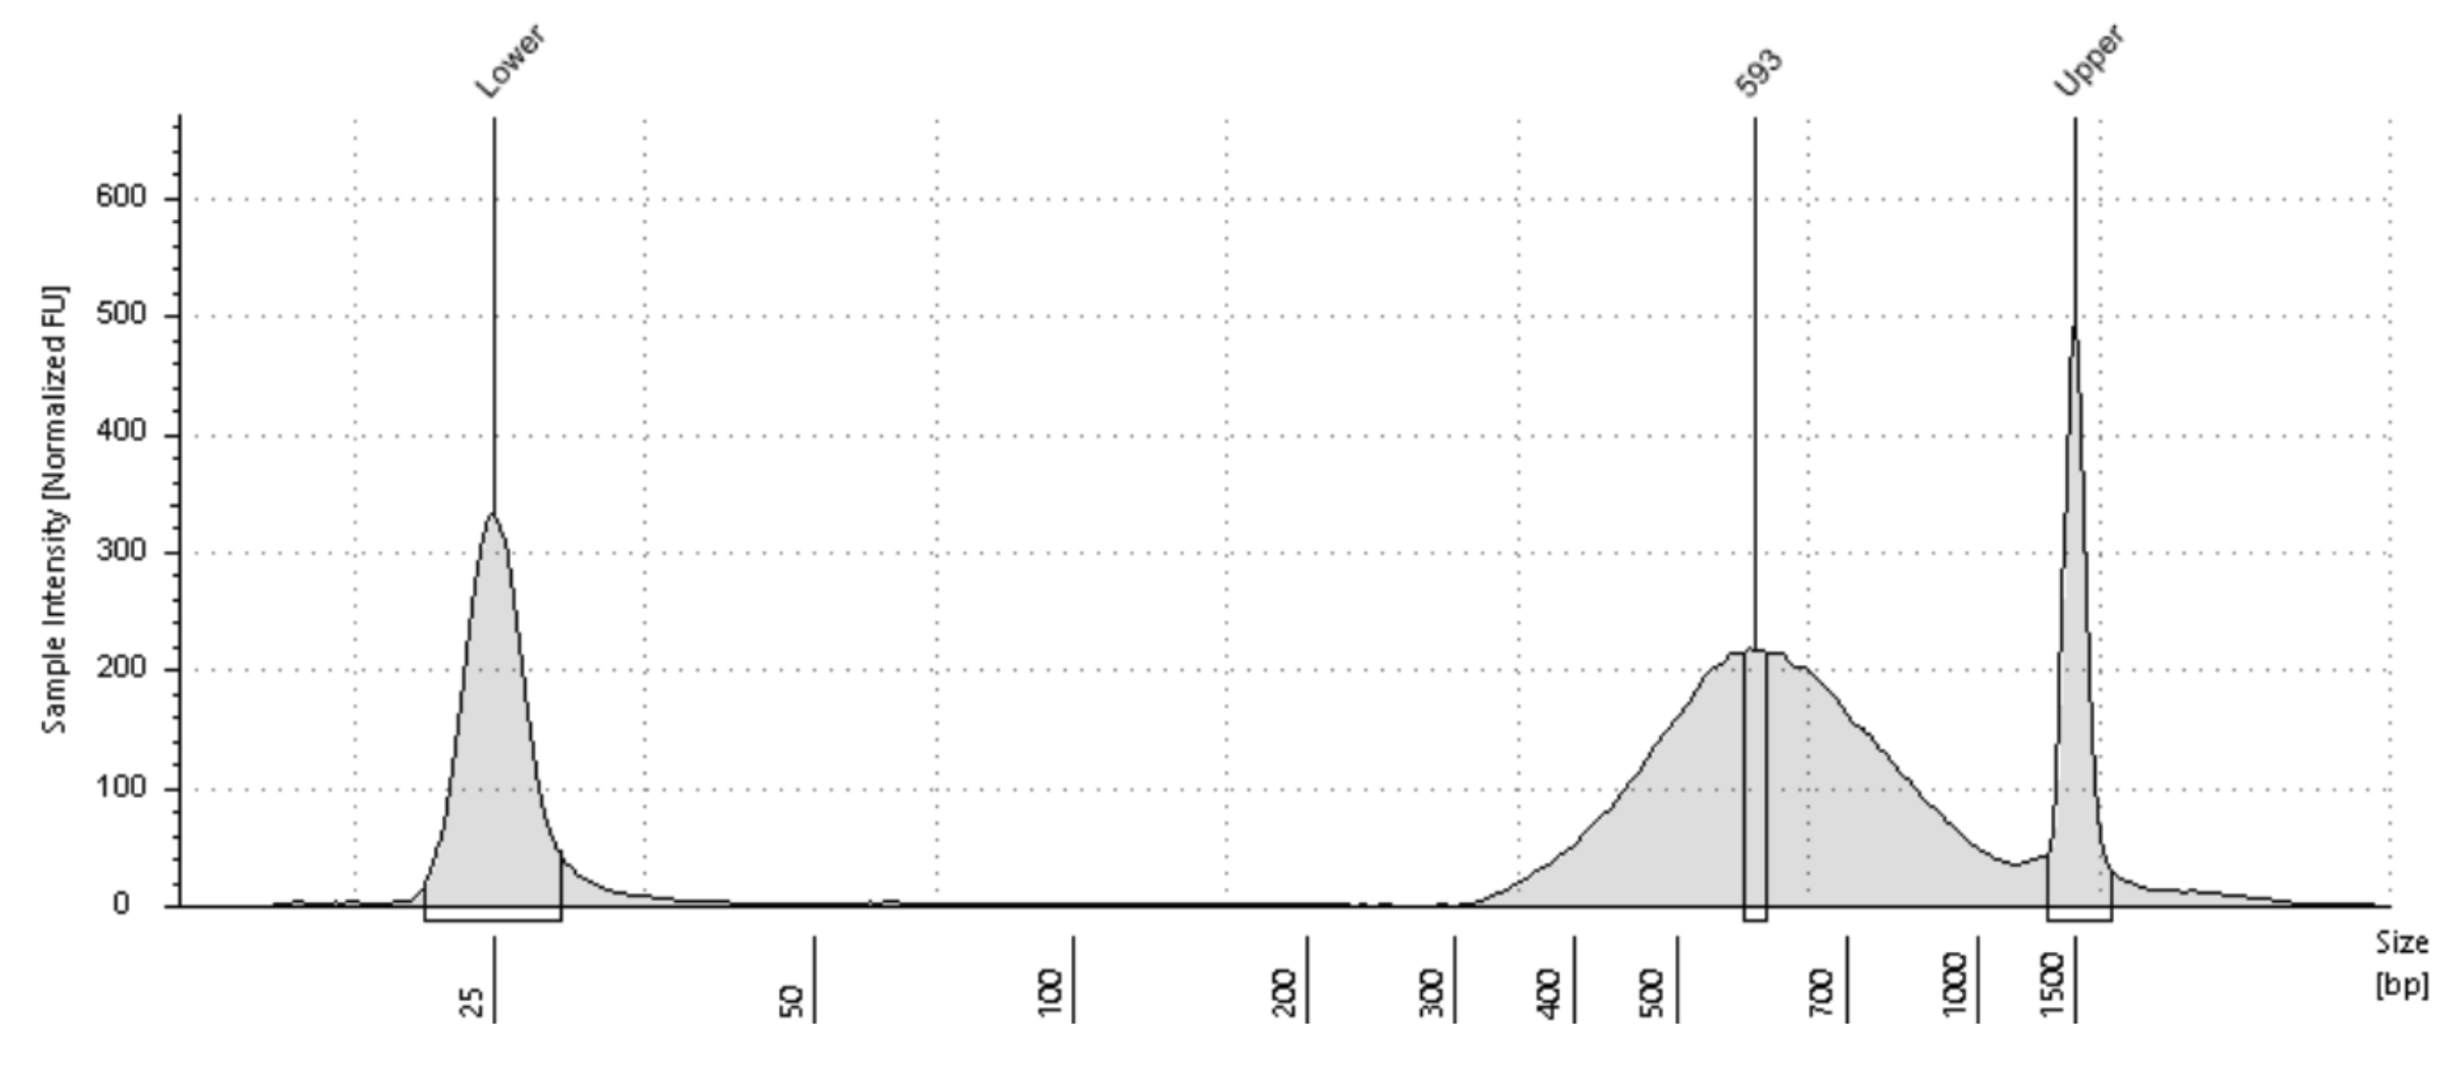
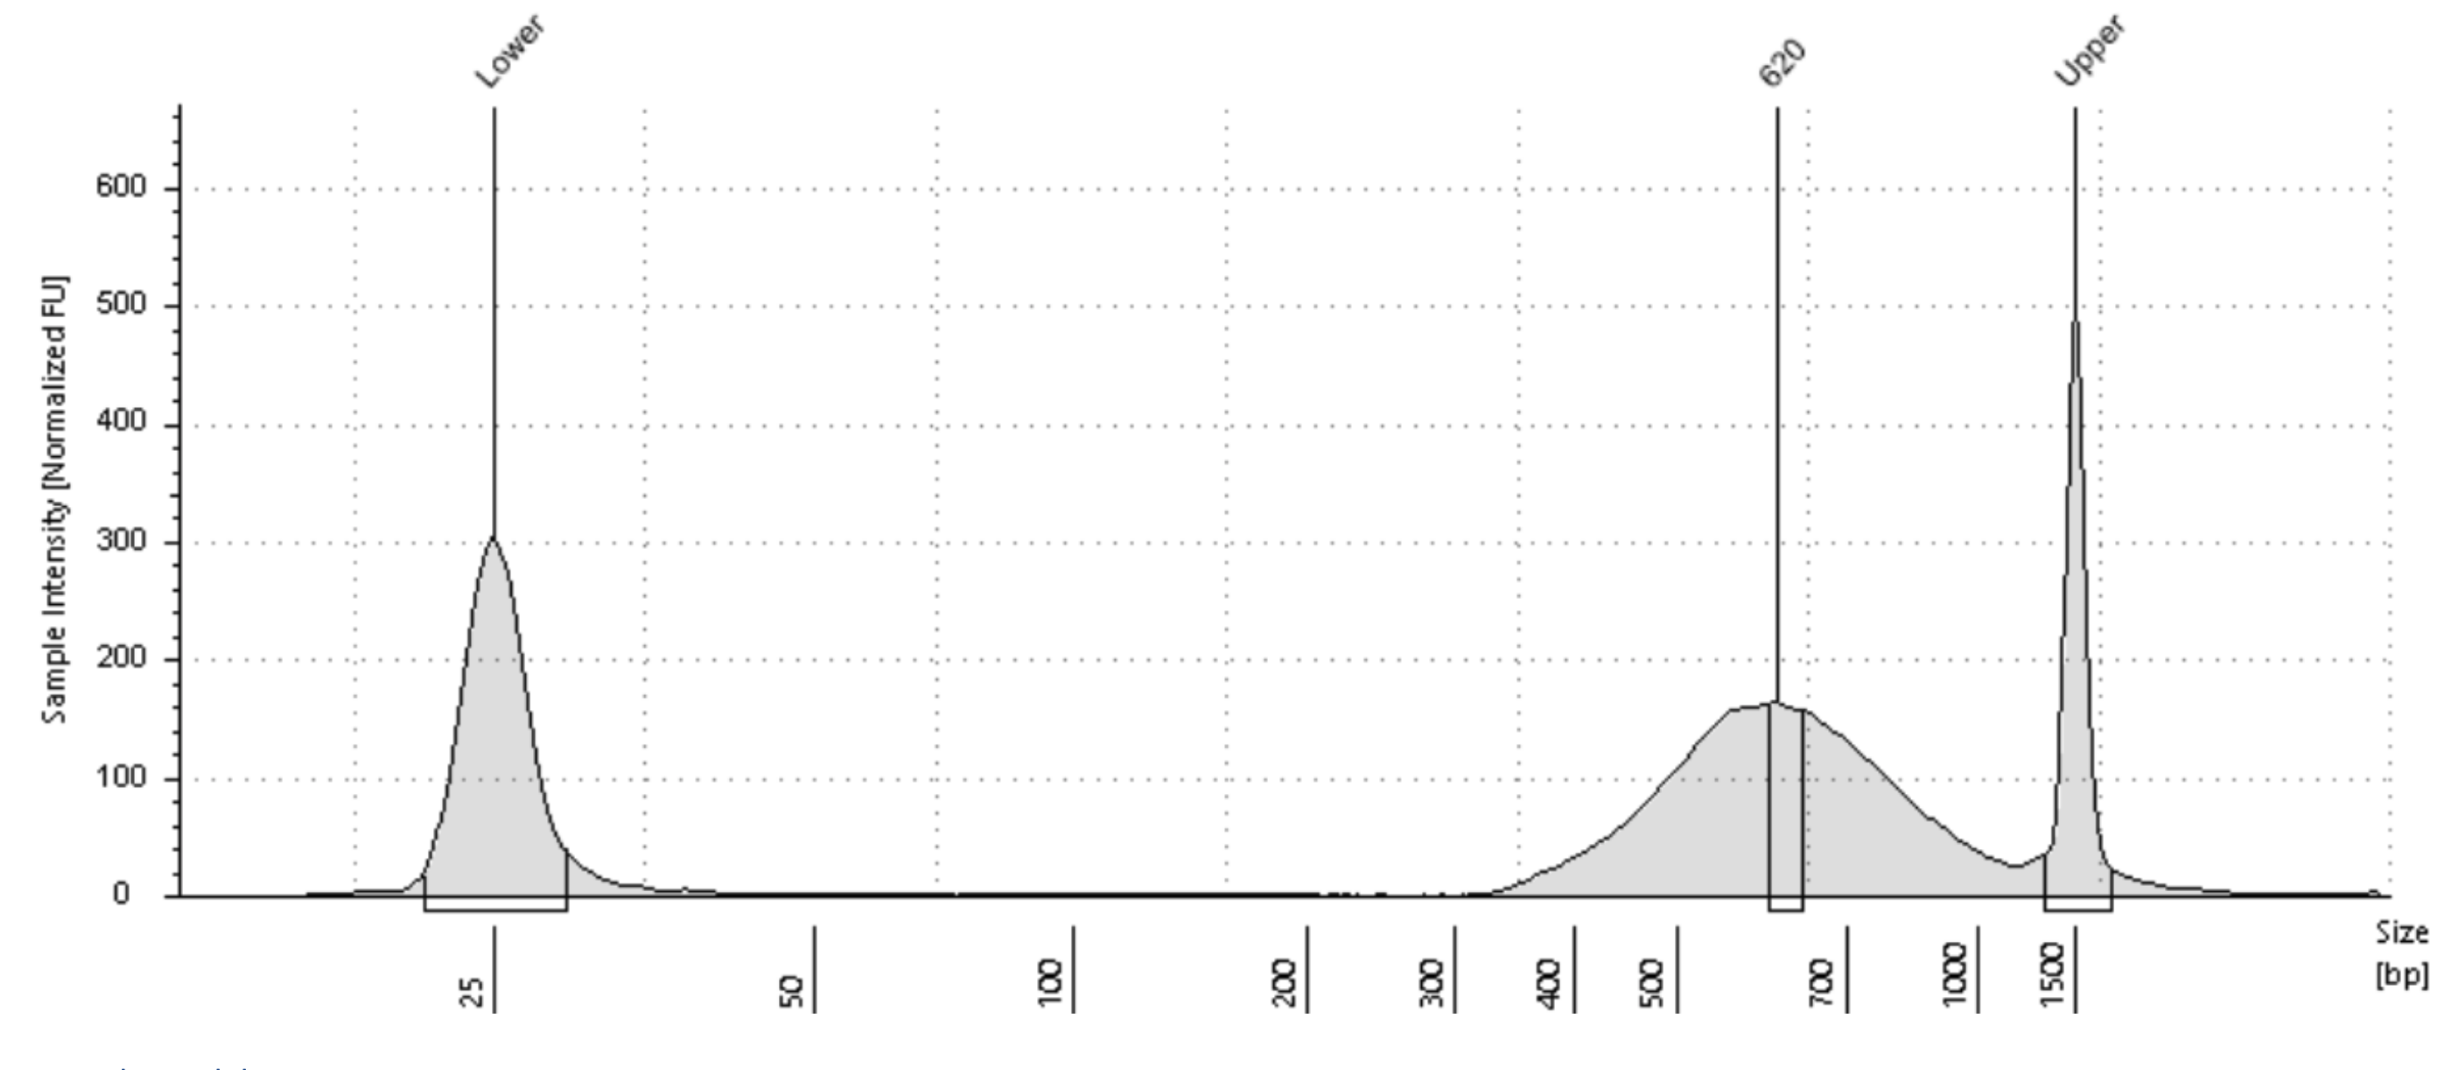
You will need the Tapestation HS D5000 plot to estimate the center of the input DNA fragment distribution. Each Tapestation Plot comes with Labels on the X axis which tells you the number of bases for each part of the DNA Fragment Distribution. Generally the labels of the peaks coincide with the actual center of the DNA fragment distribution. But sometimes they don't. In case they don't you will have to visually estimate the center by looking at the DNA Fragment distribution. Ignore the Upper and Lower Markers when trying to estimate the Center. The following examples should help you estimate the center in bp of your DNA fragment distribution.

TO DO: Use better example Tapestations for this section. Use plots with no primer peak.

Example 1 Example 2
Estimated Center: 986bp
Calculated Input DNA in ng: 0.81
Estimated Center: 968bp
Calculated Input DNA in ng: 0.82
Tagmented Library Center: 593bp Tagmented Library Center: 620bp
In [1]:
#Calculate the Estimated Input DNA in ng by changing the value of estimated_center below.
estimated_center=1420 #in bp
total_ng_dna=1.37692 - 0.000576923*estimated_center
if estimated_center>1350:
    total_ng_dna=0.6
print("The estimated input "+"\033[1m"+"Total DNA amount "+"\033[0m"+"for the Tagmentation reaction for this library is "+"\033[1m",round(total_ng_dna,2),"\033[1m"+"ng"+"\033[0m"+".\nOr a "+"\033[1m"+"DNA Concentration "+"\033[0m"+"of "+"\033[1m",round(total_ng_dna,2)/5,"\033[1m"+"ng/\u03BC"+"l"+"\033[0m"+" for a total input volume of "+"\033[1m"+"5\u03BC"+"l"+"\033[0m"+".")
The estimated input Total DNA amount for the Tagmentation reaction for this library is  0.6 ng.
Or a DNA Concentration of  0.12 ng/μl for a total input volume of 5μl.

Note on Pooling and Indices for the Sequencing on the Same Lane:

  • You can choose to pool your PCR splits into a Single Tagmentation Reaction and use the same i7 index for all the splits.
    • You can also Tagment them separately with different i7 Indices. This choice is up to you.
    • When you combine different splits together then equal amounts of DNA should be added to the Tagmentation reaction from each split. So for example, if you have two splits and your calculated input DNA is 0.80ng then 0.40ng should come from each split.
  • Different experimental conditions should always have different i7 indices if you are sequencing them on the same lane.
  • Always use different indices for Bulk Experiments being sequenced on the same Lane.
  • For the Nextera Index Kit (FC-131-1001) the i7 Indices are N701-N706. Other kits can provide even more indices if you want more libraries on the Same Lane.
  • When you submit your Libraries always use the i7 index Sequence in the "i7 Bases for Sample Sheet" Column mentioned here.
  • If you have low plex (less than six libraries being pooled) make sure you use the correct combination of i7 Indices for Color compatibility. Please see Table 2 in this Low Plex Pooling Guide from Illumina.

Tagmentation

Preparing for Tagmentation

  • Make sure there is no water condensation inside your PCR wells for your PCR machine.

OPTIONAL: You can set your well temperature to 98°C for 5 minutes with the lid open to get rid of the condensation.

  • Get the Tagment DNA Buffer and Amplicon Tagment Mix from the Nextera XT Kit (FC-131-1024) stored at -20°C
  • Leave the Tagment DNA Buffer to melt on your bench. Put the Amplicon Tagment Mix(ATM) in an ice bucket.
  • Get the Neutralization(NT) Buffer and also leave it on your bench for later use.
  • Preheat a PCR Machine to 55°C:
    • Set the Volume to 20μl
    • Lid temperature of 105°C
    • Duration ∞.
    • I recommend using the Incubate function if your PCR Machine has this option.
  • For each sample, prepare 200μl PCR Tubes with the Calculated DNA concentration in a total volume of 5μl:
    • Make sure the final concentration matches the concentration calculated above.
    • Use Qubit Concentration Values when making this Dilution.
    • Try to avoid Pipetting Volumes less than 0.4μl as the Accuracy is not very good.
    • Use the P2.5 Pipette whenever possible for greater accuracy.

Run Tagmentation Reaction

  • Keep a record of which i7 index (N70X Oligo) will be used with each PCR Tube.
  • To each tube, add 10 μl of Tagment DNA buffer.
  • Now add 5 μl of Amplicon Tagment Mix to each tube for a total volume of 20μl.
  • Mix well by pipetting 5 times.
  • Spin down the PCR Tubes using a Tabletop centrifuge for PCR Tubes.
  • Incubate @55°C. Set a timer for 5 minutes.
  • Without delay, Add 5μl of Neutralization Buffer to each tube.
  • Mix well by pipetting 5 times.
  • Spin down the PCR Tubes using a Tabletop centrifuge for PCR Tubes.
  • Incubate at room temperature for 5 minutes.

Preparation for PCR

  • Get the KAPA HiFi Hotstart Readymix stored at -20°C. Put it in an ice bucket.
  • Get the Nextera Index Kit (FC-131-1001) from -20°C. Leave the i7 Indices you plan to use for your samples on the bench to melt.
  • Get the 10μM New‐P5‐SMART PCR hybrid oligo from -20°C and leave it on your bench to melt.
  • Now add each of these to your PCR tubes in the following order:
    1. 18μl Distilled Water
    2. 2μl 10μM New‐P5‐SMART PCR hybrid oligo
    3. 5μl of the i7 index (N70X Oligo) from the Nextera Index Kit.
  • Mix well by pipetting 5 times.
  • Spin down the PCR Tubes using a Tabletop centrifuge for PCR Tubes.
  • Now add to each tube:
    • 50μl 2X KAPA HiFi HotStart ReadyMix
  • Mix well by pipetting 5 times.
  • Spin down the PCR Tubes using a Tabletop centrifuge for PCR Tubes.

Post Tagmentation PCR Program

Now run the Following PCR Program:

Lid Temperature 105°C
Volume of Liquid: 100μl


72°C 3 min
95°C 30 s

16 cycles of:
  • 95°C 10 s
  • 55°C 30 s
  • 72°C 30 s

72°C 5 min
4°C ∞

This is a STOPPING STEP. You can leave the PCR Tubes at 4°C and finish the protocol later. Consider moving the beads to a refrigerator if you plan to resume after more than one day.

PCR Cleanup

  • Get the Ampure XP Beads eppie from 4°C.
  • Vortex the AMpure beads at full speed for 10 seconds to resuspend the beads completely. Leave them on your bench till they reach room temperature.
  • Spin down the PCR Tubes using a Tabletop centrifuge for PCR Tubes.
  • We will do two rounds of purifications. First will be a 0.6X AMpure Fraction and the second will be a 0.9X AMpure Fraction.

First round 0.6X AMpure Fraction:

  • Vortex the eppie with the Ampure XP beads to evenly resuspend the beads.
  • Add 60μl of Ampure XP beads to each 100μl PCR tube. This is a 0.6X AMpure beads fraction.
  • Mix each PCR tube well by pipetting up and down at least 15 times.
  • Incubate at room temperature for 5 minutes.
  • Place the PCR tubes in a Magnetic Rack. Wait two minutes for the liquid to become clear.
  • Don't remove the PCR tubes from the Magnetic Rack.
  • Remove 155μl of liquid from each PCR tube, without disturbing the Ampure XP beads.
  • Wash the beads with 80% Ethanol twice:
    • Add 200μl of the freshly prepared 80% Ethanol to each tube.
    • Wait 30 seconds.
    • Remove the liquid from each PCR tube without disturbing the Ampure XP beads.
    • Add 200μl of the freshly prepared 80% Ethanol to each tube.
    • Wait 30 seconds.
    • Remove the liquid from each PCR tube without disturbing the Ampure XP beads.
  • Using a P200, remove the residual liquid from each PCR tube without disturbing the Ampure XP beads.
  • Leave the PCR tubes on the Magnetic rack for 10-15 minutes to allow the remaining Ethanol to evaporate.
  • Remove the PCR tubes from the Magnetic rack.
  • Now add 52μl of Distilled Water to each PCR tube. Using the same tip evenly resuspend all the beads stuck to the side of the PCR tube.
  • Incubate at room temperature for 2 minutes.
  • Place all the PCR tubes back in the Magnetic Rack. Wait two minutes for the liquid to become clear.

Second round 0.9X AMpure Fraction:

  • Prepare another set of clean PCR tubes identical in number to the PCR tubes in the Magnetic rack.
  • Without sucking up any AMpure beads, transfer 50μl of liquid from each PCR tube in the rack to its corresponding clean PCR tube.
  • Vortex the eppie with the Ampure XP beads to evenly resuspend the beads.
  • Add 45μl of Ampure XP beads to each 50μl PCR tube. This is a 0.9X AMpure beads fraction.
  • Mix each PCR tube well by pipetting up and down at least 15 times.
  • Incubate at room temperature for 5 minutes.
  • Place the PCR tubes in a Magnetic Rack. Wait two minutes for the liquid to become clear.
  • Don't remove the PCR tubes from the Magnetic Rack.
  • Remove 93μl of liquid from each PCR tube, without disturbing the Ampure XP beads.
  • Wash the beads with 80% Ethanol twice:
    • Add 200μl of the freshly prepared 80% Ethanol to each tube.
    • Wait 30 seconds.
    • Remove the liquid from each PCR tube without disturbing the Ampure XP beads.
    • Add 200μl of the freshly prepared 80% Ethanol to each tube.
    • Wait 30 seconds.
    • Remove the liquid from each PCR tube without disturbing the Ampure XP beads.
  • Using a P200, remove the residual liquid from each PCR tube without disturbing the Ampure XP beads.
  • Leave the PCR tubes on the Magnetic rack for 10-15 minutes to allow the remaining Ethanol to evaporate.
  • Remove the PCR tubes from the Magnetic rack.
  • Now add 17μl of Distilled Water to each PCR tube. Using the same tip evenly resuspend all the beads stuck to the side of the PCR tube.
  • Incubate at room temperature for 2 minutes.
  • Place all the PCR tubes back in the Magnetic Rack. Wait two minutes for the liquid to become clear.
  • Prepare clean 1.5ml Eppendorf tubes identical in number to the PCR tubes in the Magnetic rack. Label each tube with the i7(N70X) Oligo used, a short description of the experiment, your name and the date.
  • Without sucking up any Ampure XP beads, transfer 15μl of liquid from each PCR tube in the rack to its corresponding eppie.

Tagmented Library Concentration with Qubit

⚠ IMPORTANT:For all Qubit Tubes only Pipette till the first stop even if there is liquid left in the pipette tip. Don't pipette up and down to mix.

  • Get the Qubit 1X dsDNA HS Working Solution from 4°C.
  • Prepare Qubit Assay tubes identical in number to the eppies.
  • Add 199μl of Qubit 1X dsDNA HS Working Solution to each Qubit Assay tube.
  • Transfer 1μl of purified product from each eppie to its corresponding Qubit Assay Tube.
  • Vortex all the Qubit Assay tubes at full speed for 5 seconds.
  • Go to the Device Home Screen. Select the 1X dsDNA High Sensitivity assay
  • Select 1μl as Sample Volume.
  • Now measure the dsDNA concentration for each tube in ng/μl using the Qubit device.
  • You should expect a concentration between 5ng/μl to 18ng/μl for each sample/split.

This is a STOPPING STEP. You can store your eppies with the libraries at -20°C. I recommend having a decicated Storage box for storing these libraries.