Instructions for Assembling XY Robot, Ice Box 1 and Ice Box 2

Brief Description

  • The ChronoSeq device only produces high quality Droplets for a short period called the Sampling Duration. The remainder of the time is spent:
    • Washing out any remaining cells or beads in the ChronoSeq device.
    • Priming the Microfluidic chip.
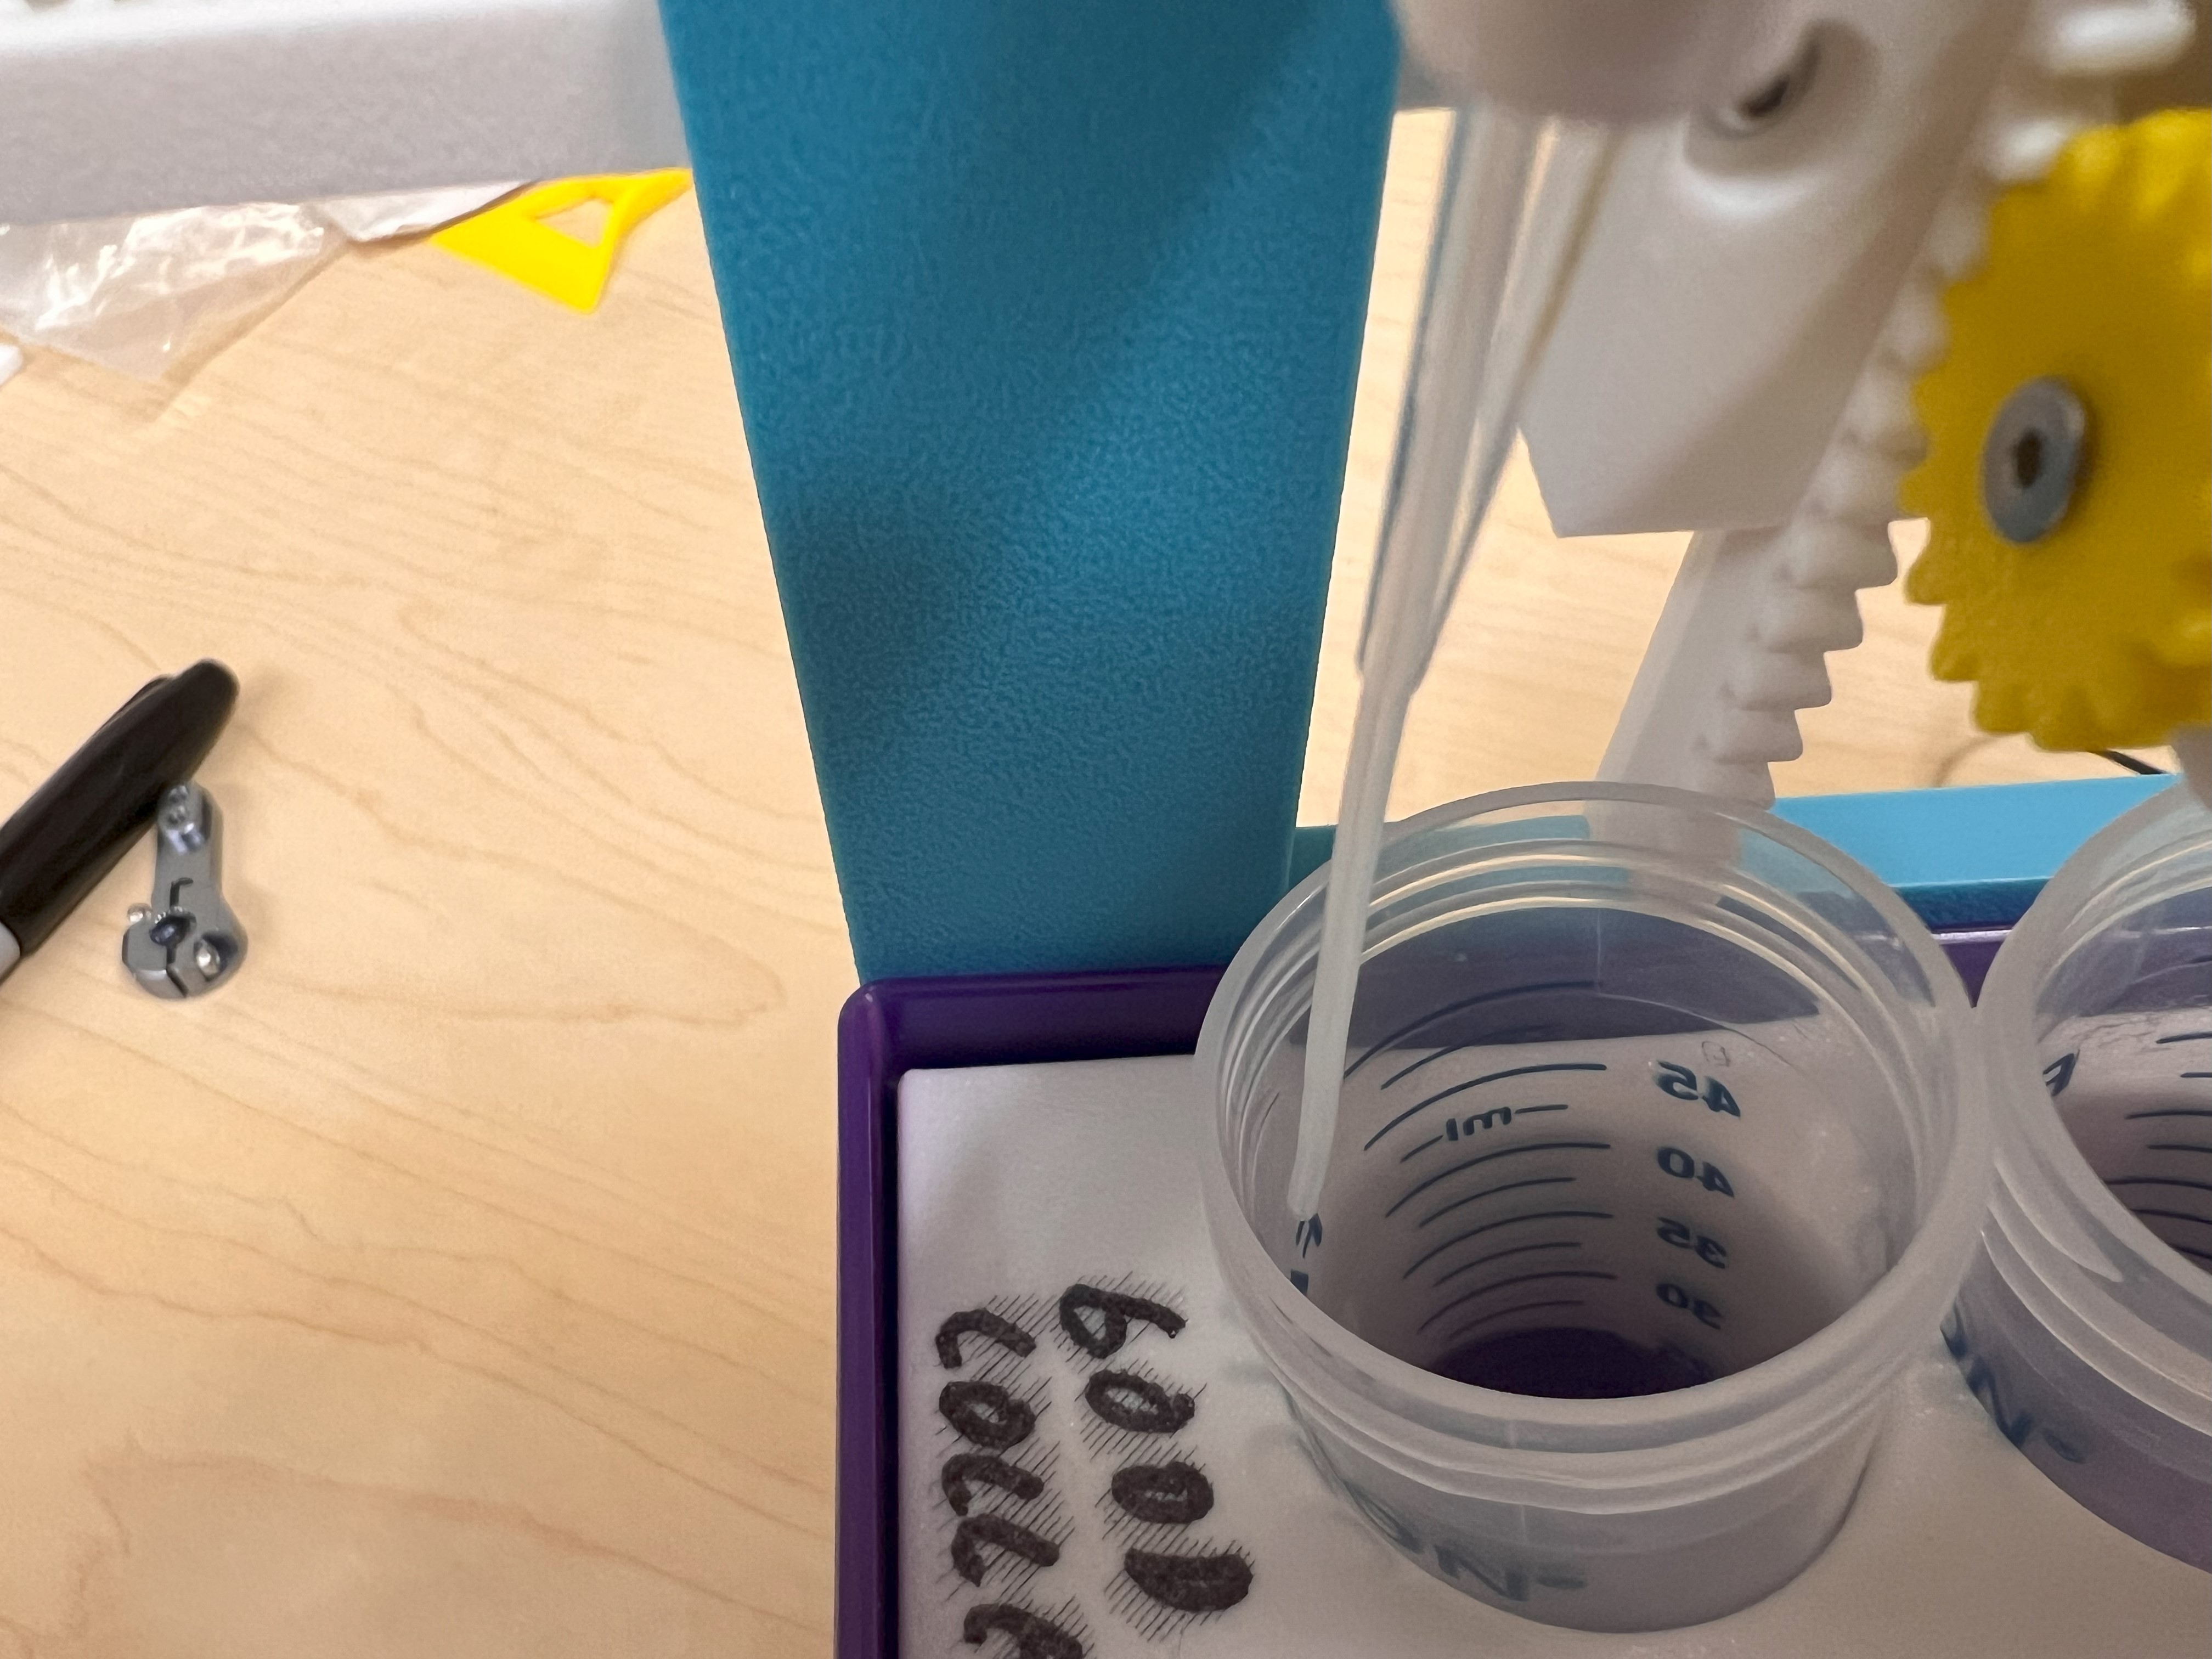
  • We need a way to deposit these high quality Droplets in a separate 50ml tube during the Sampling Duration. The remaining liquid flow-through needs to be deposited into a different 50ml Tube.
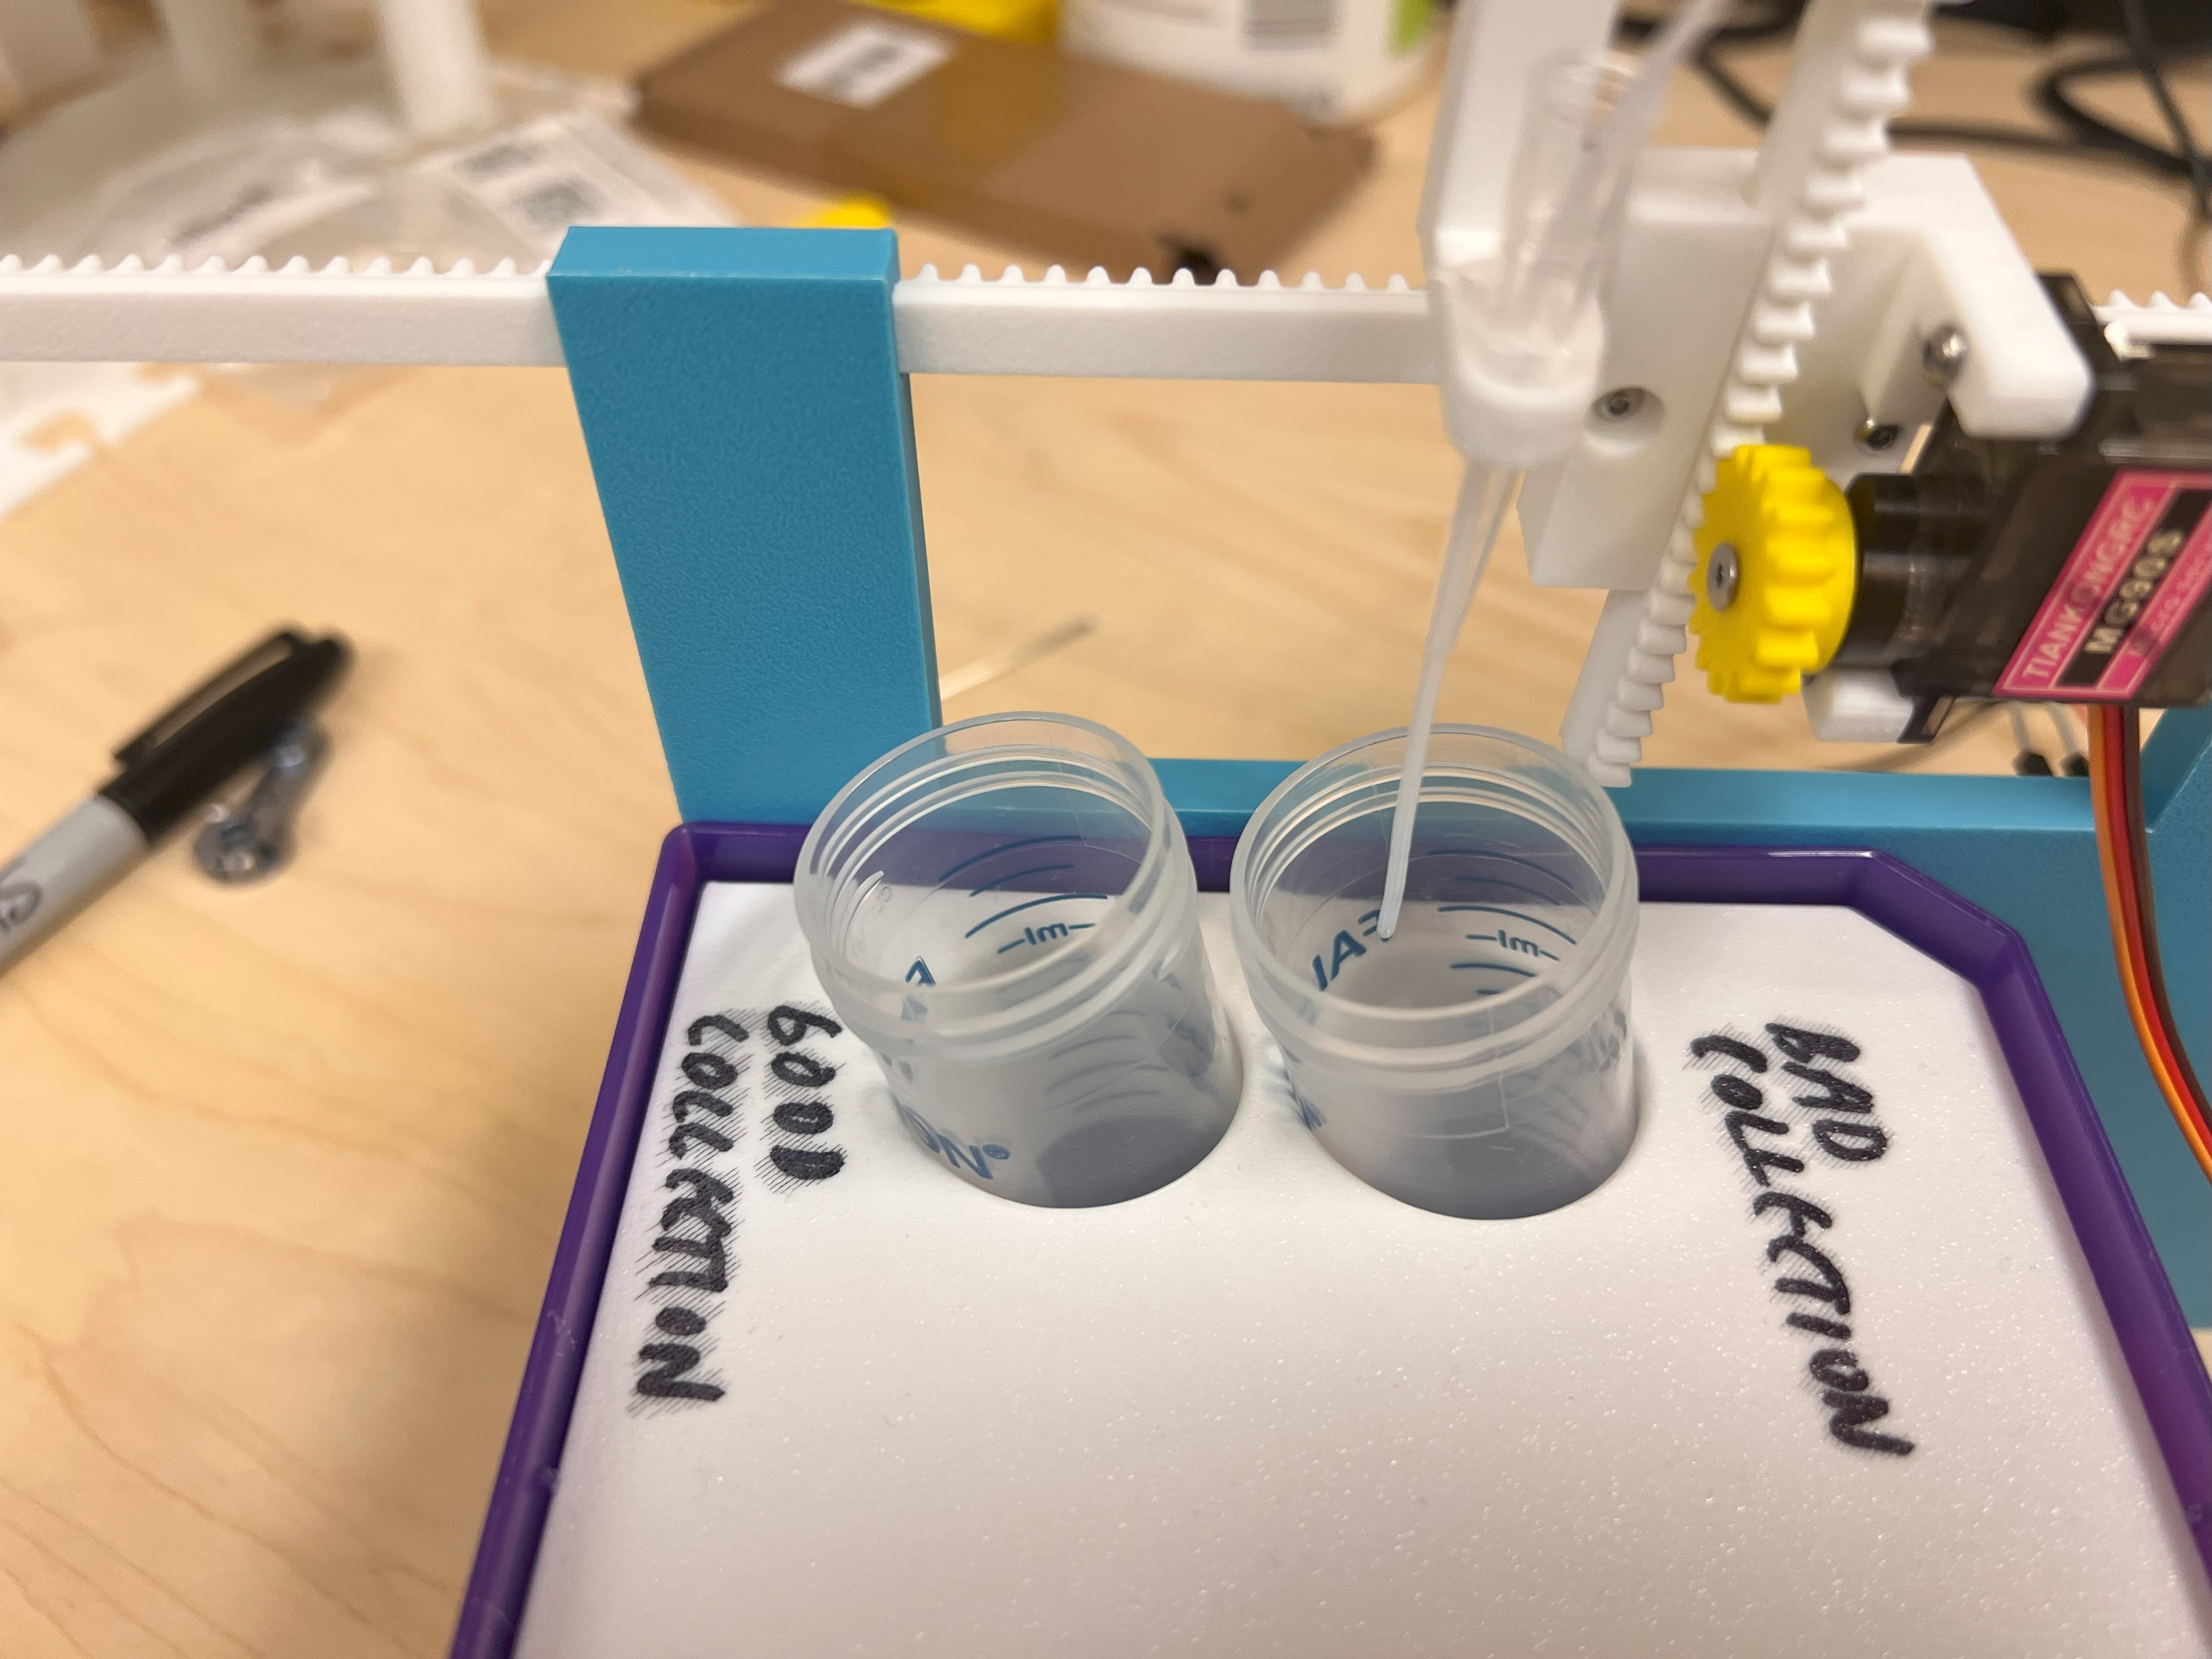
  • To switch between the "Good Collection Tube" for the high quality droplets, and "Bad Collection Tube" for the remaining flow-through, we use the XY Robot.
  • The XY Robot is mainly made of 3D Printed parts and two Servos.
  • Both the XY Robot and XYZ Robot Deposit the liquid into tubes held in place using 3D Printed Lids.
Location of XY Robot in Schematic indicated with Red Box
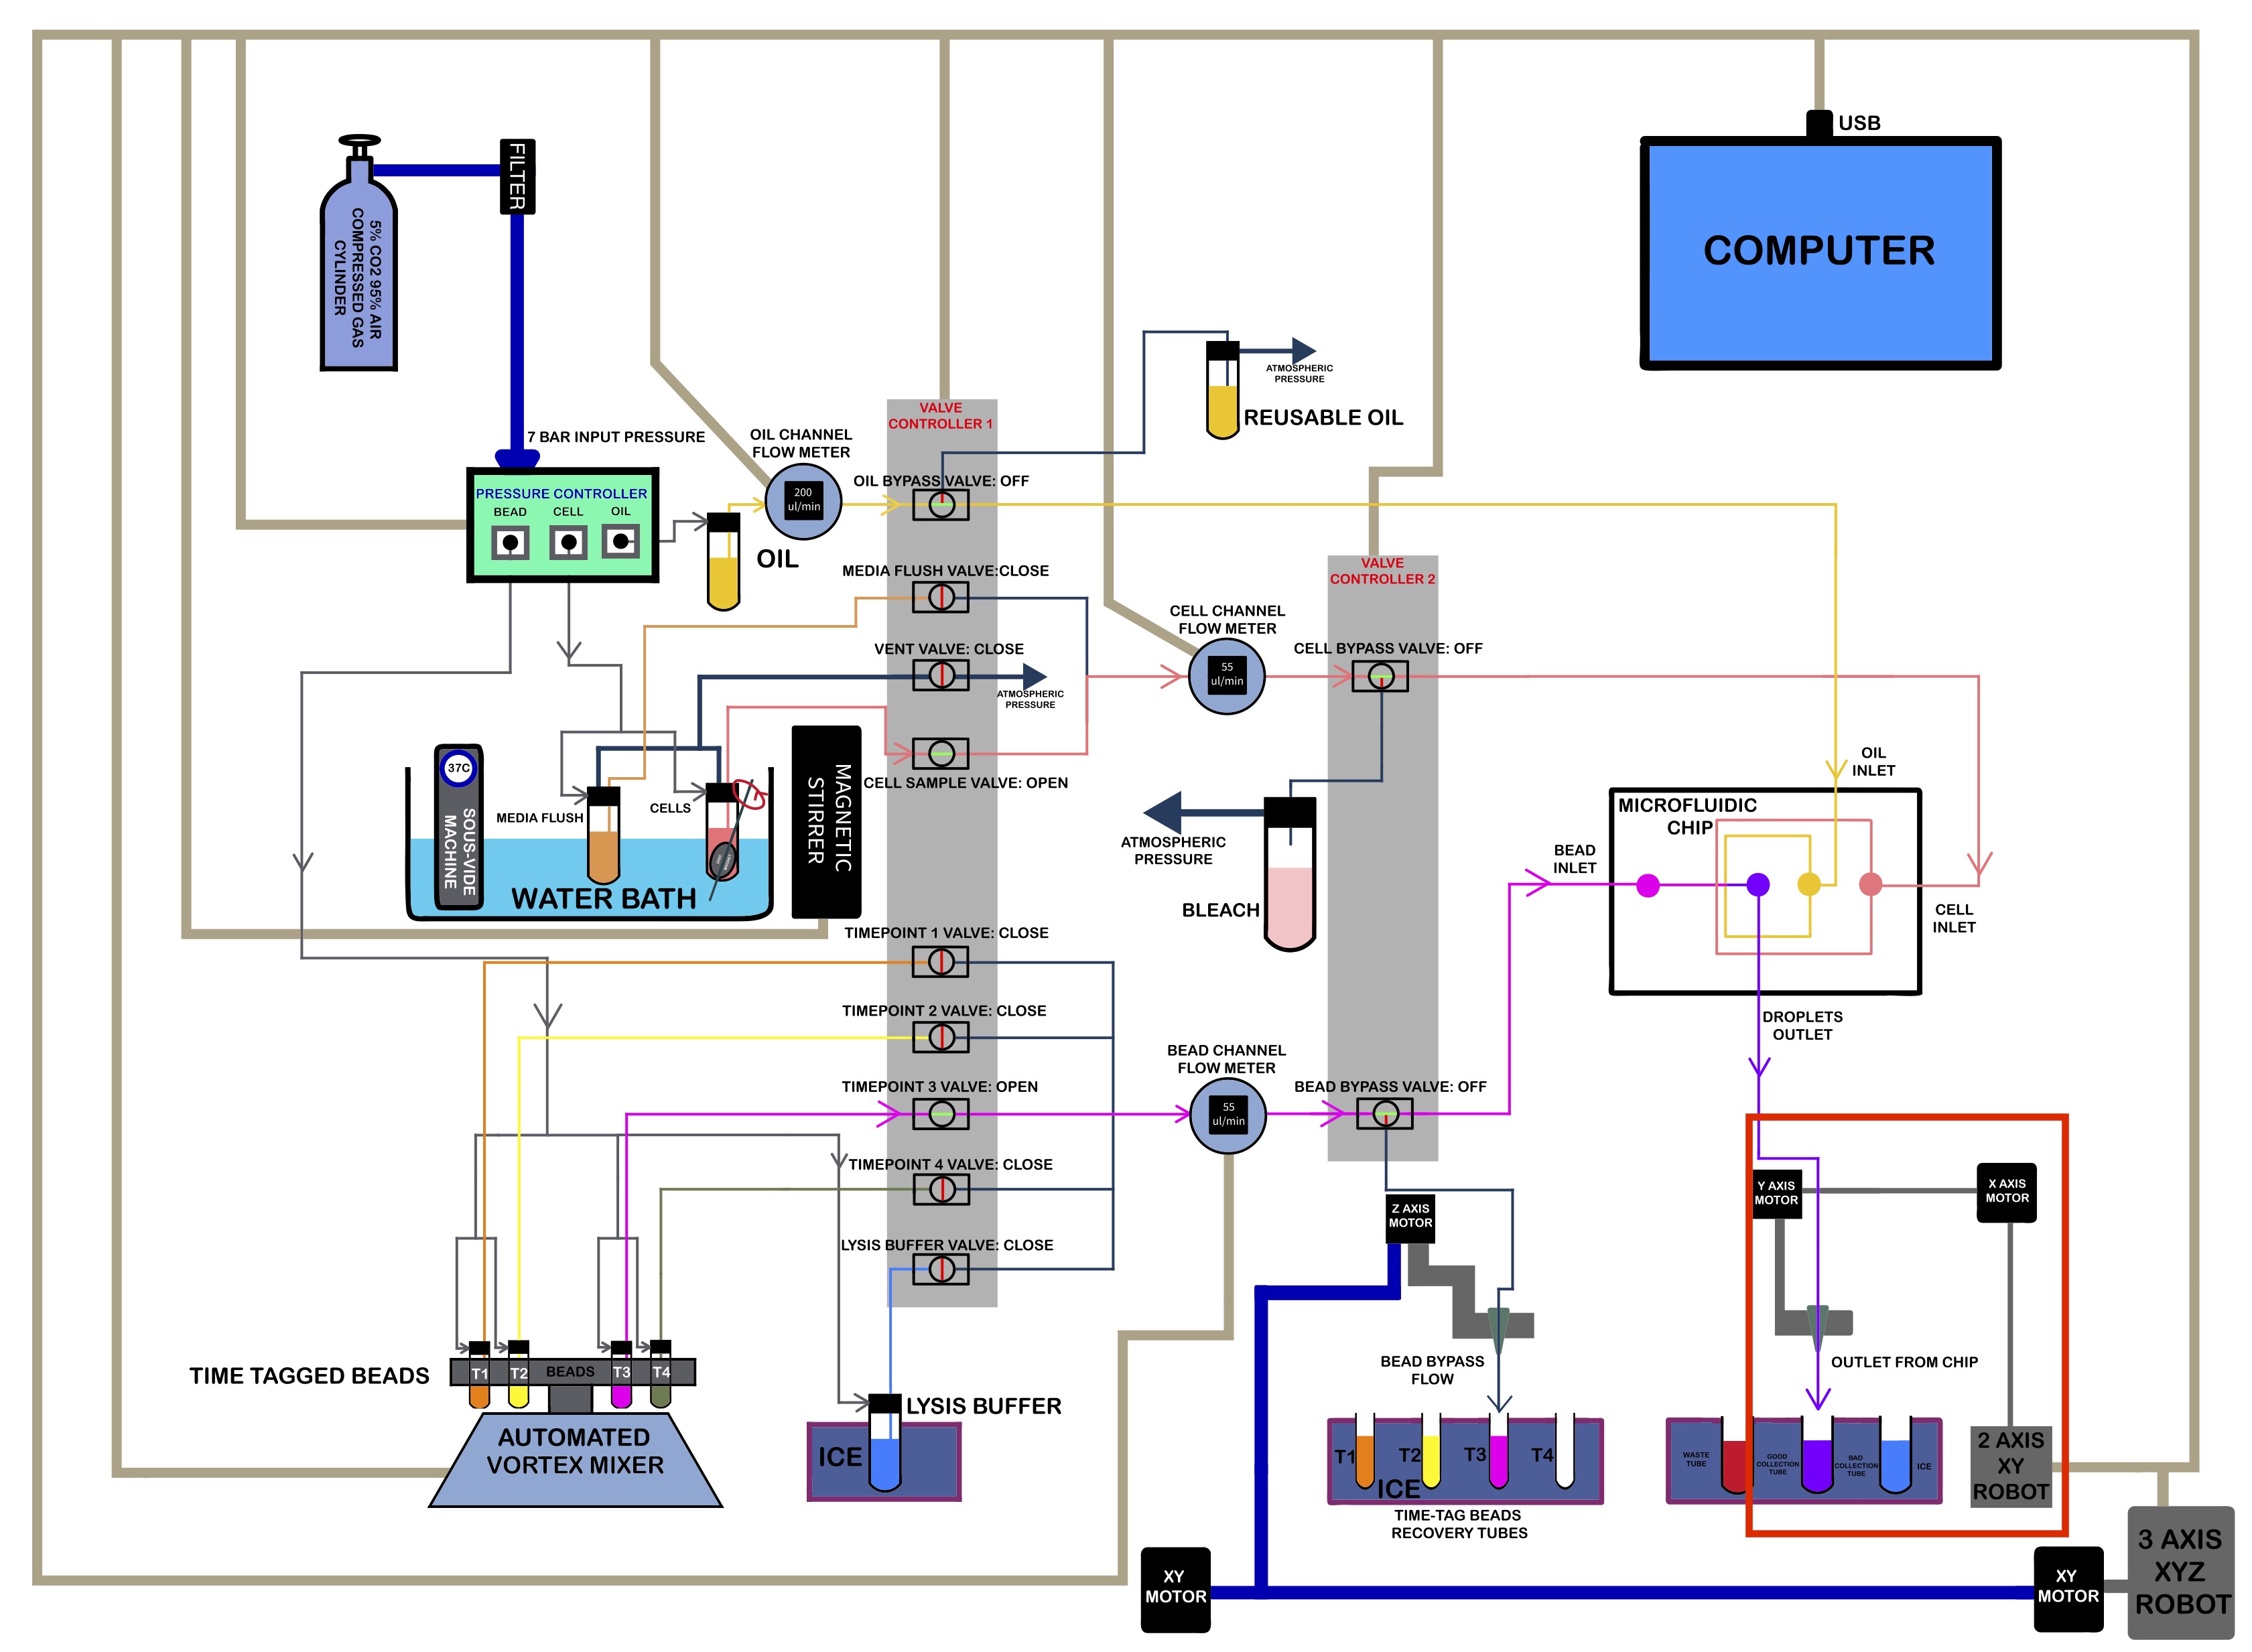
3D Printing Parts

  • We used a Bambu Lab X1 Carbon to print the Parts.
    • 0.4mm Nozzle
    • Textured PEI Plate
  • We generated several 3MF Files with all the Settings we used for the Print. You can open these files on the Orca Slicer.
  • The Original STEP Files and F3D Files can be found in the same directory.
  • We also generated the 3MF and CAD files for the Ice Box Lids.
  • We recommend using White Colored PLA for printing these Lids.
  • We recommend getting a 3D Printing Accessories Kit if you haven't purchased one already.
    • Its extremely helpful in removing supports and cleaning up the print.

Ordering the Parts

  • MG90S 9g Servo
  • Heathrow Scientific Ice Boxes SKU:HS23271A
  • 5V 20W Power Supply
  • DC Power Supply Breakout Screw Terminal
  • Servo Extension Cable Kit
  • 20Kg Servo
  • Self Tapping Screw Set
  • Arduino UNO R3 Clone
  • Metal Servo Horn Kit
  • 6 inch/150mm Adjustable Wrench
  • Dupont Jumper Cables
  • Electronics Screw Driver Set
  • M4 M3 M2.5 M2 Button Head Socket Cap Screws Bolts Nuts Washers Assortment Kit

Assembling the Ice Boxes

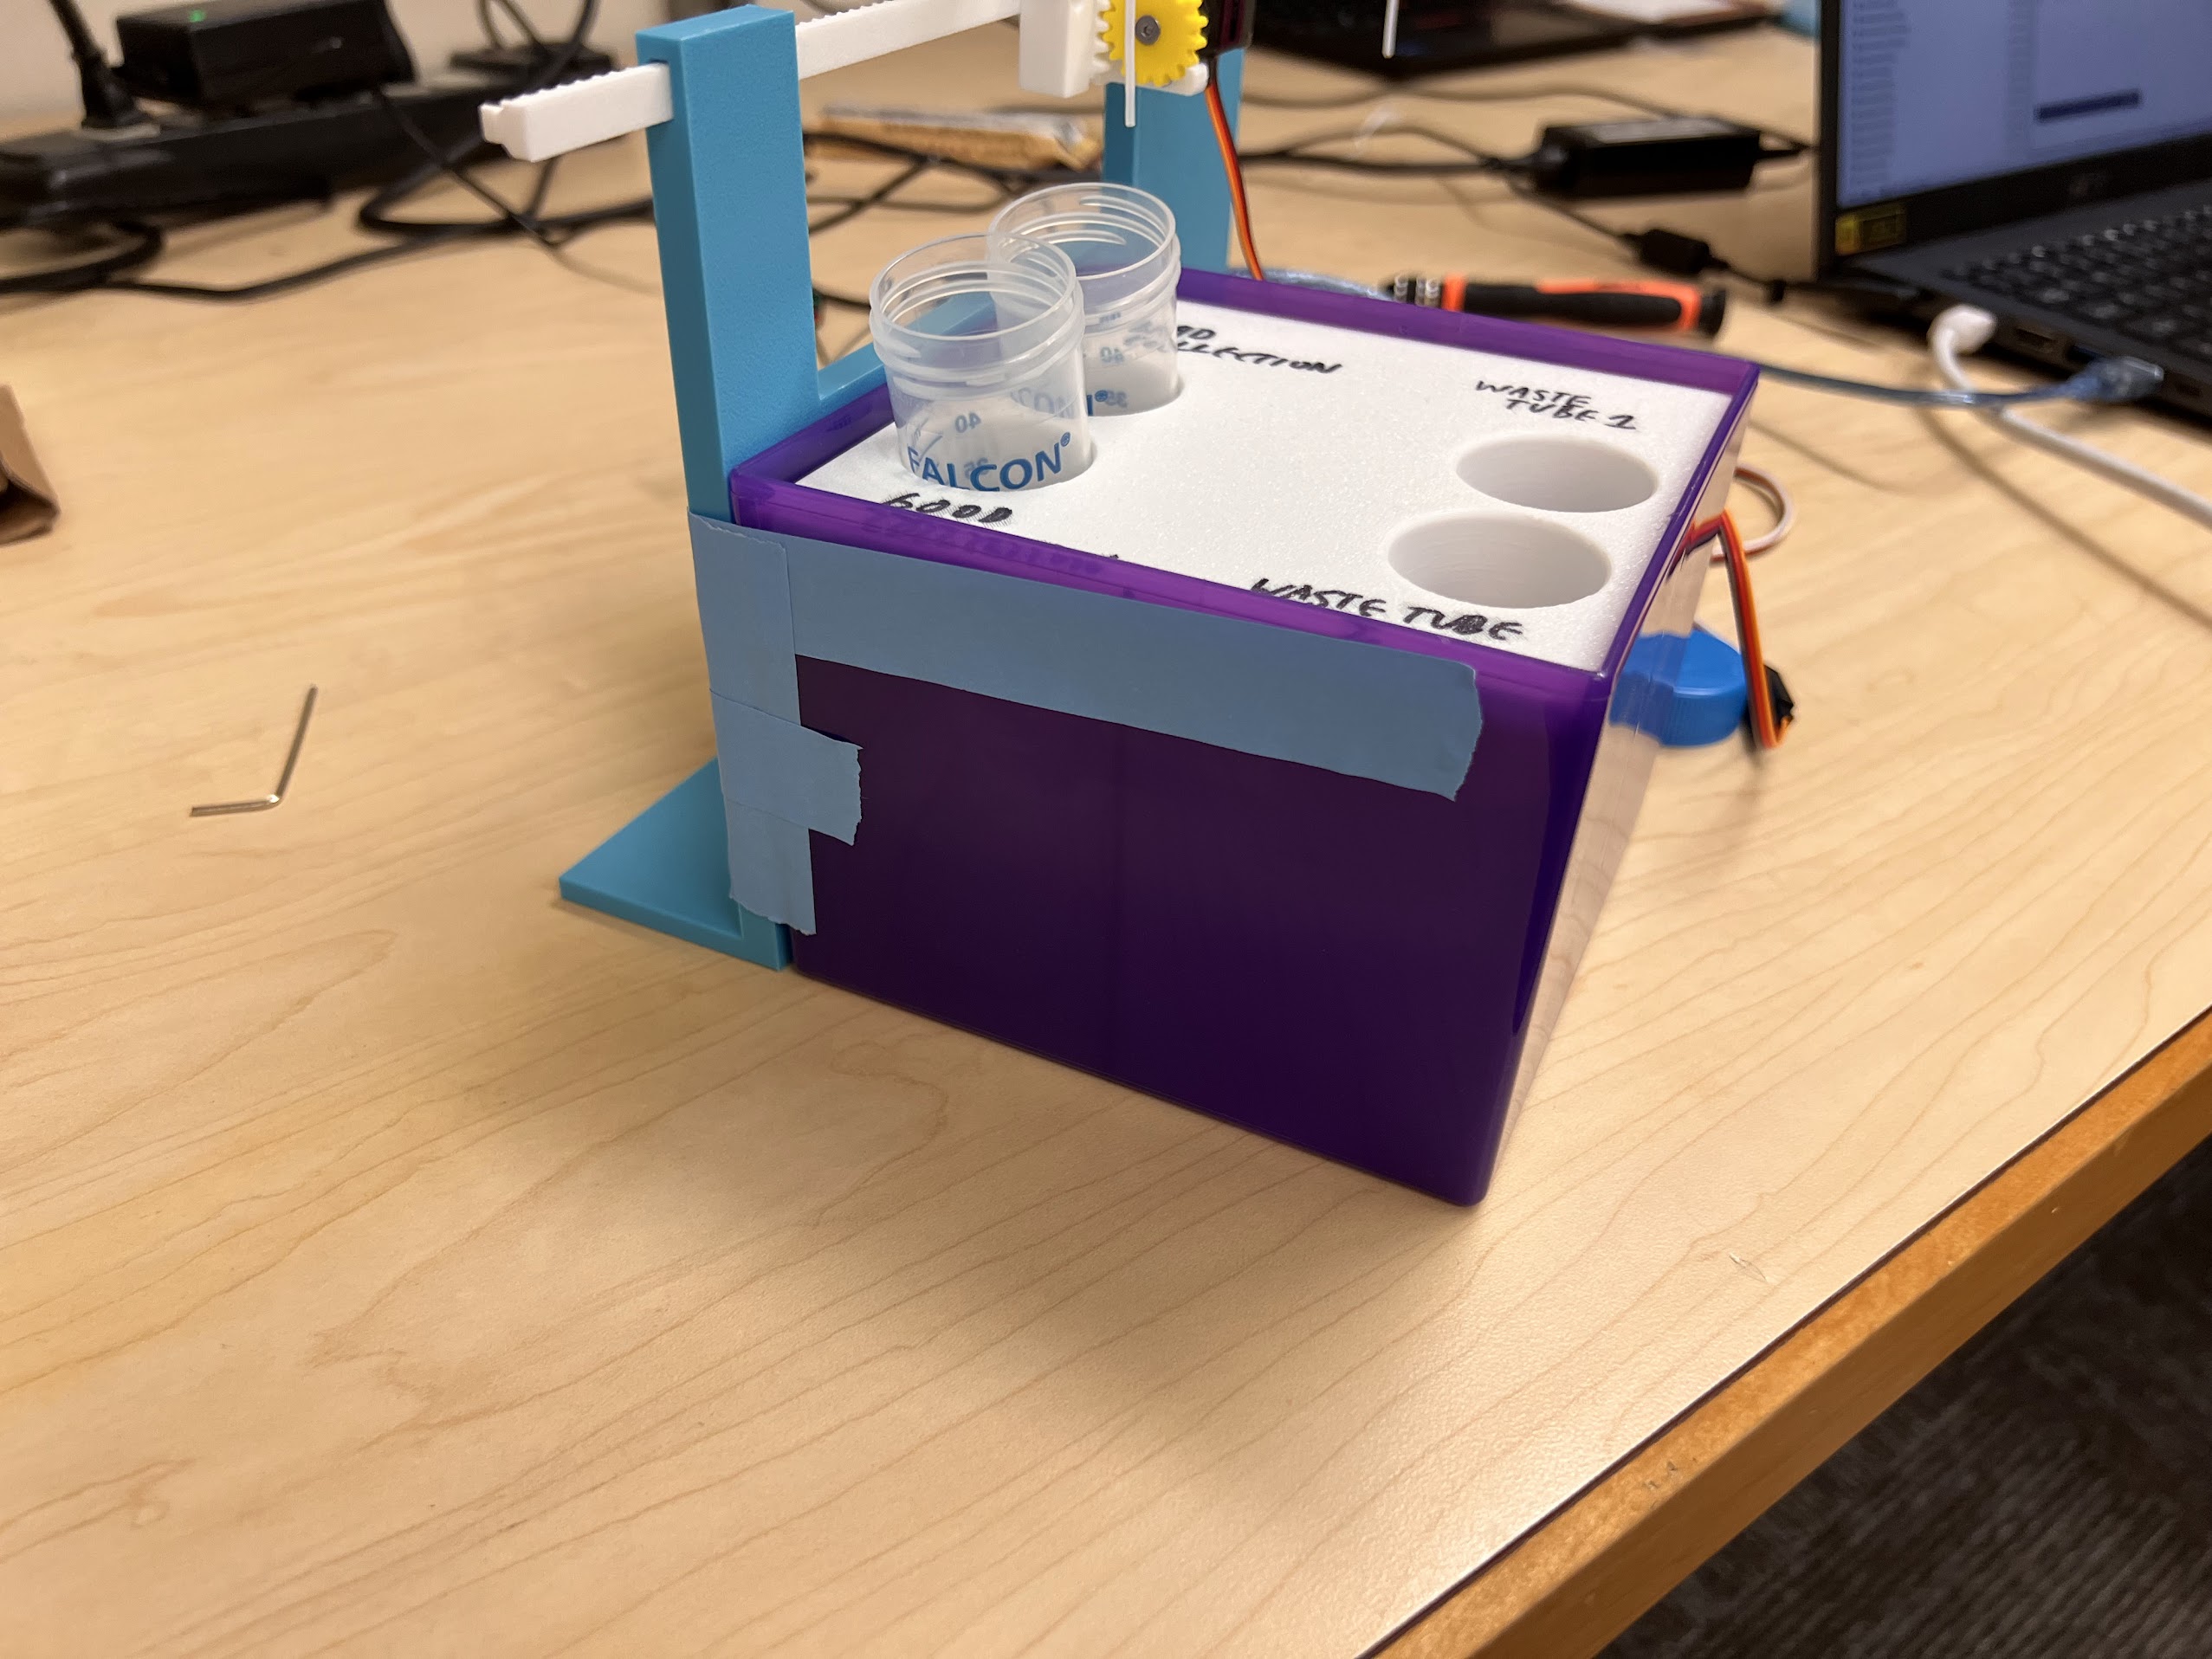
  • Simply replace the Heathrow Scientific lids with the 3D Printed Lids.
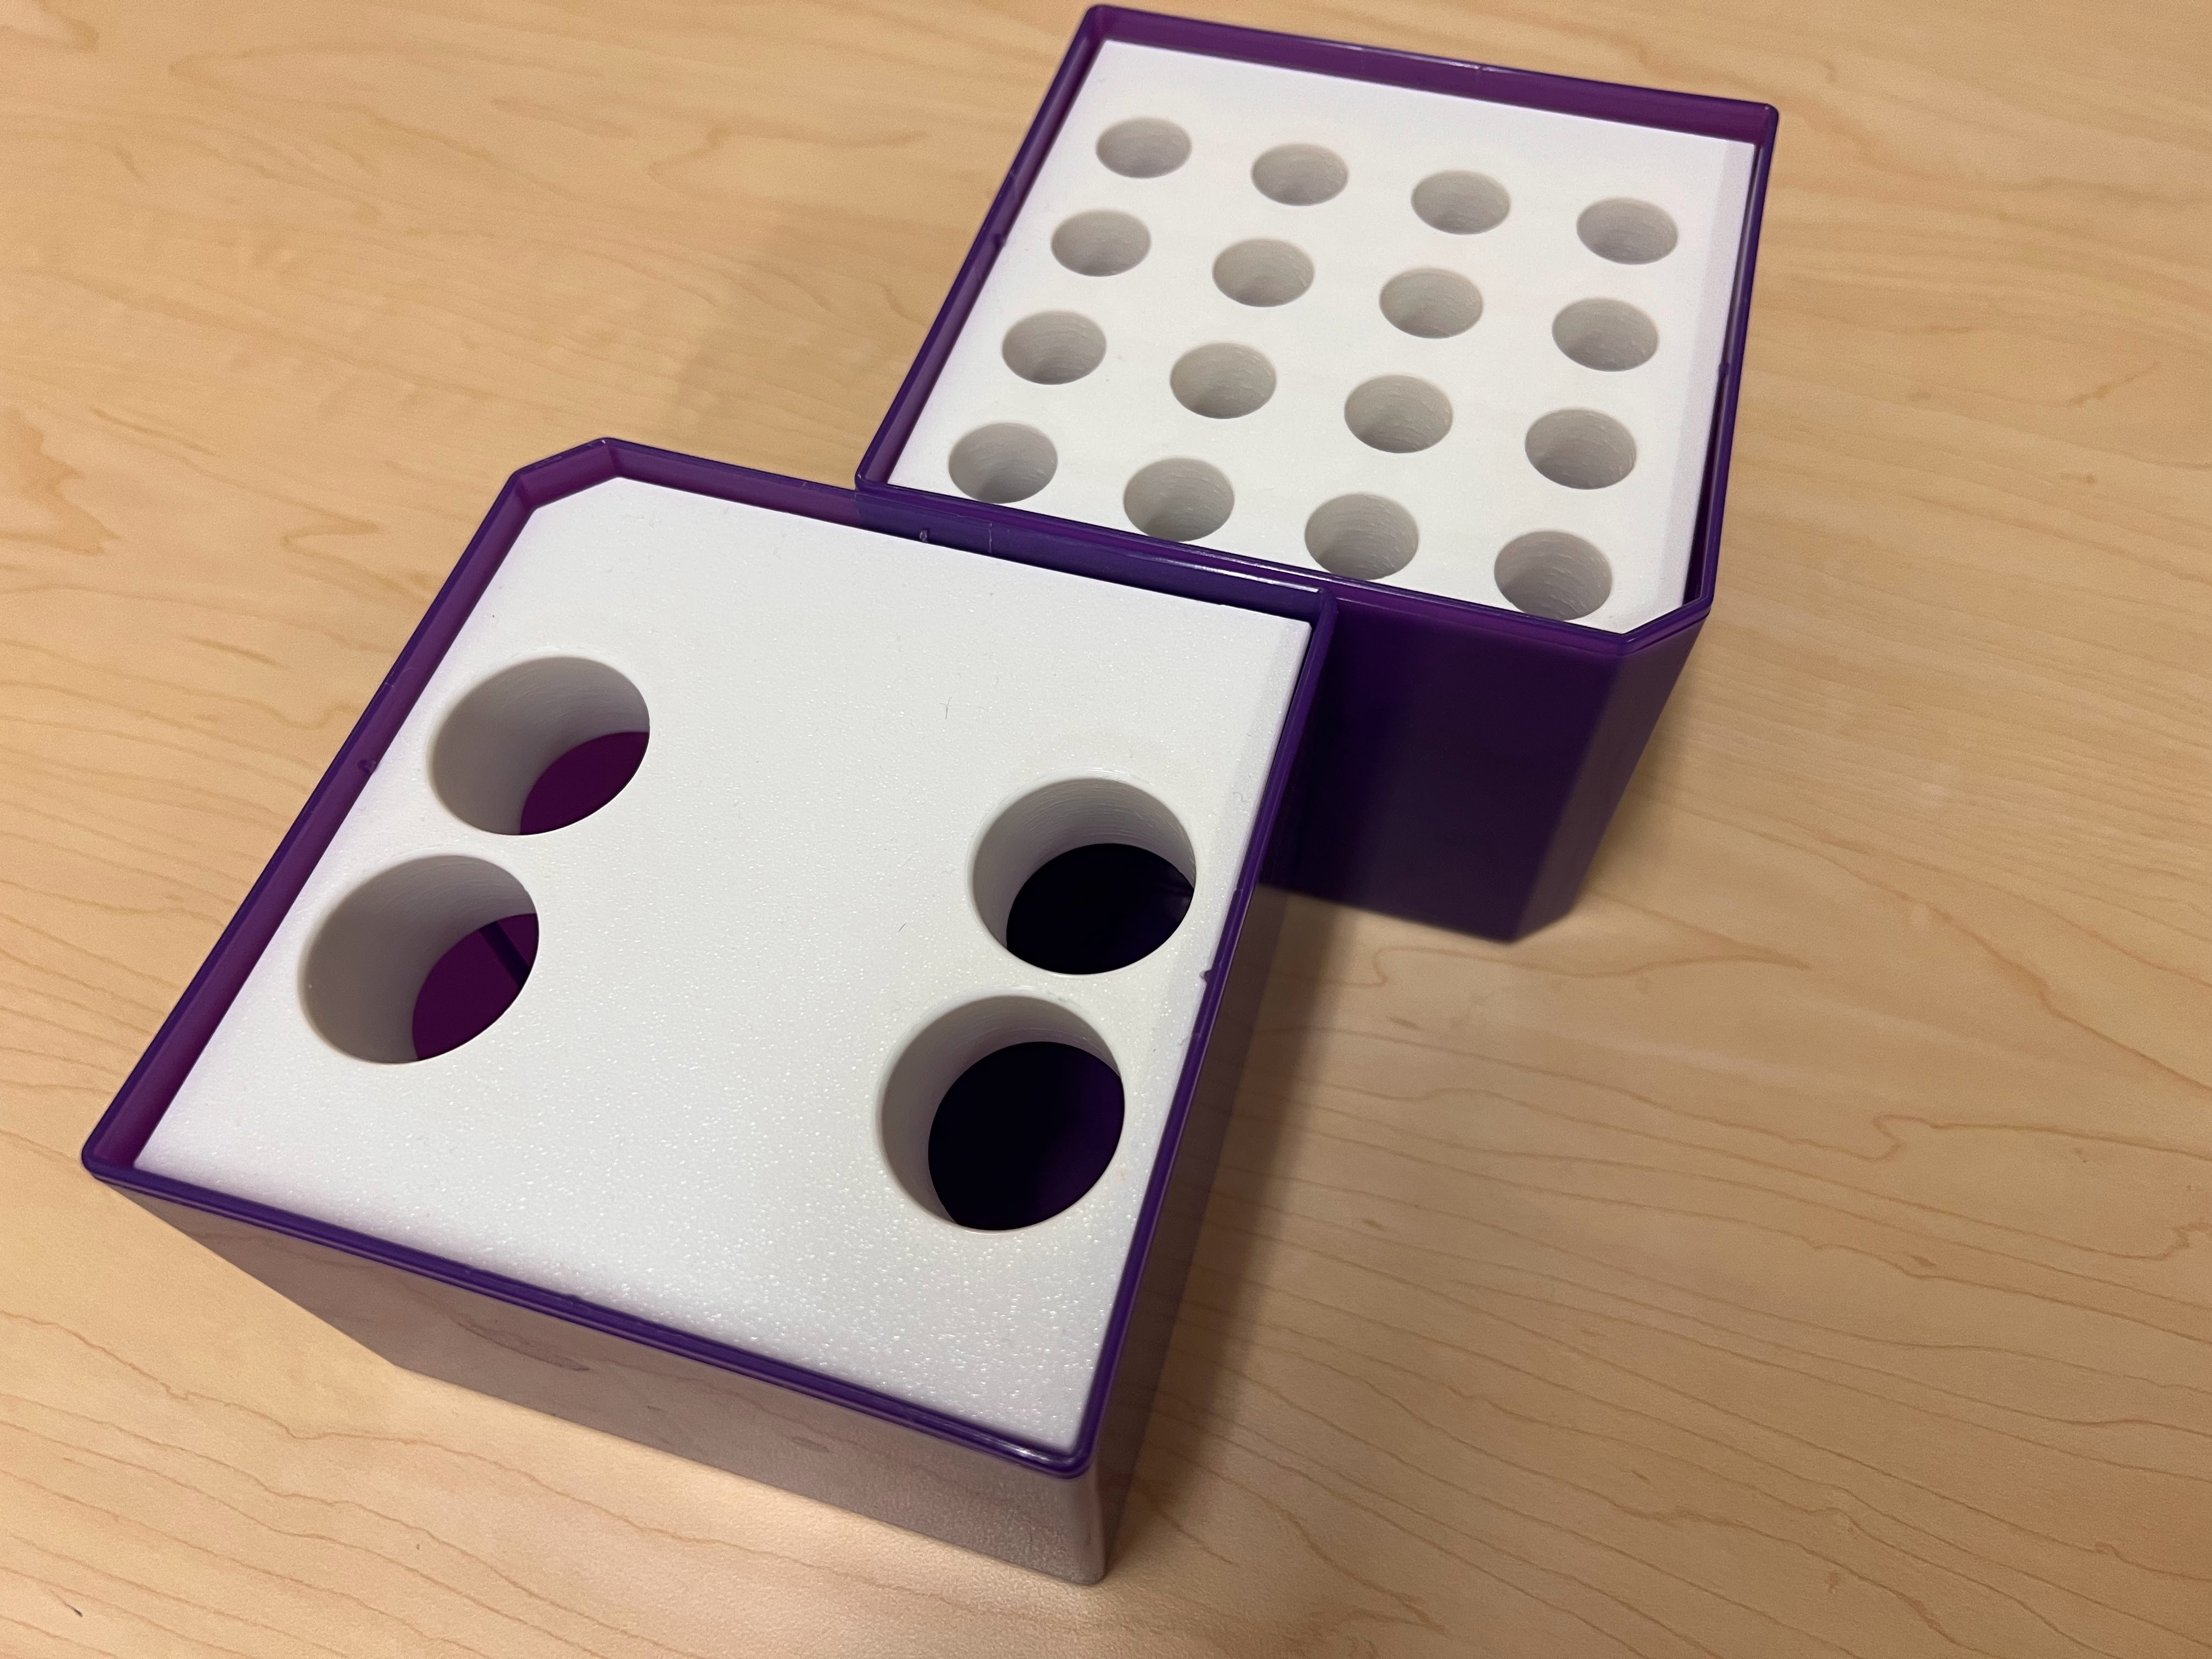
    • The printed lids will just pop in place.
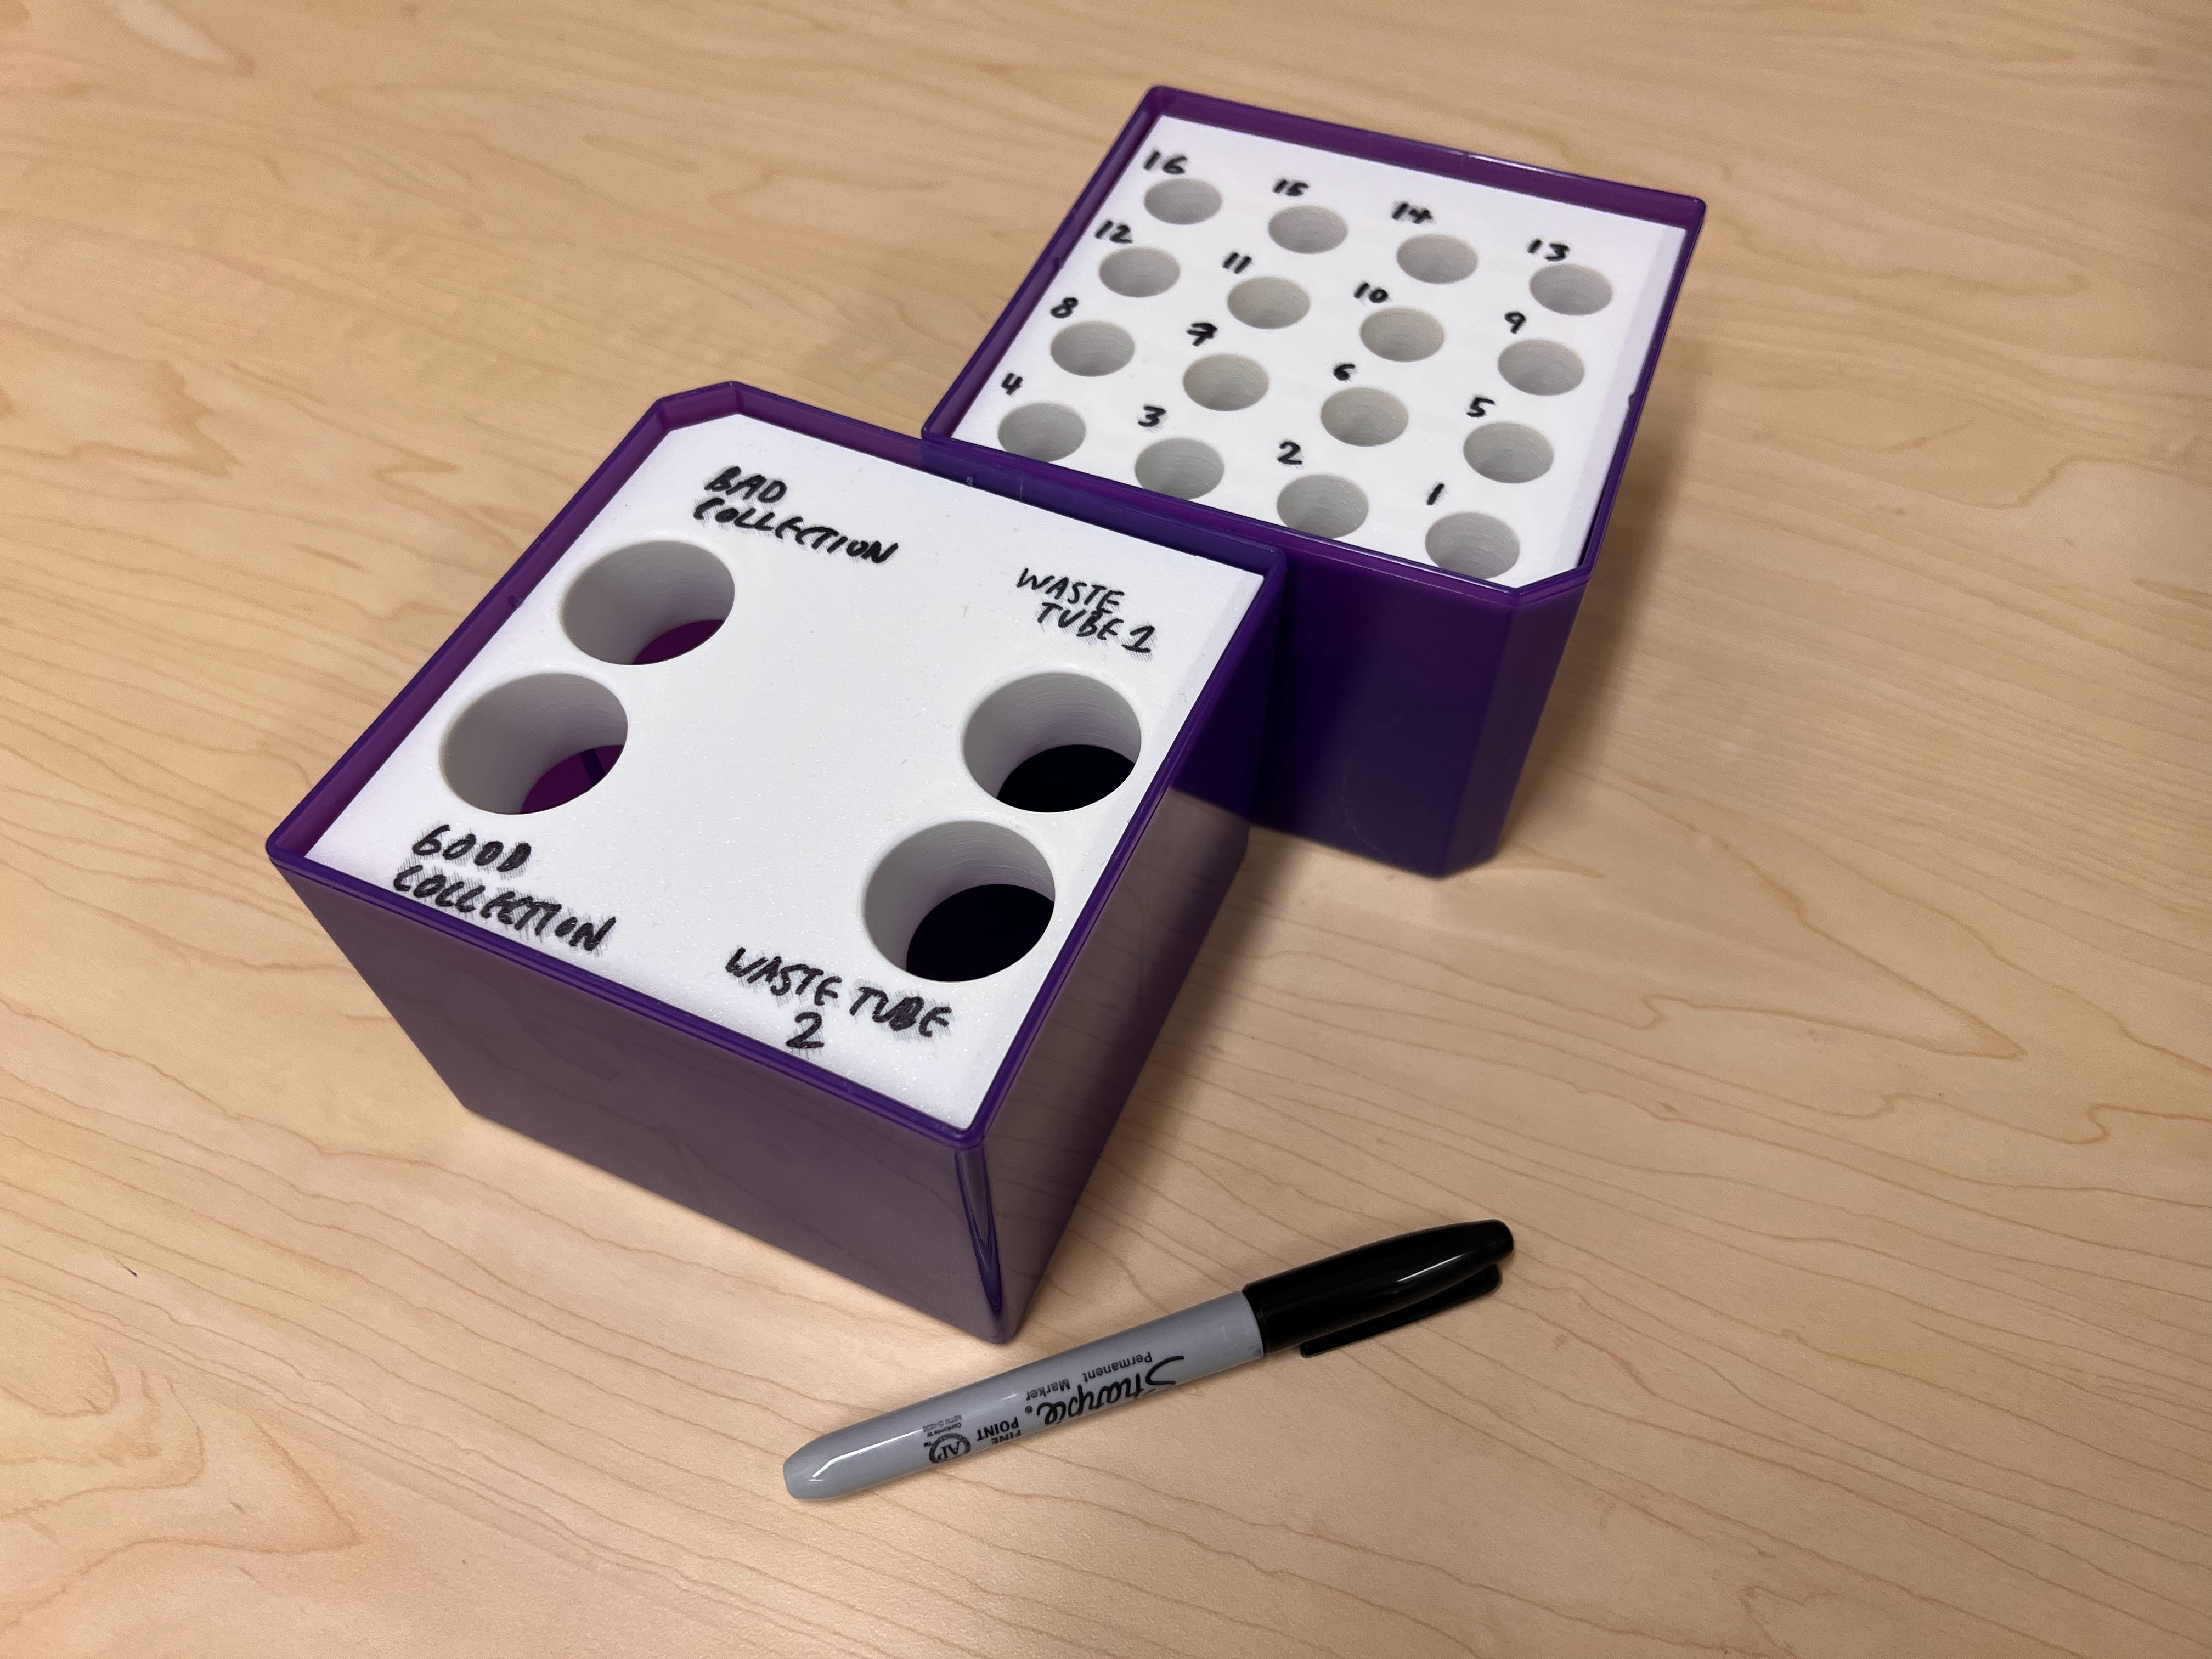
  • Label the 50ml and 15ml Lid Ice Boxes.
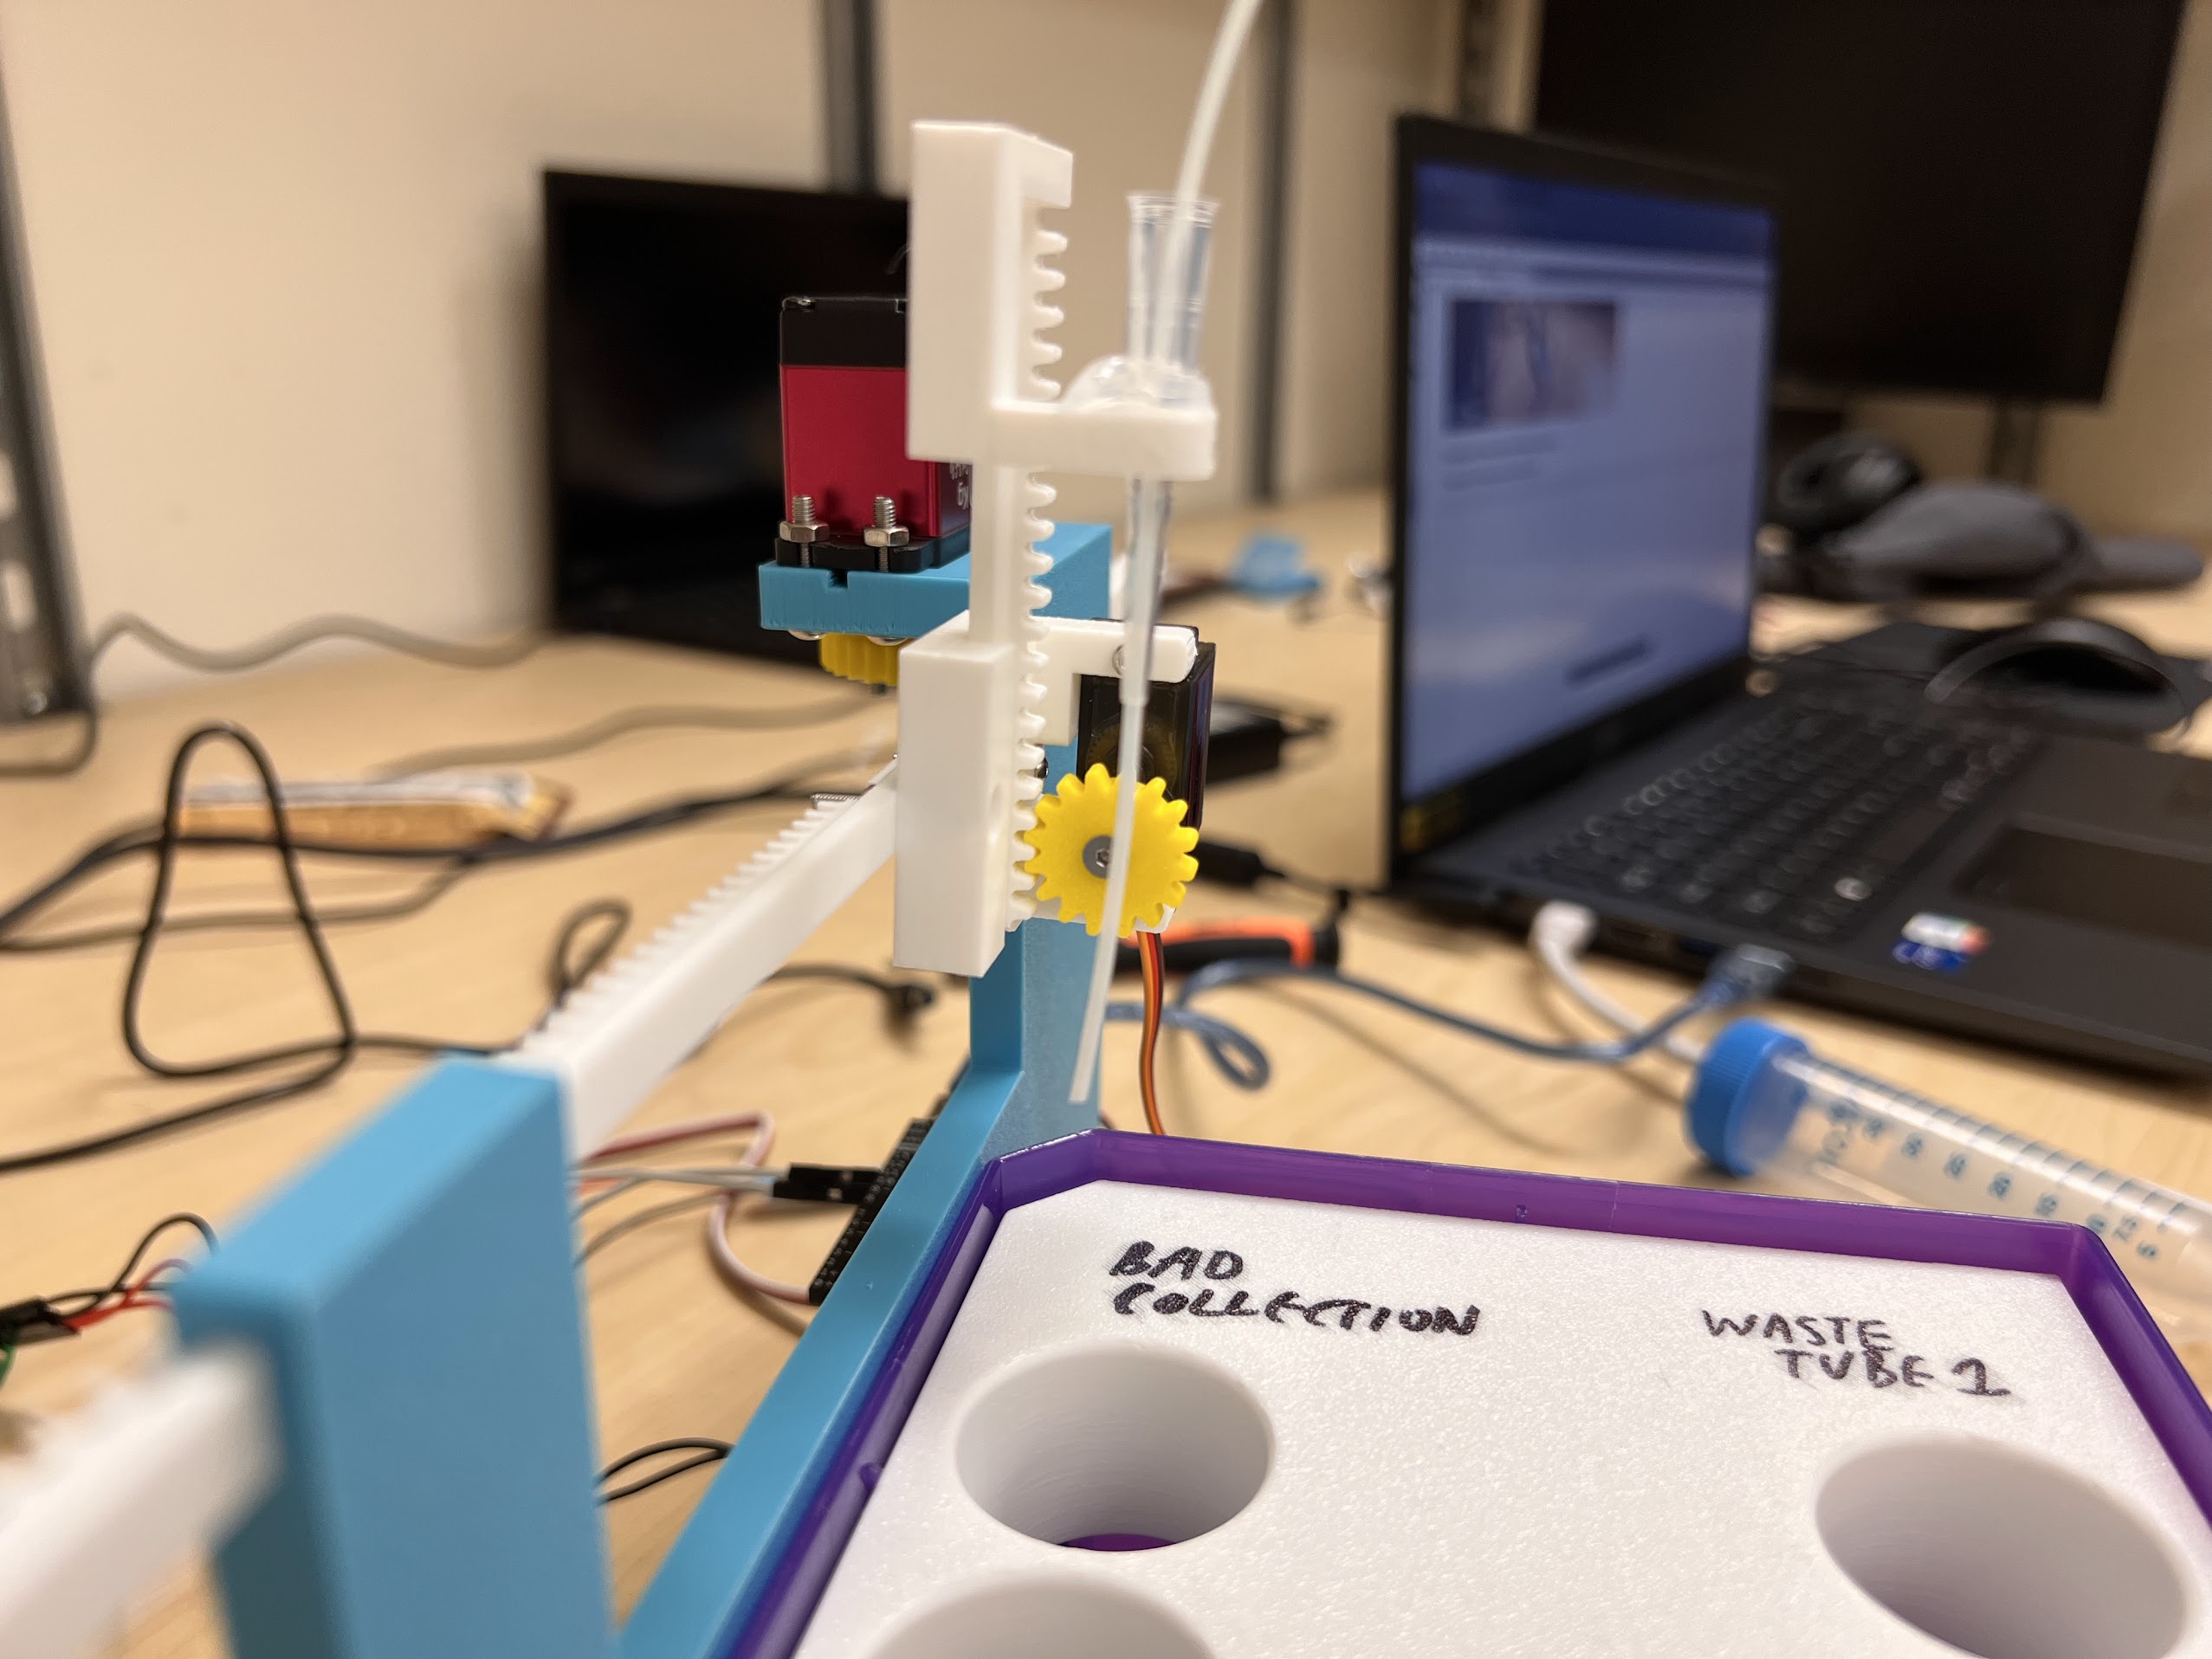
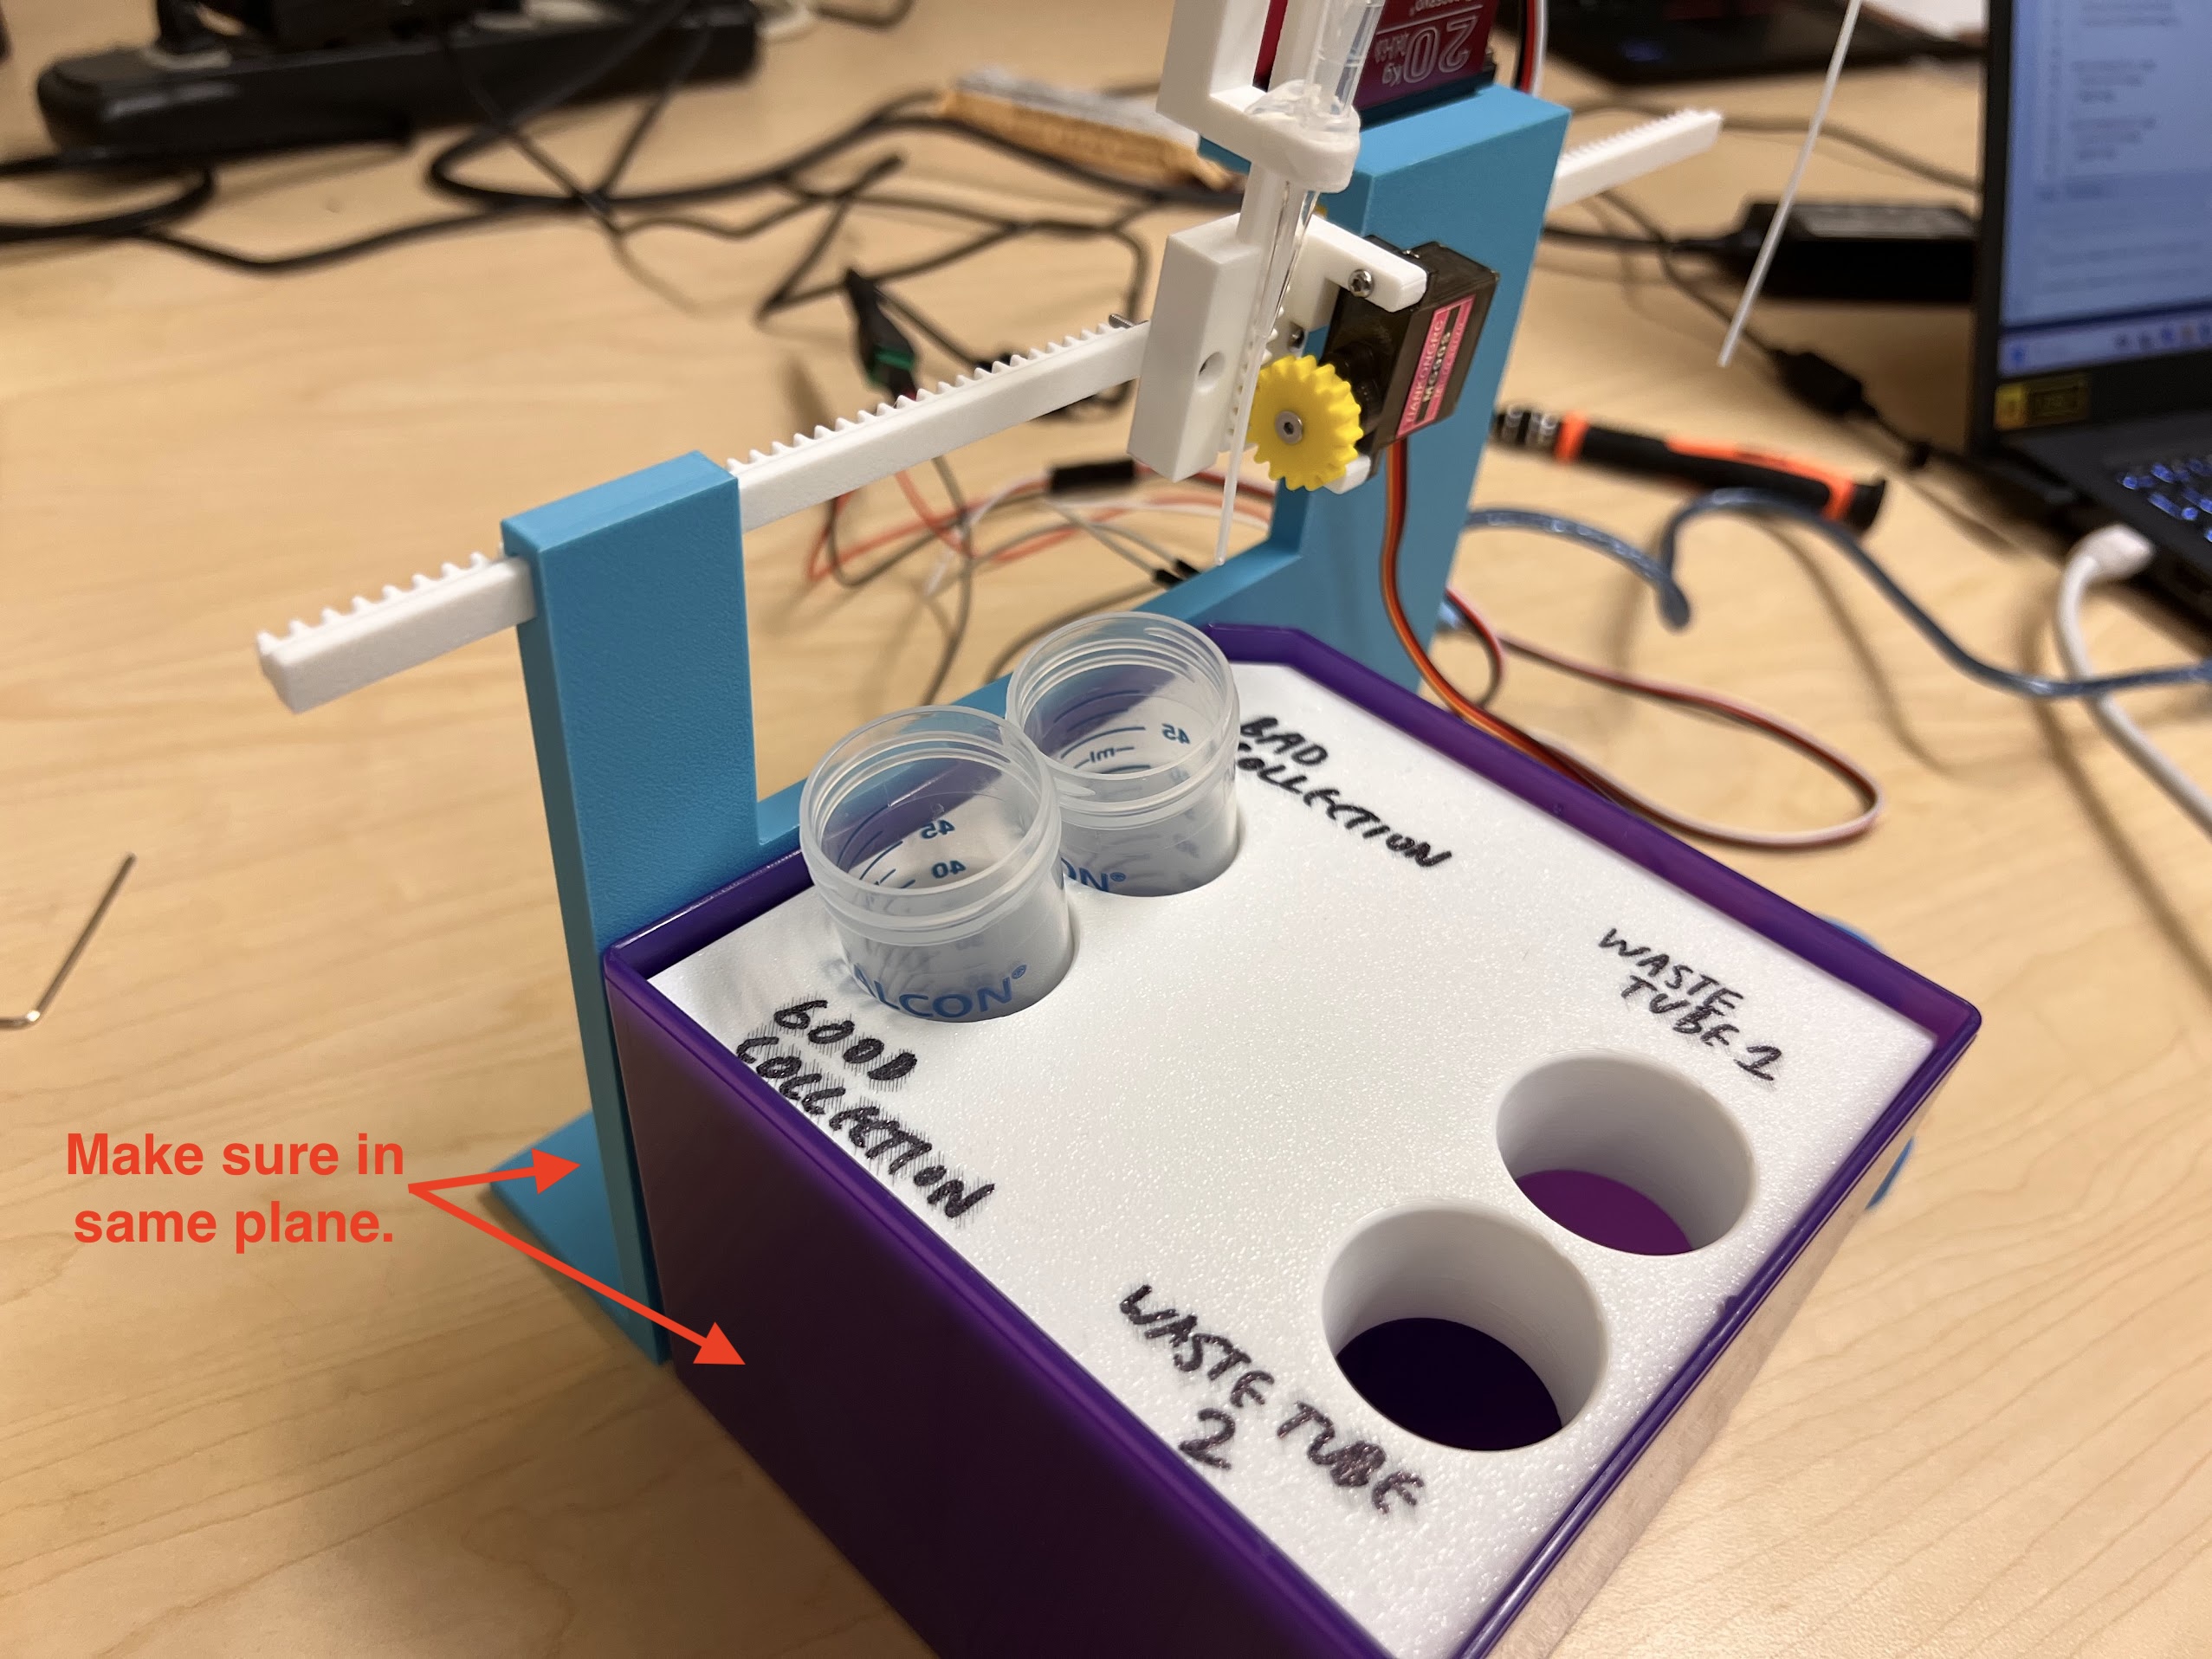
    • Make sure the orientation matches the picture below.
    • The 50ml Tube Positions are:
      • Top Left: Bad Collection Tube
      • Bottom Left: Good Collection Tube
      • Top Right: Waste Tube 1
      • Bottom Right: Waste Tube 2
    • The 15ml Tube Positions are marked in increasing order with the first position being the bottom right and last positions being the top left.
    • Mark the positions on the Lid with a Permanent Marker as follows.

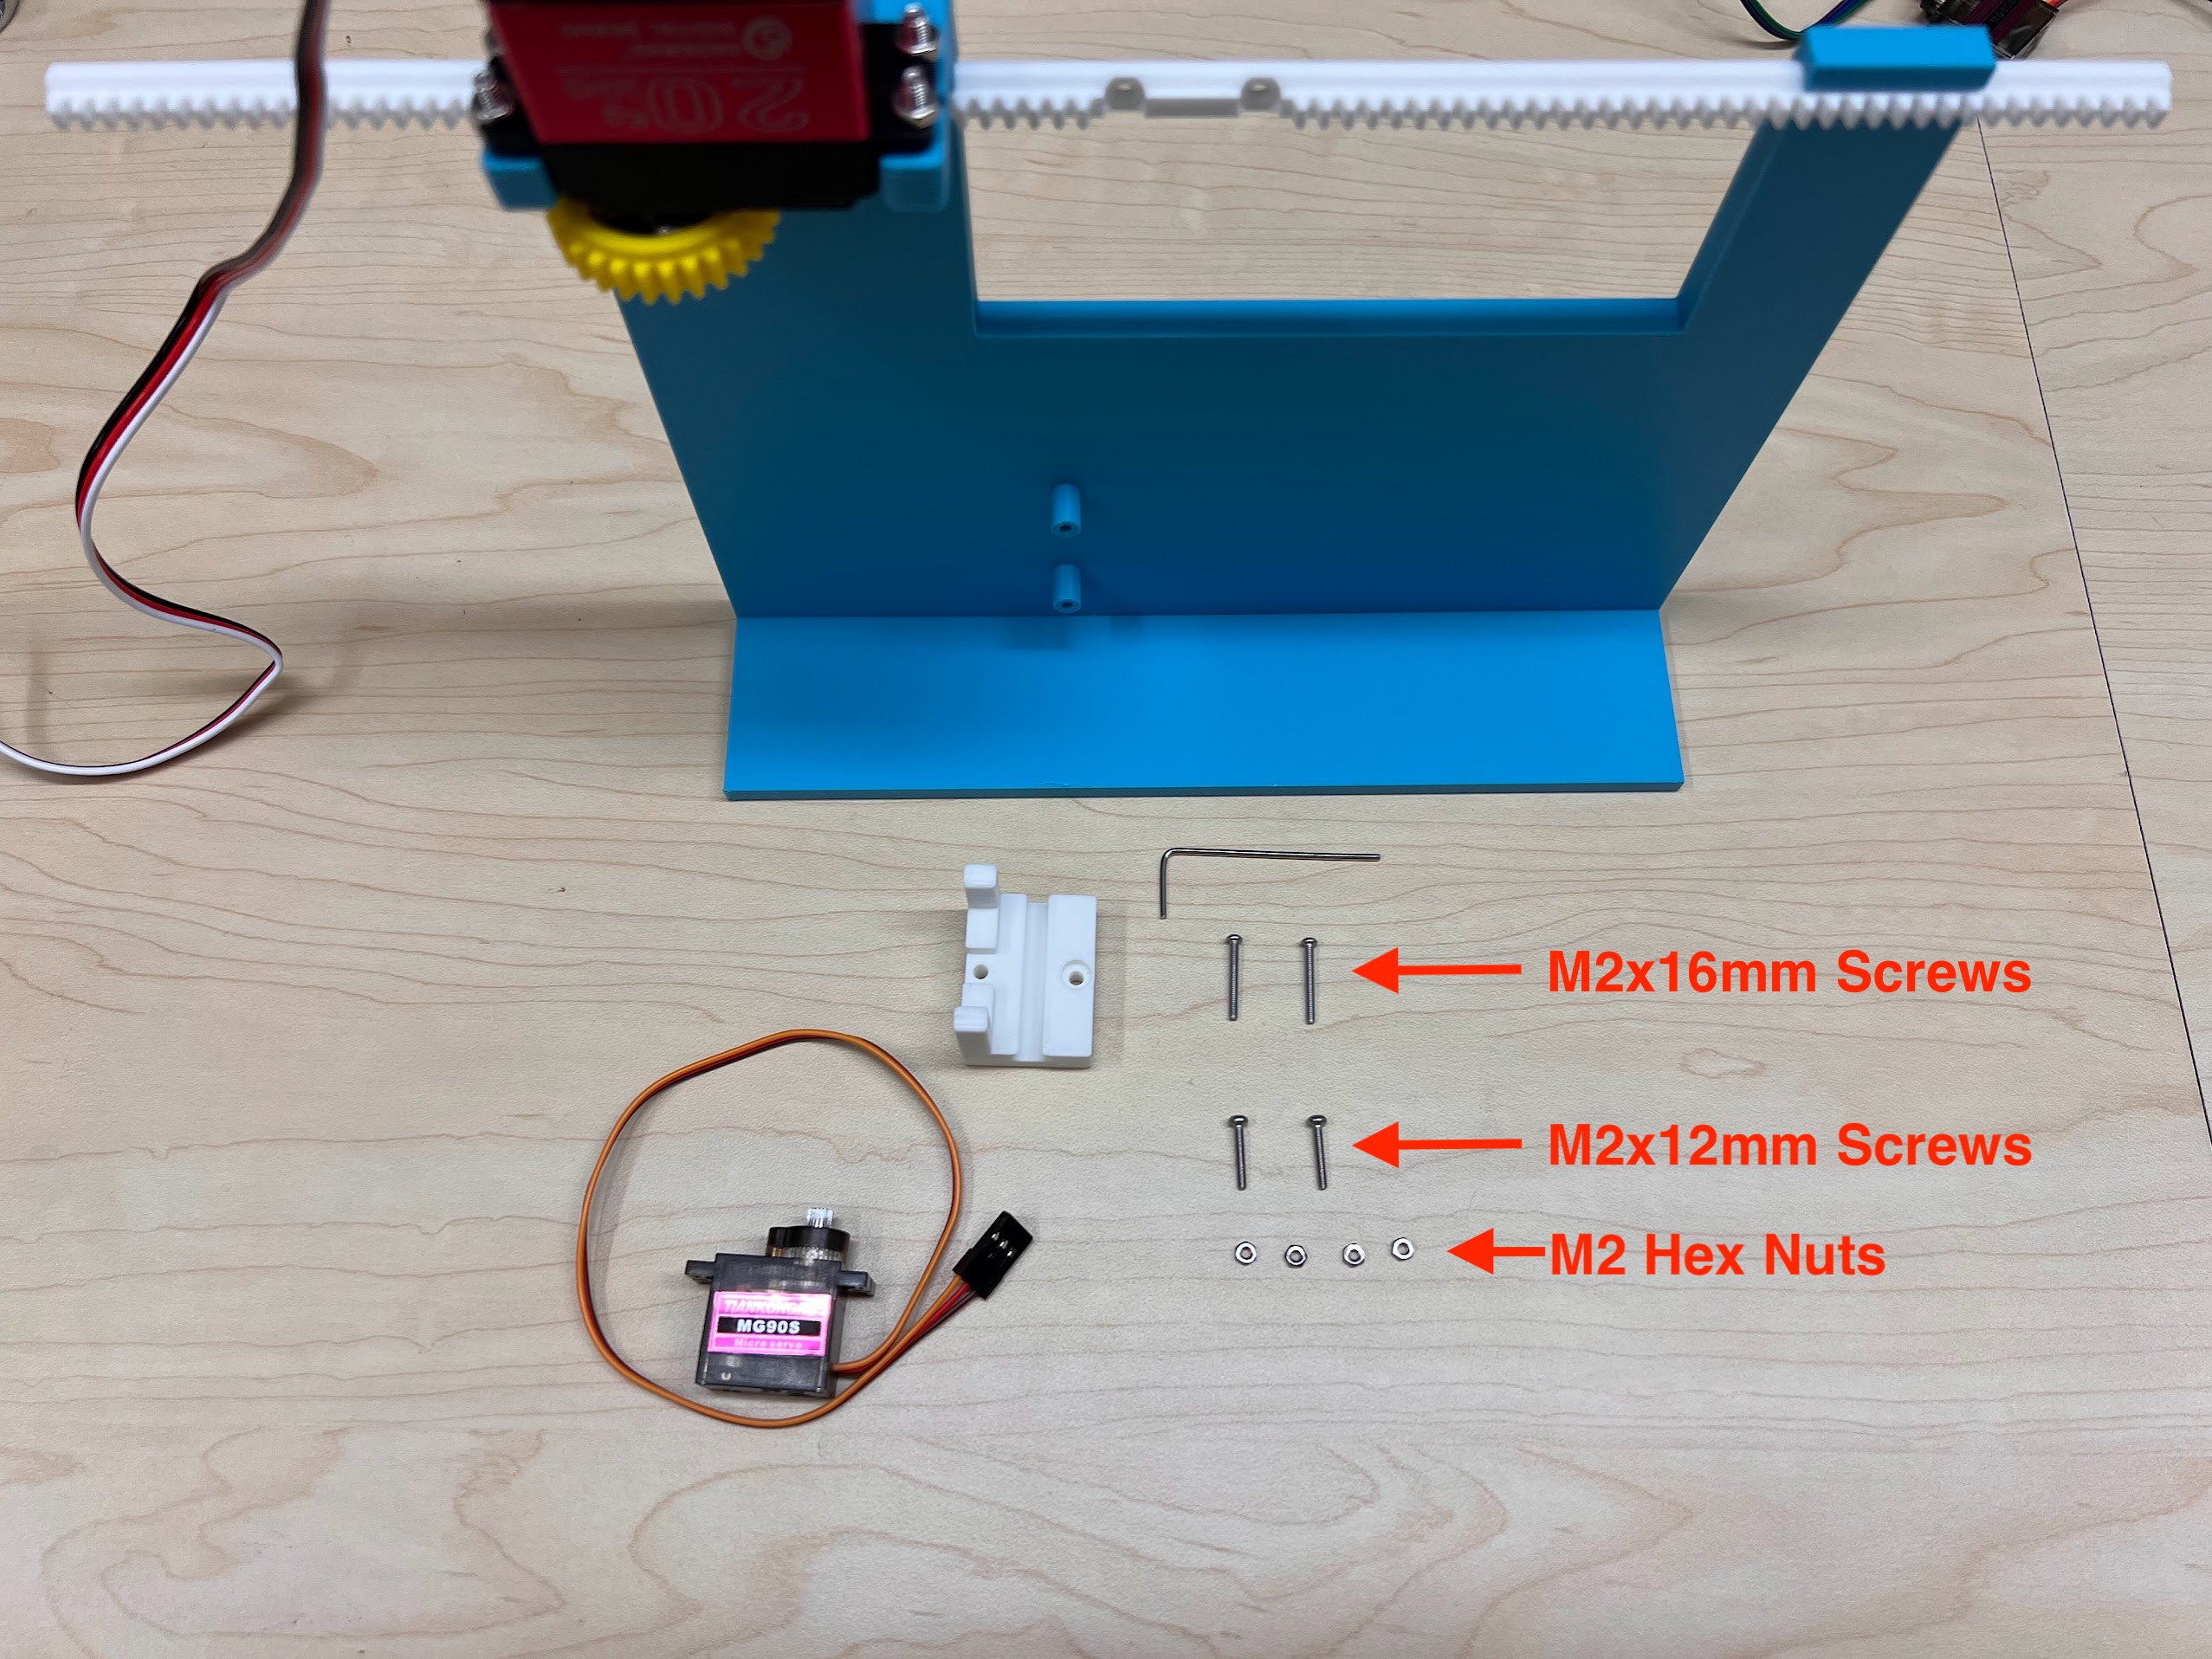
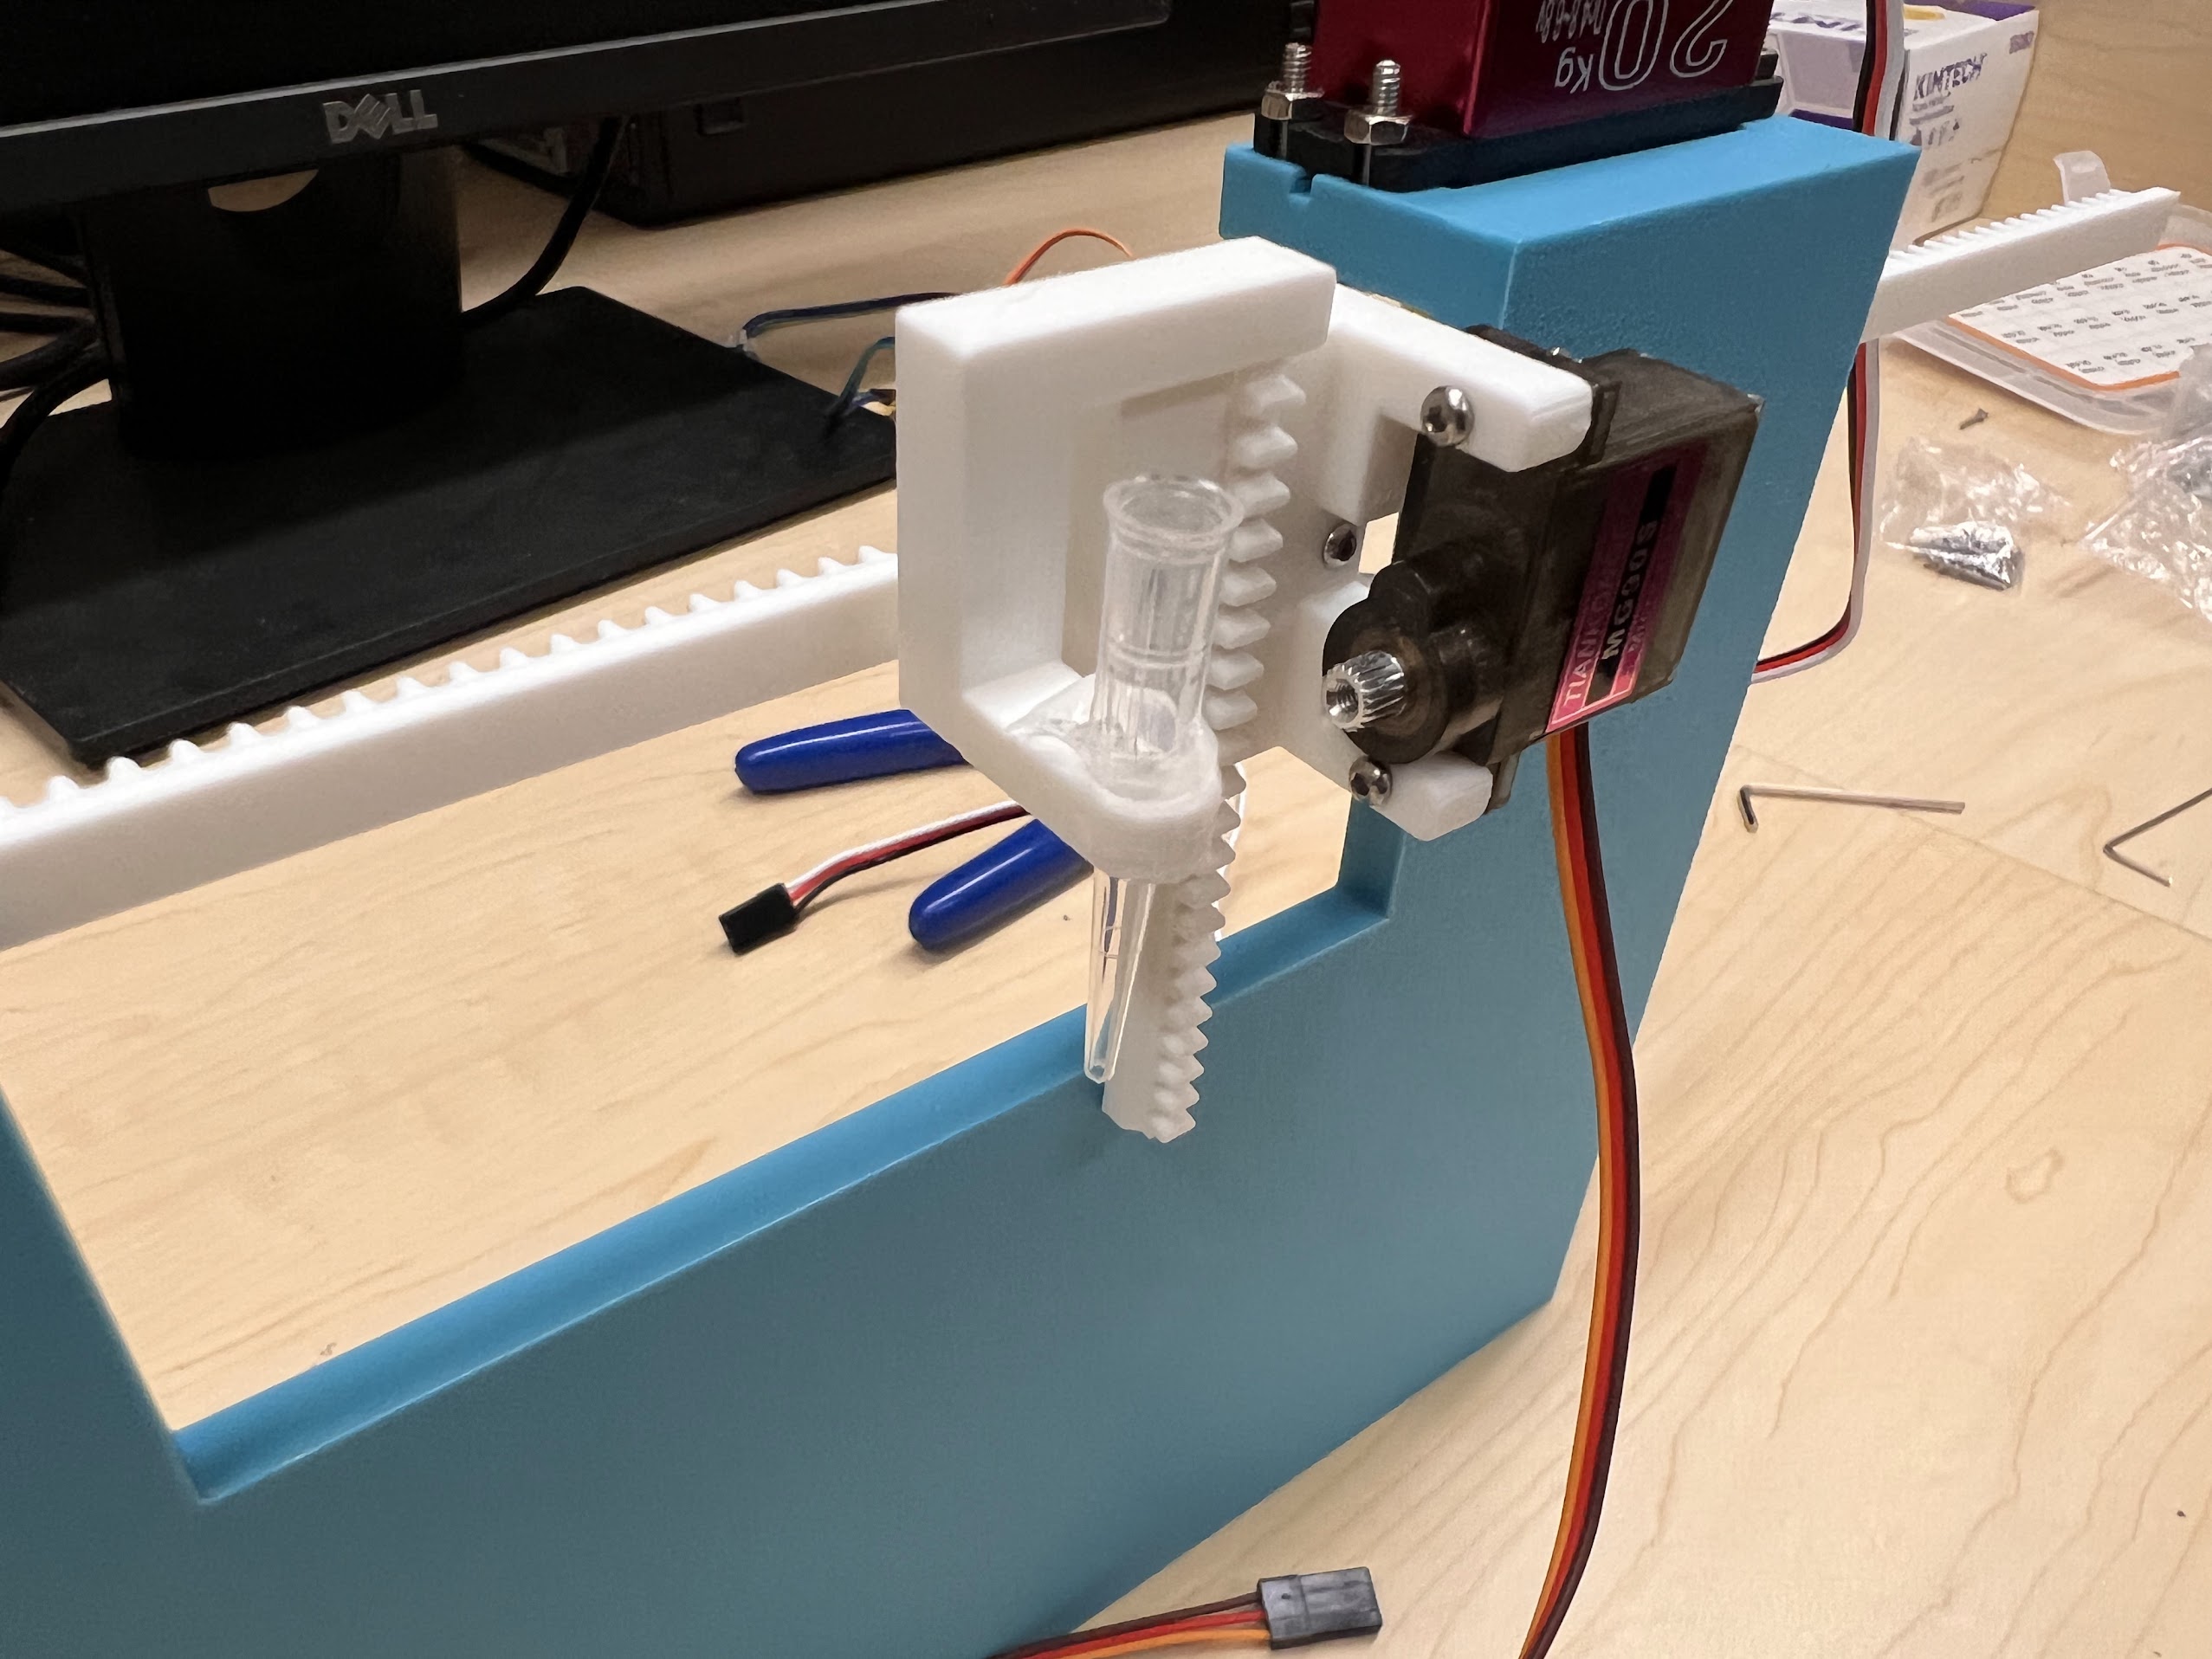
Assembling the XY Robot

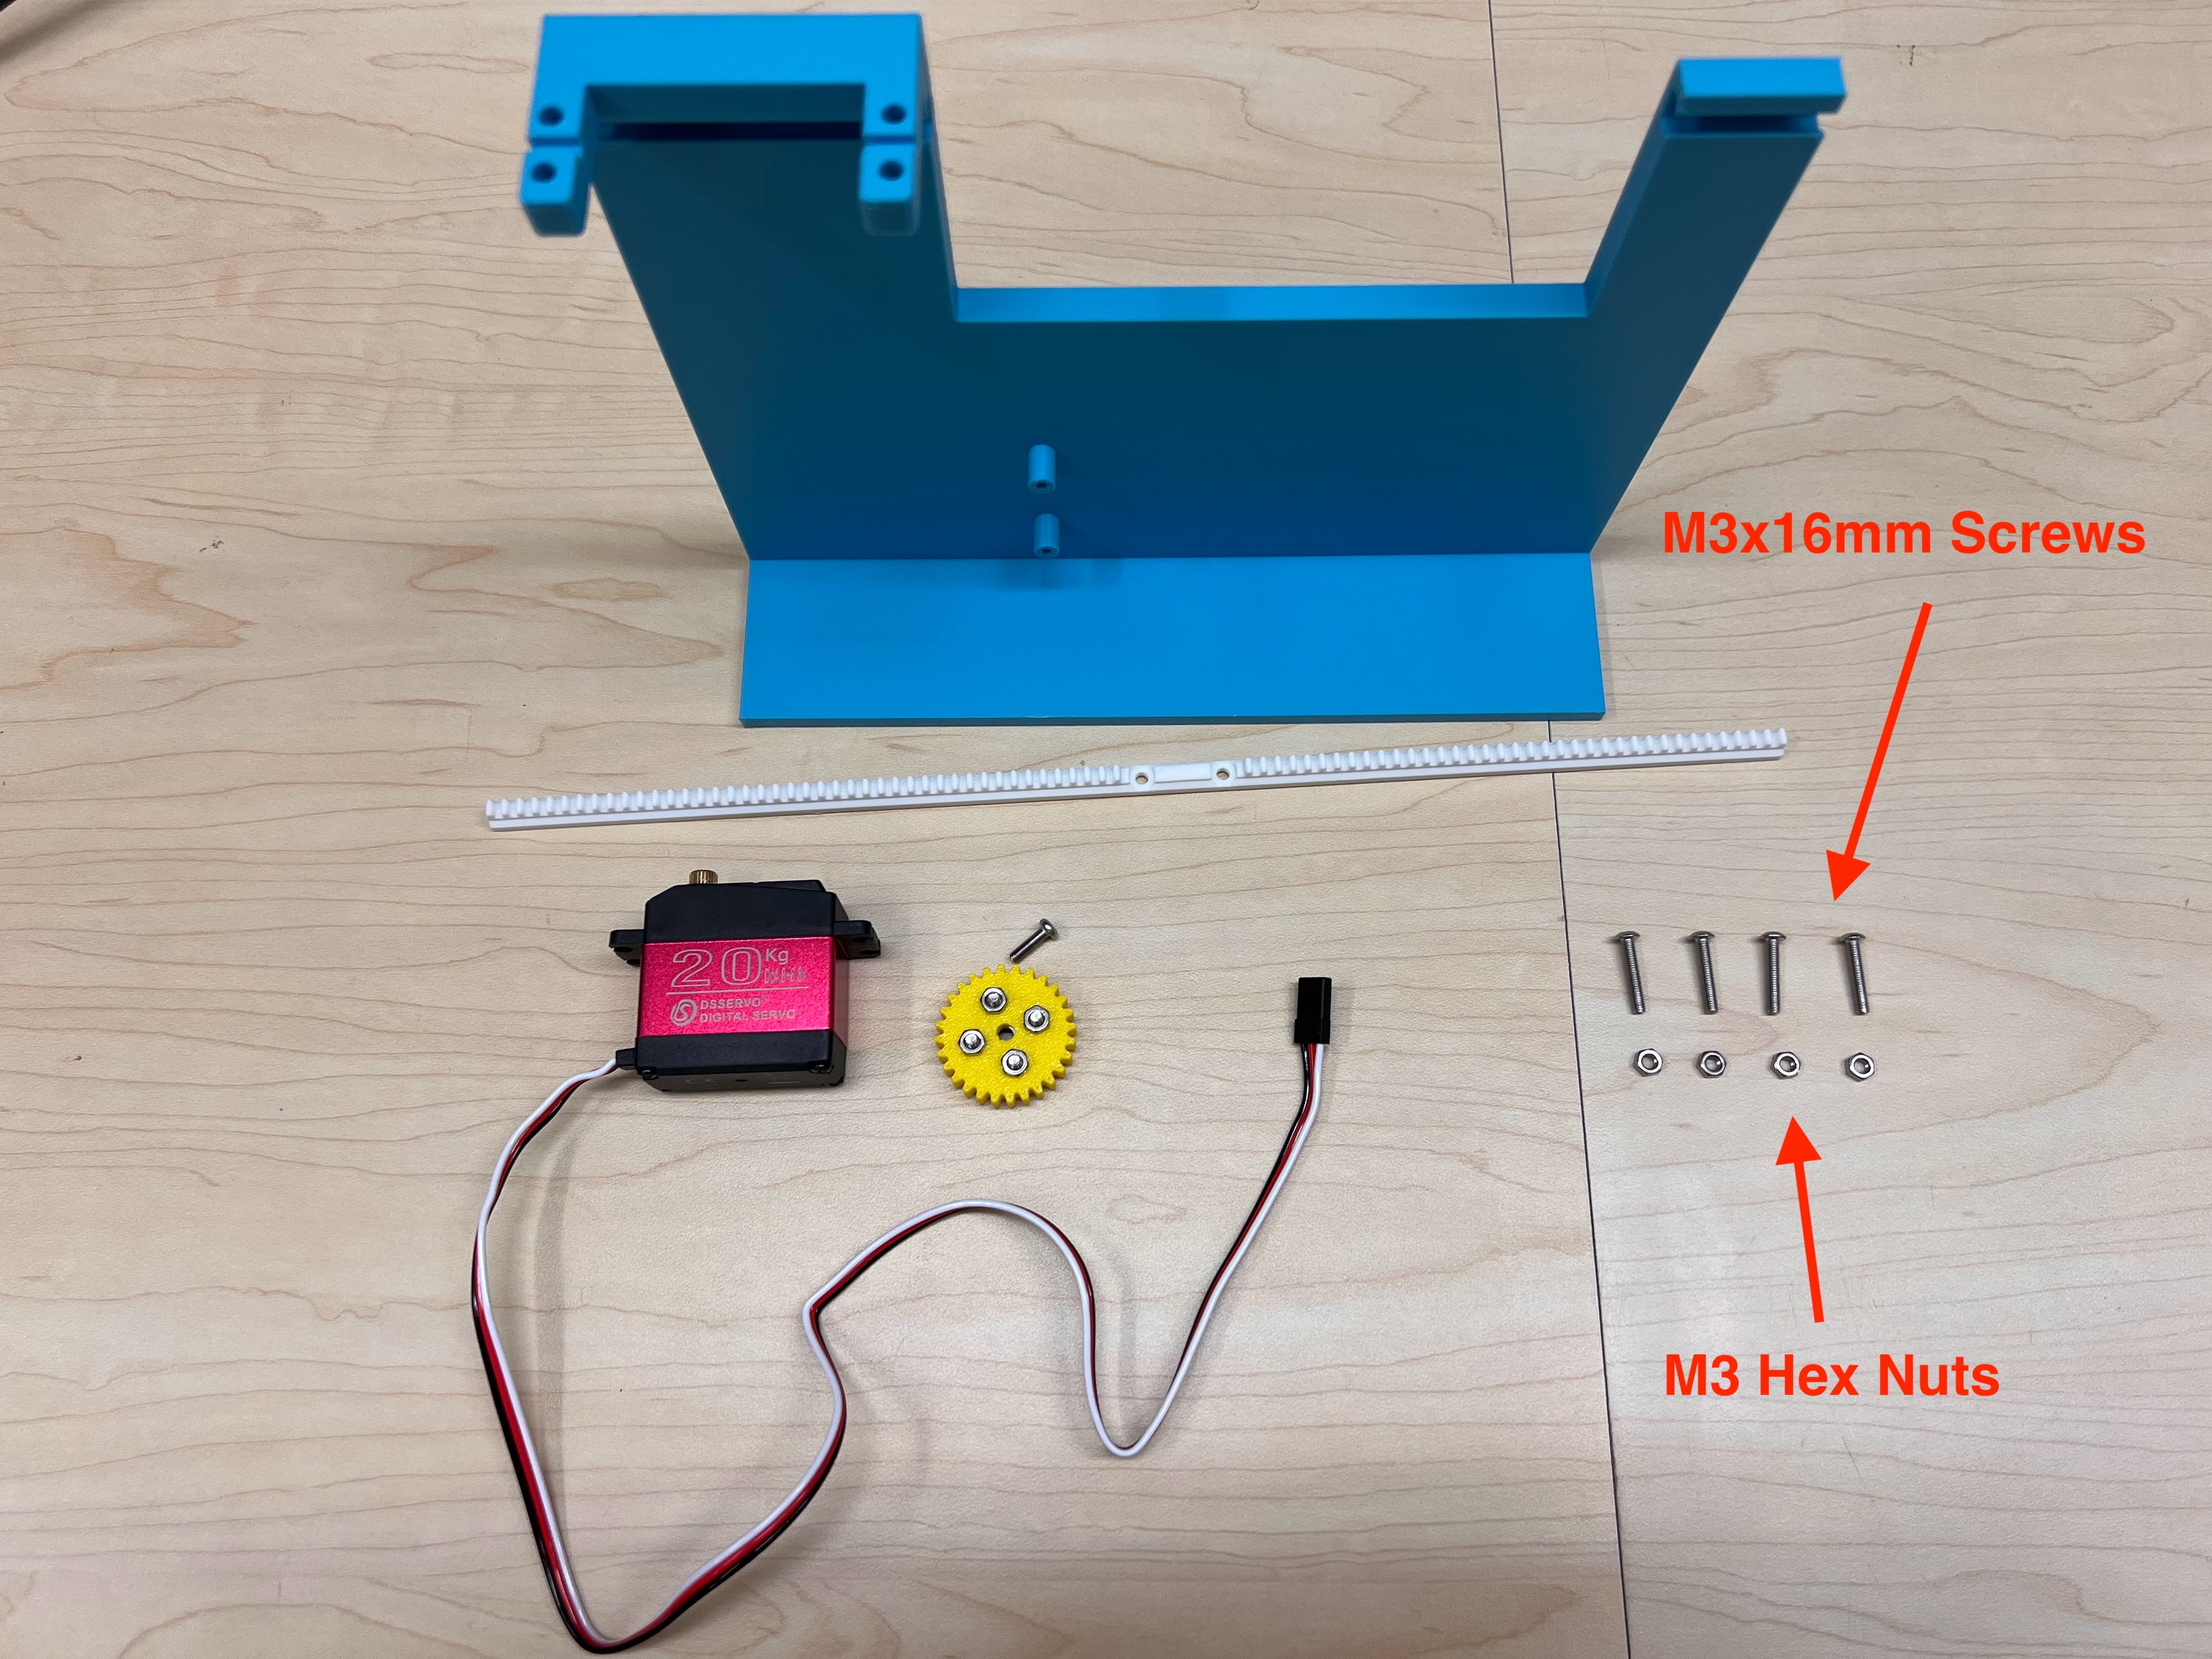
Assembling the Large Gear

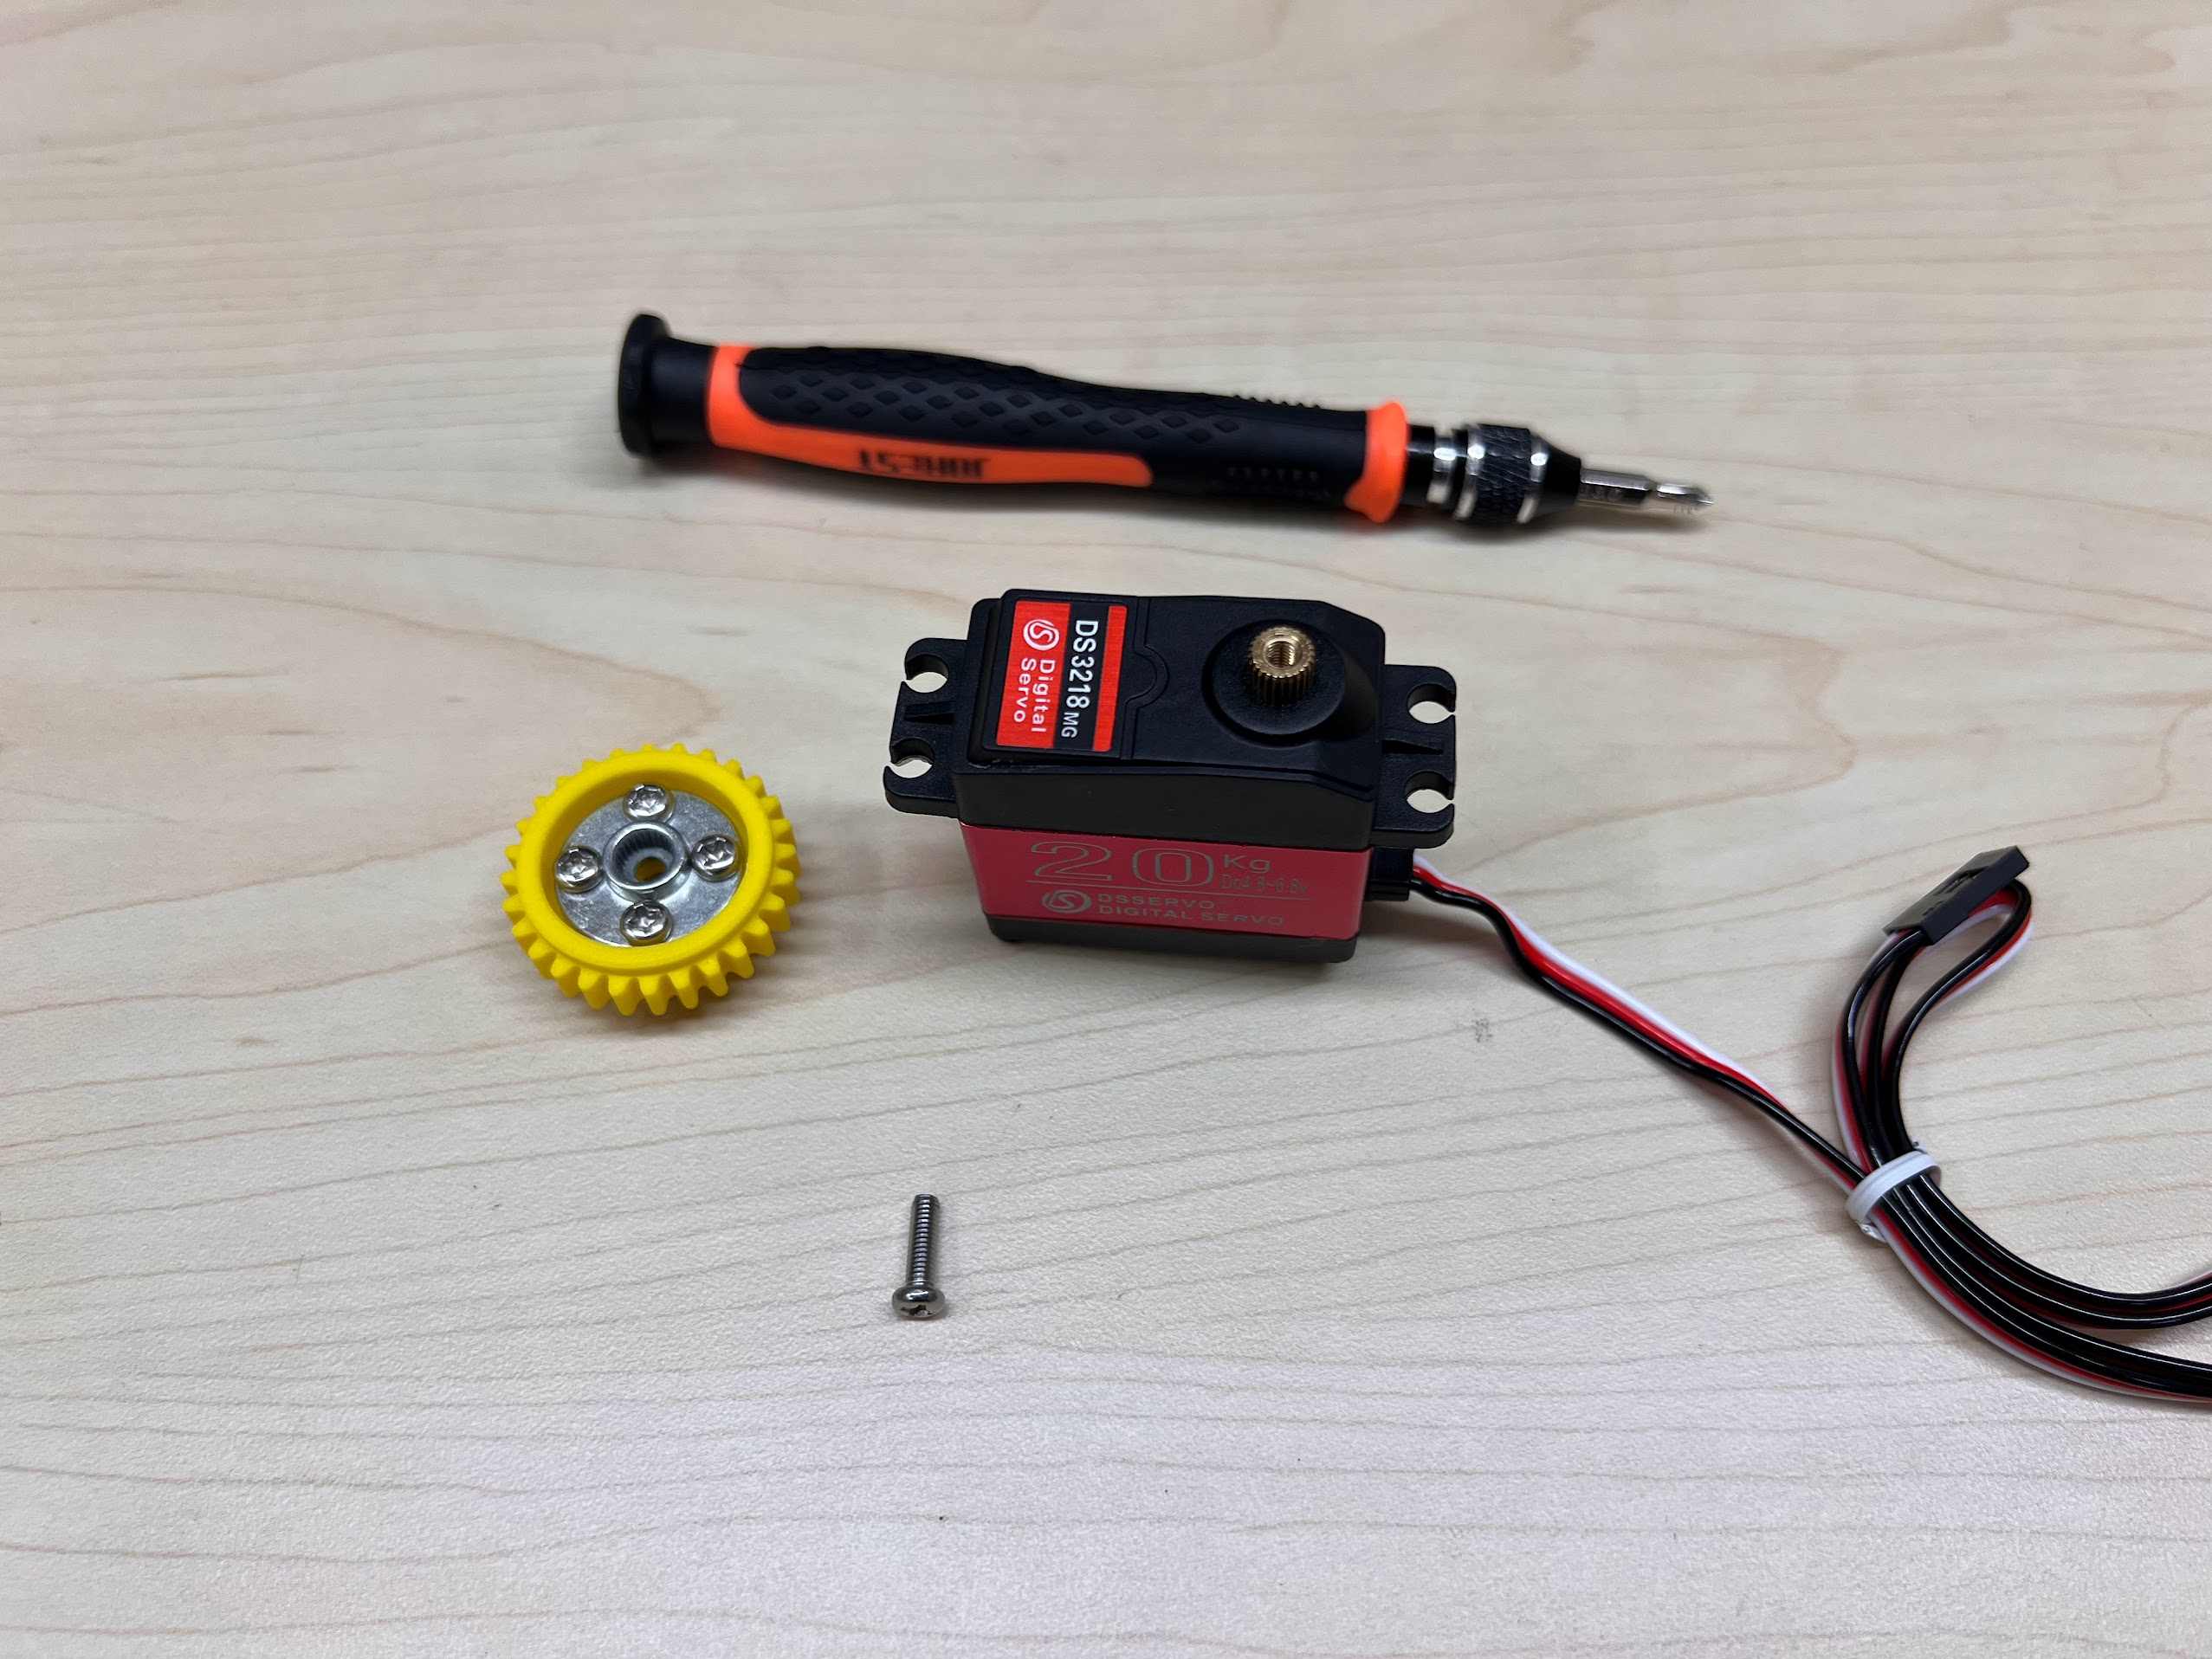
  • We will first assemble the Large 3D printed gear. You will need the following parts from the Metal Servo Horn Kit.
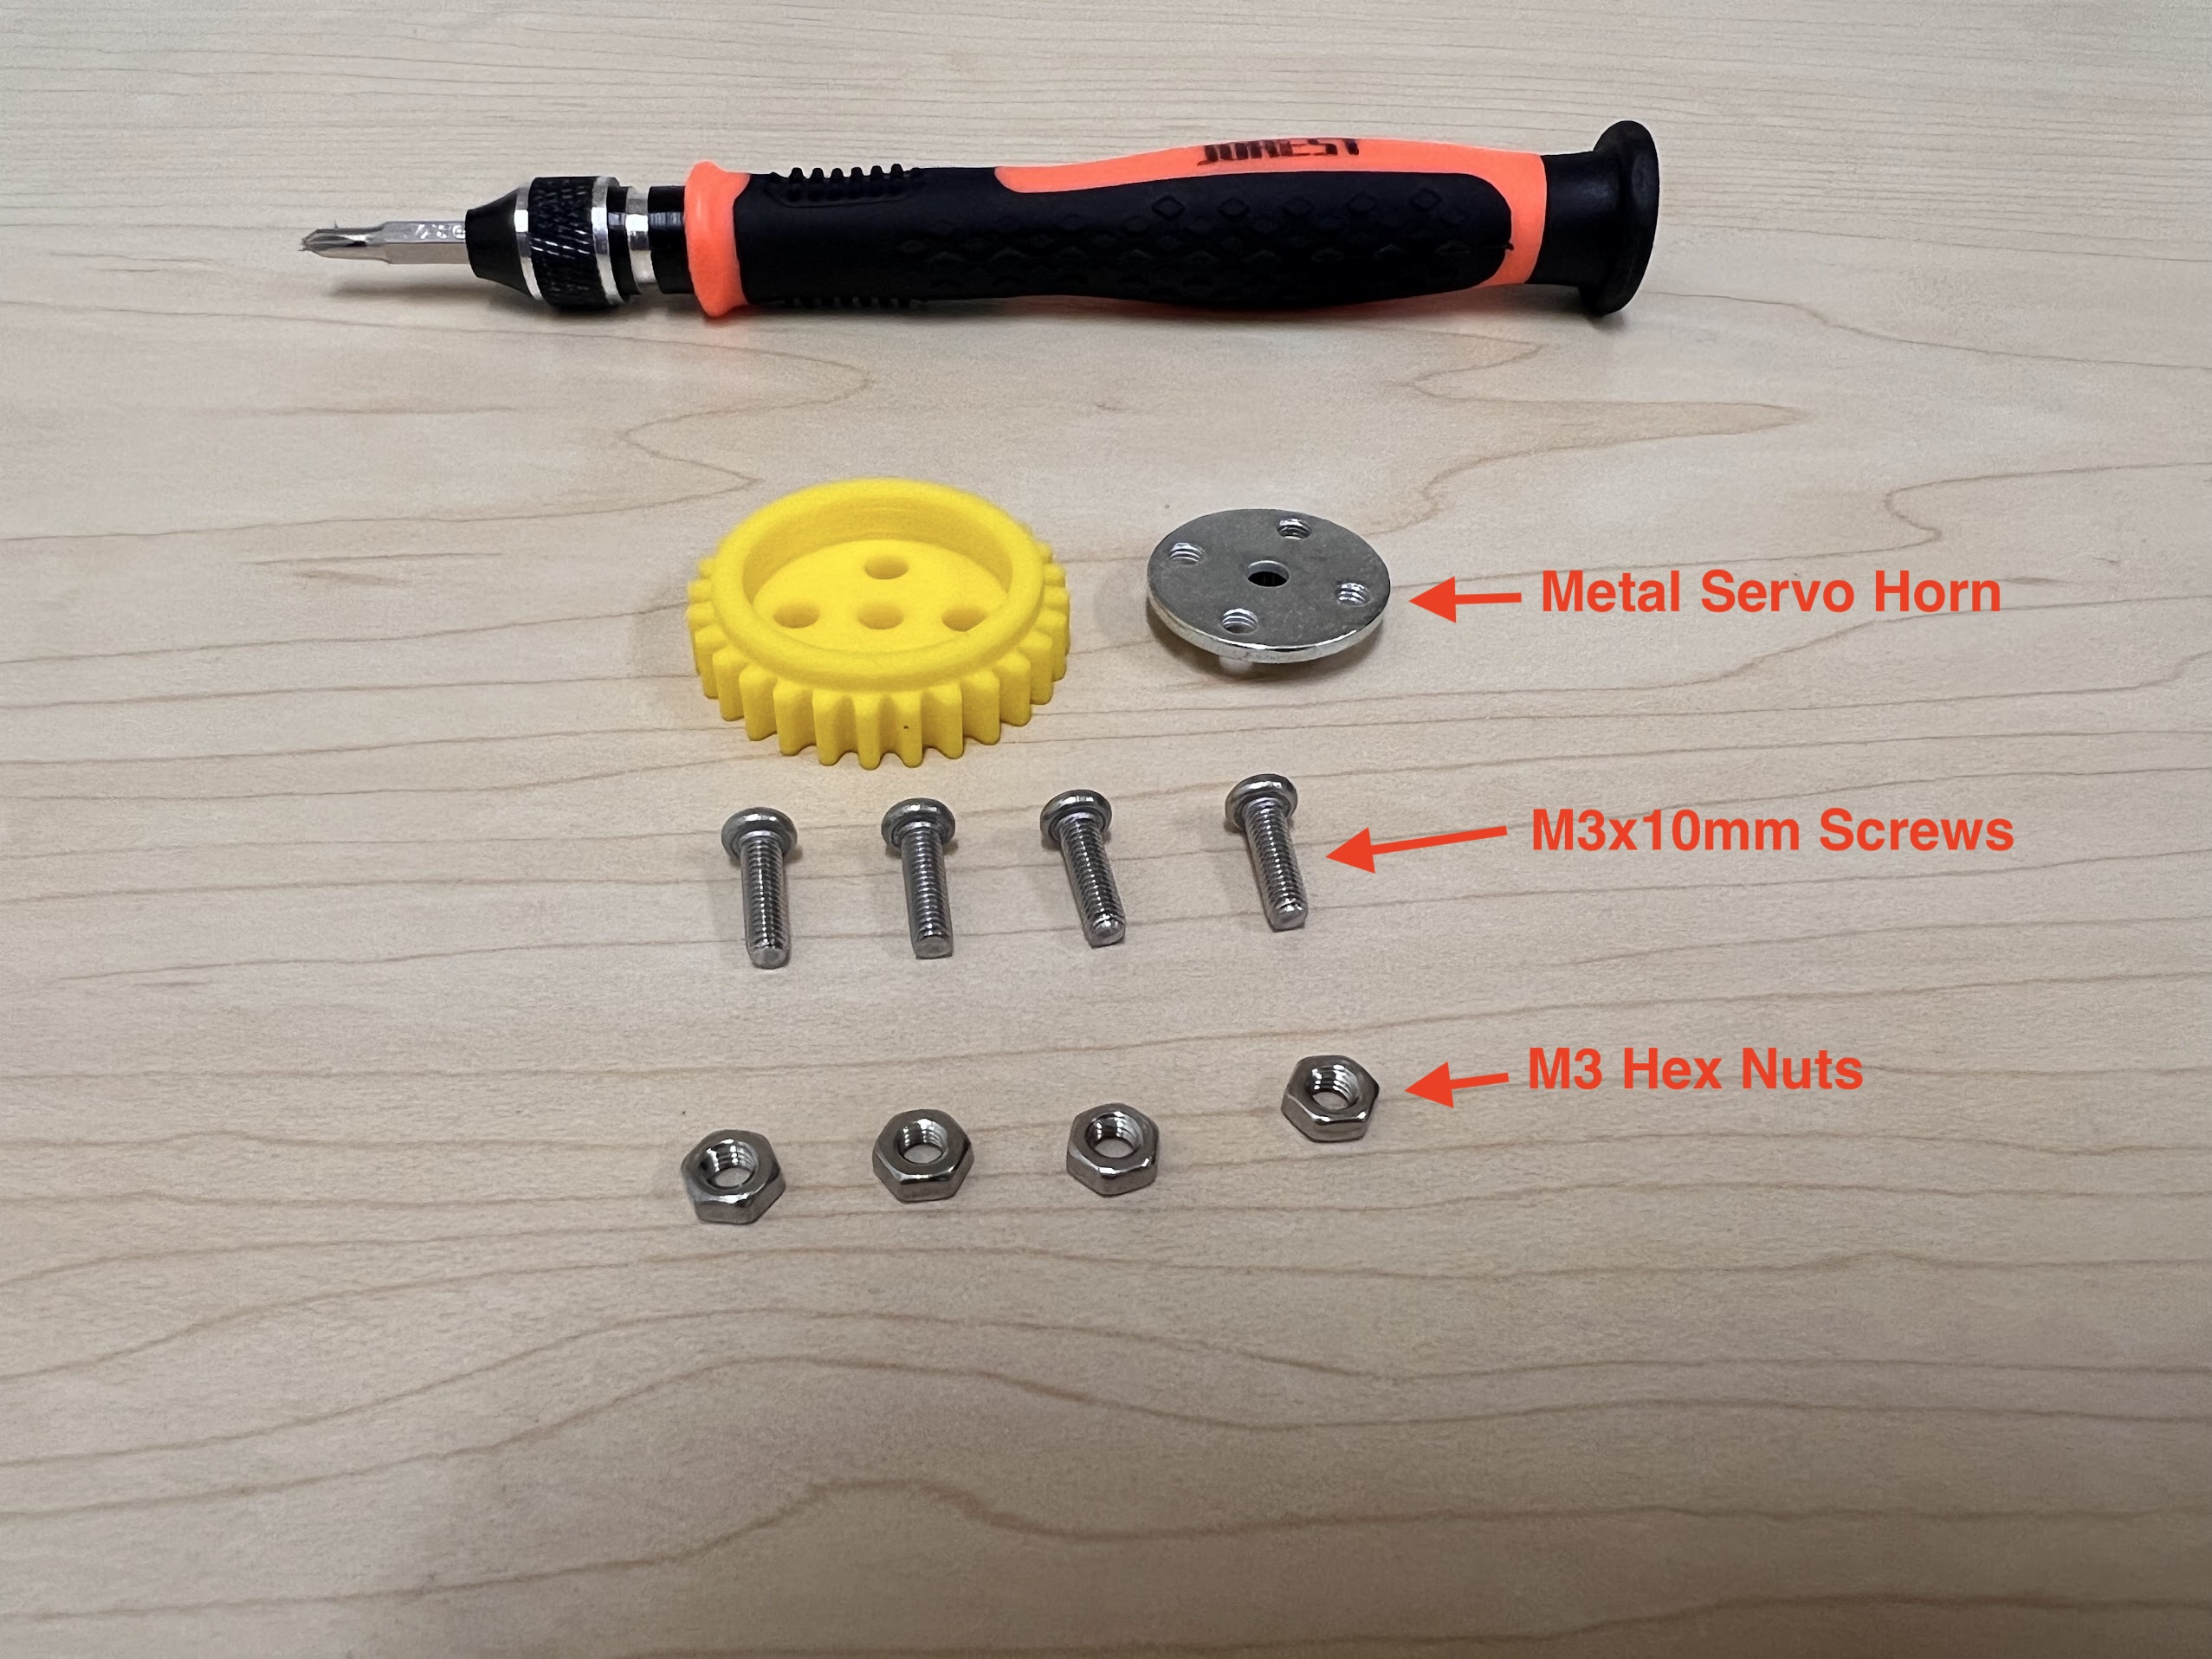
  • Assemble as follows and then tighten the nuts using the Adjustable Wrench.
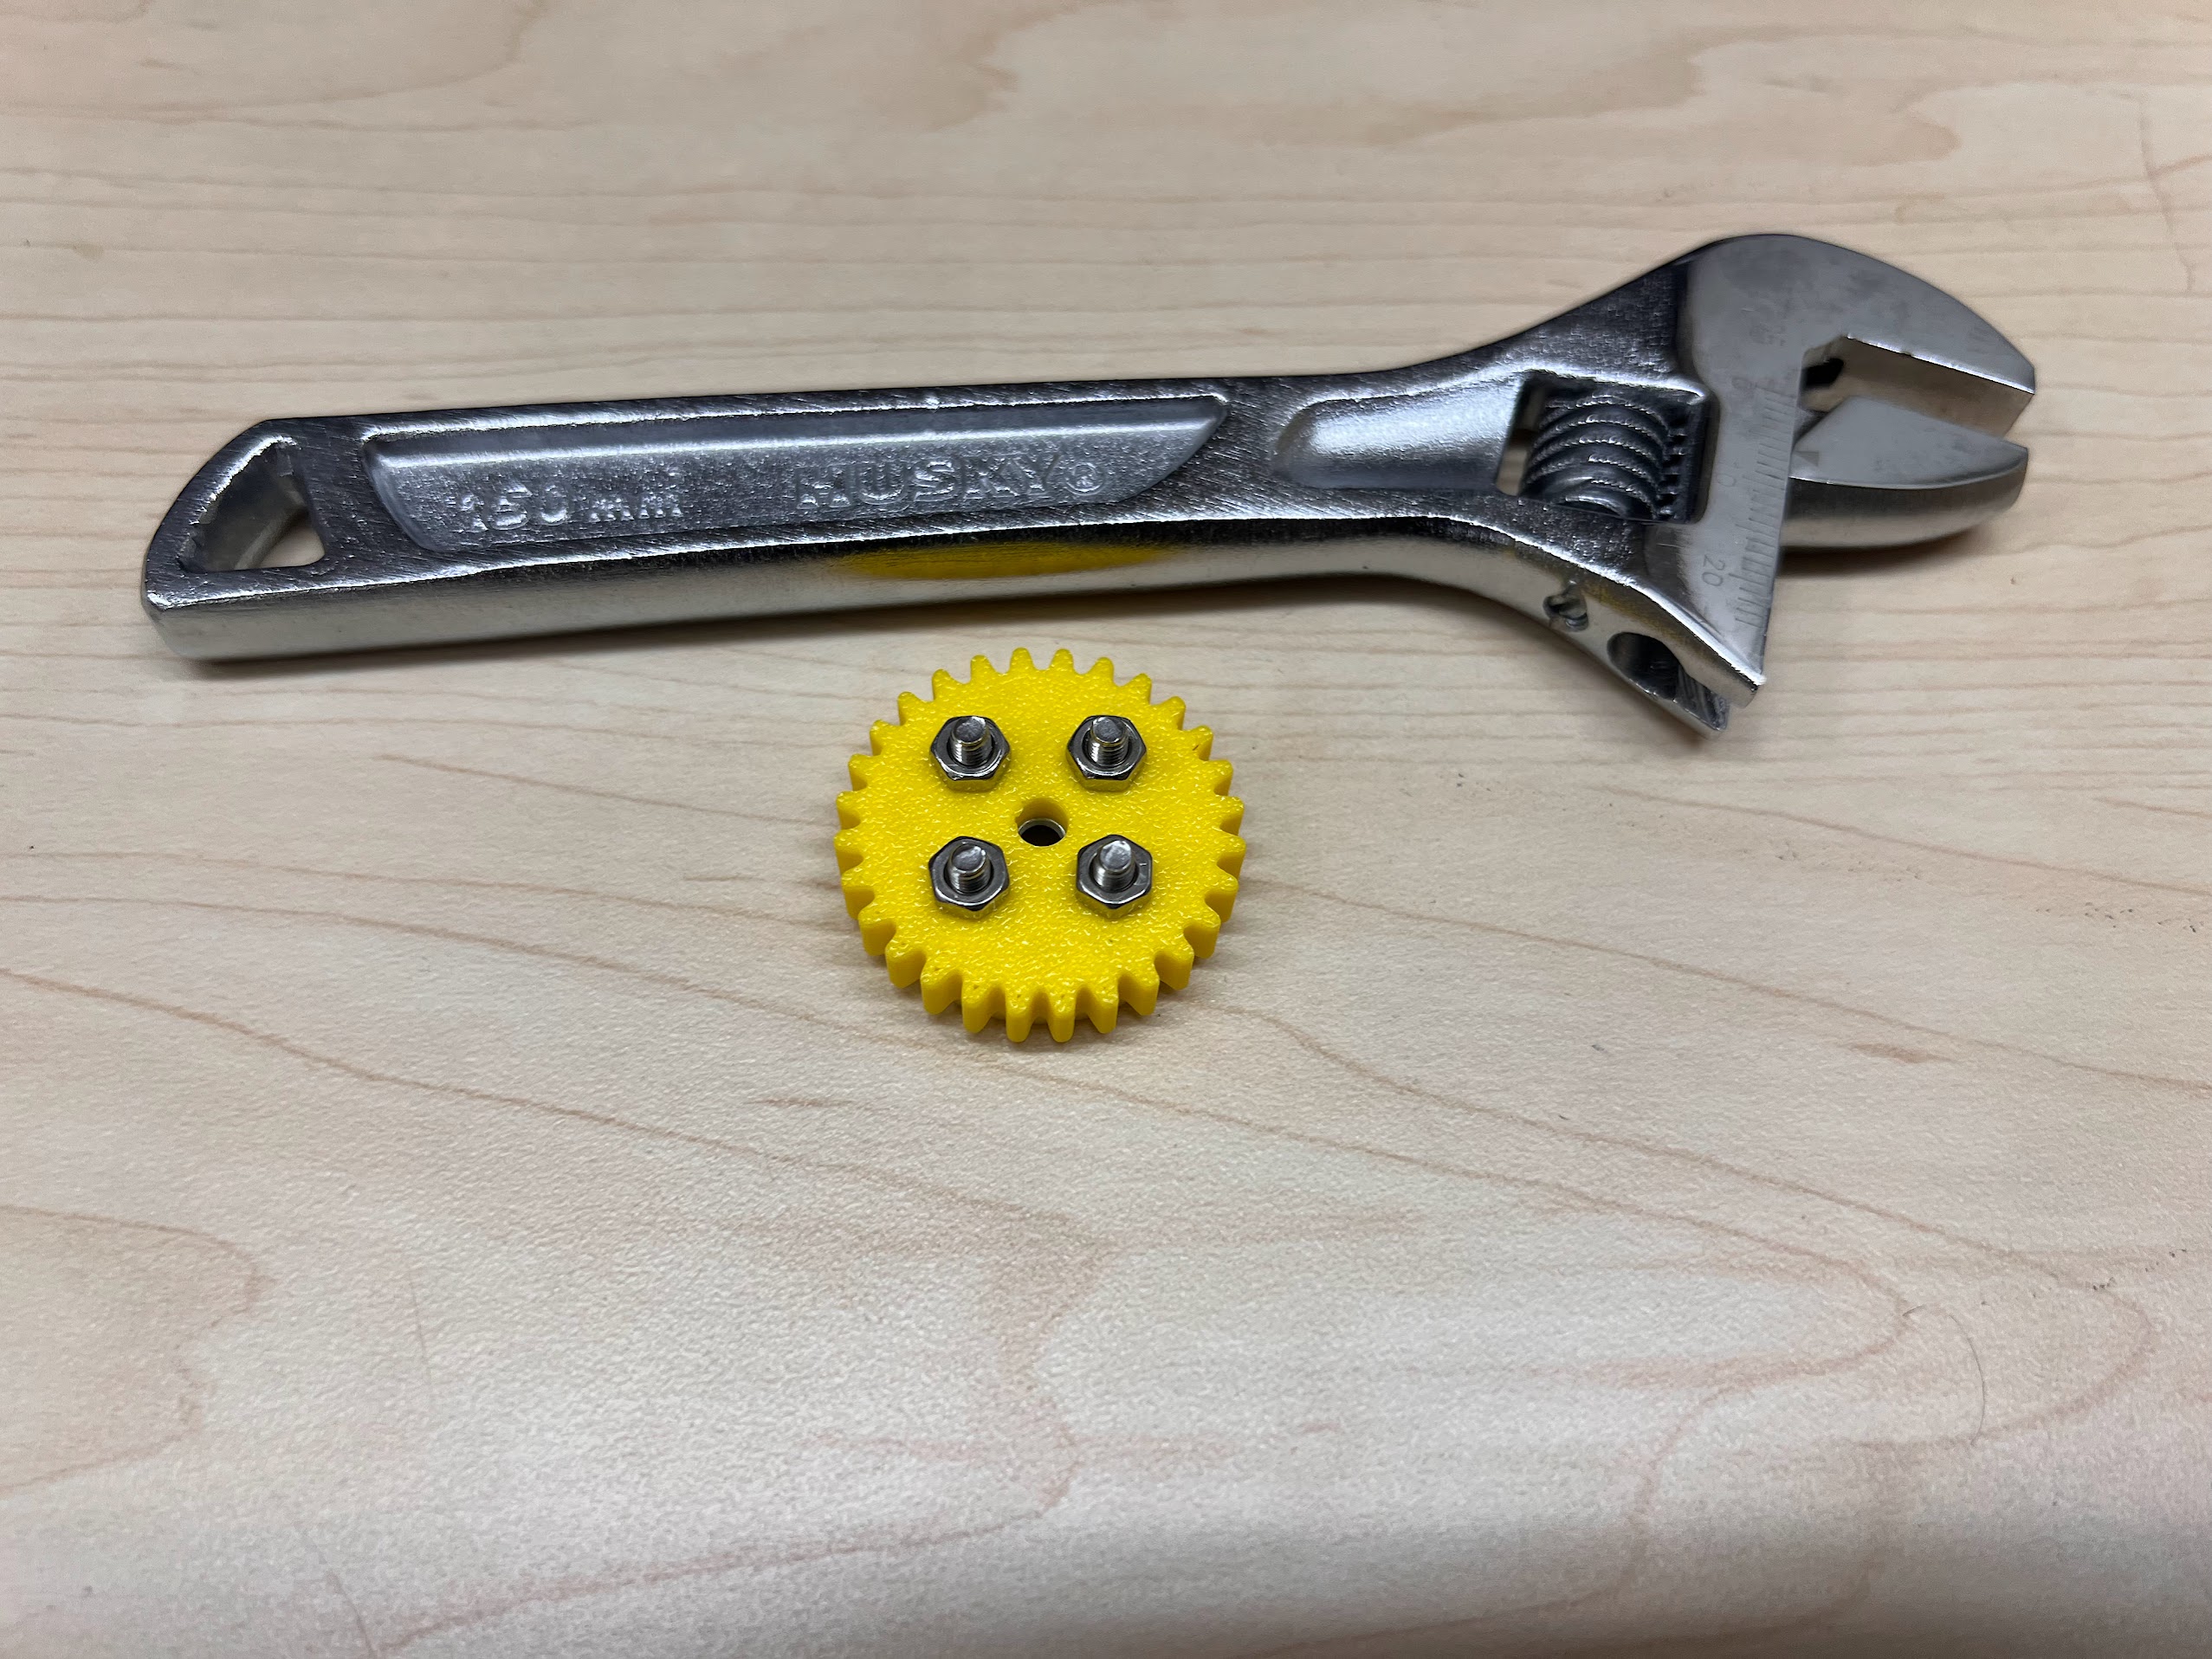
  • Using another M3x10mm Screw attach the Assembled Large Gear to the 20Kg Servo.


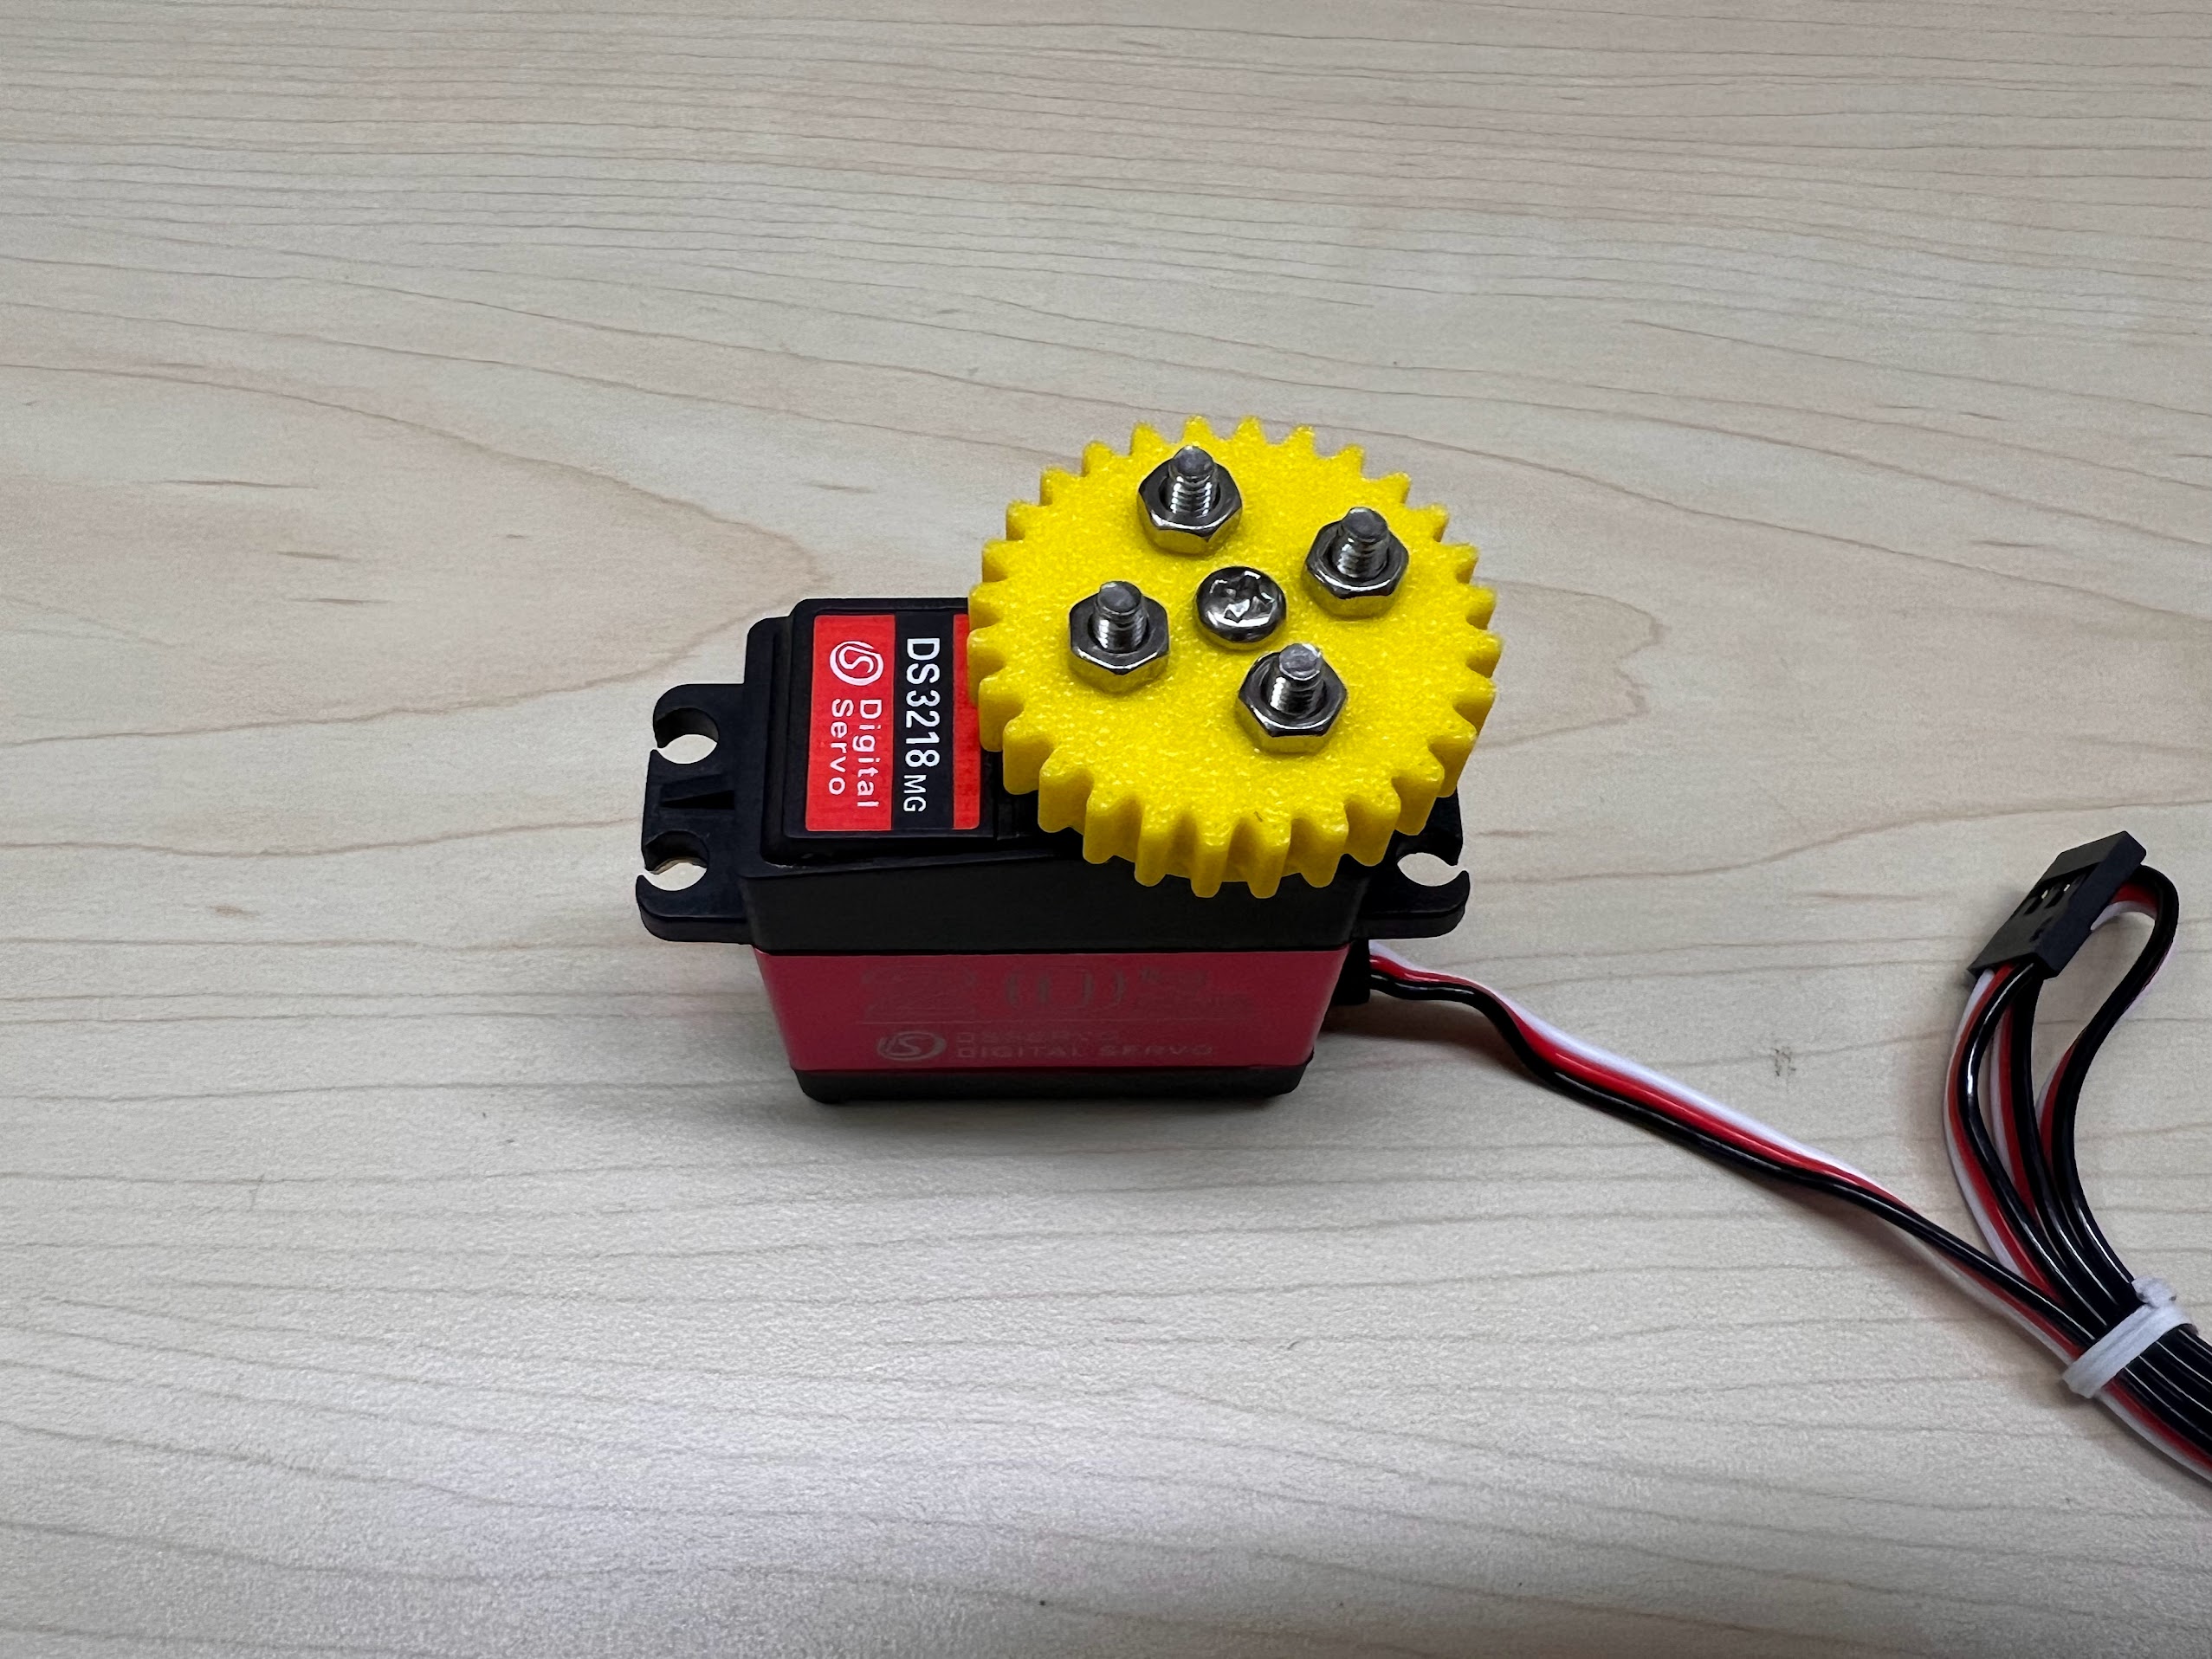
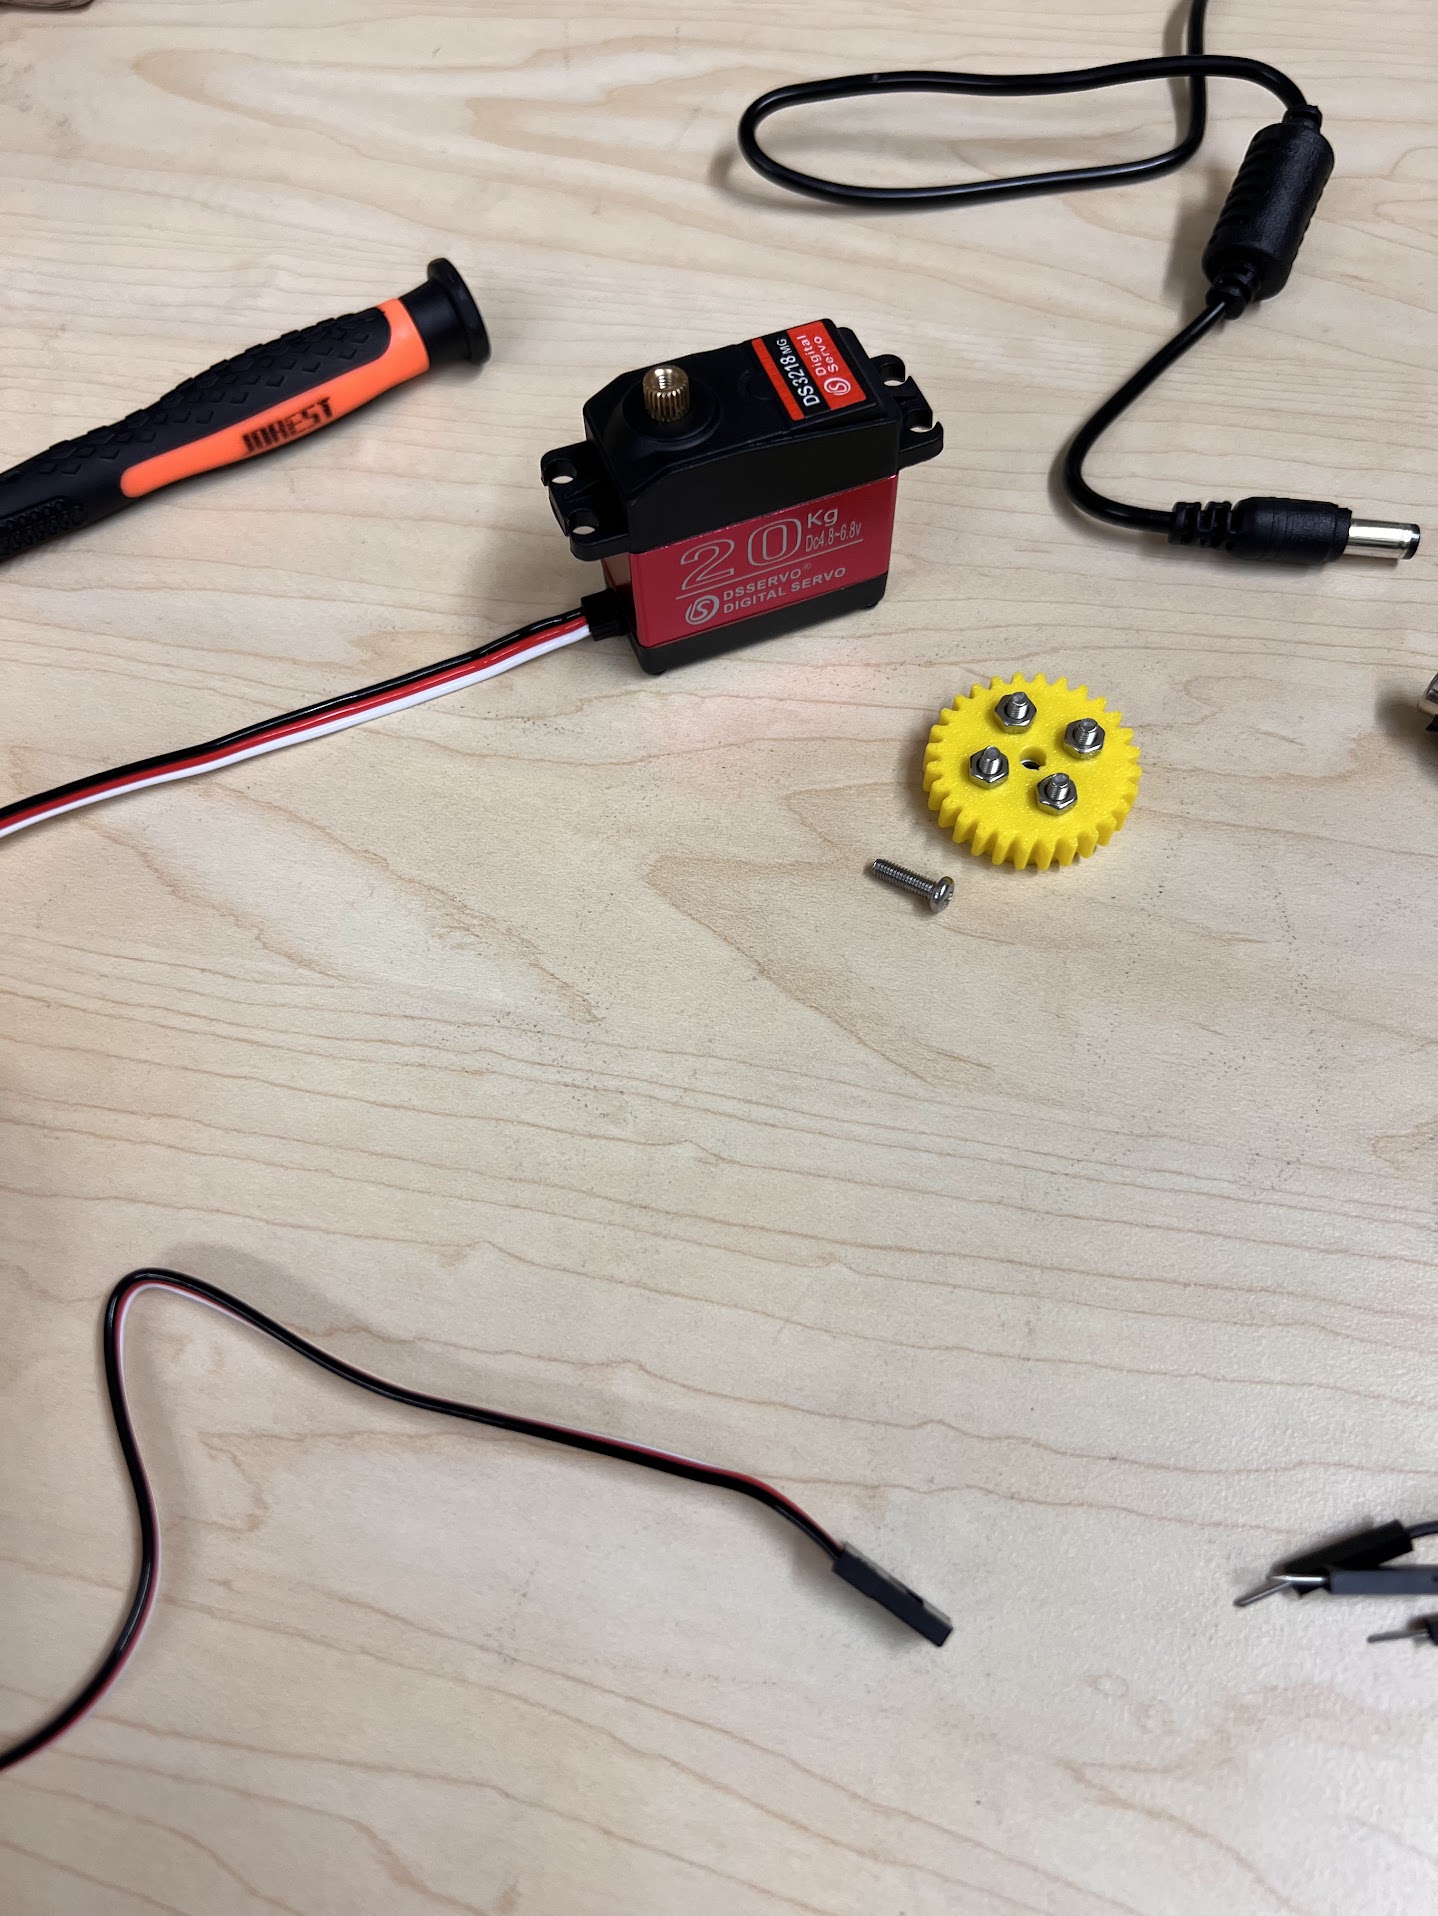
Testing the 20Kg Servo

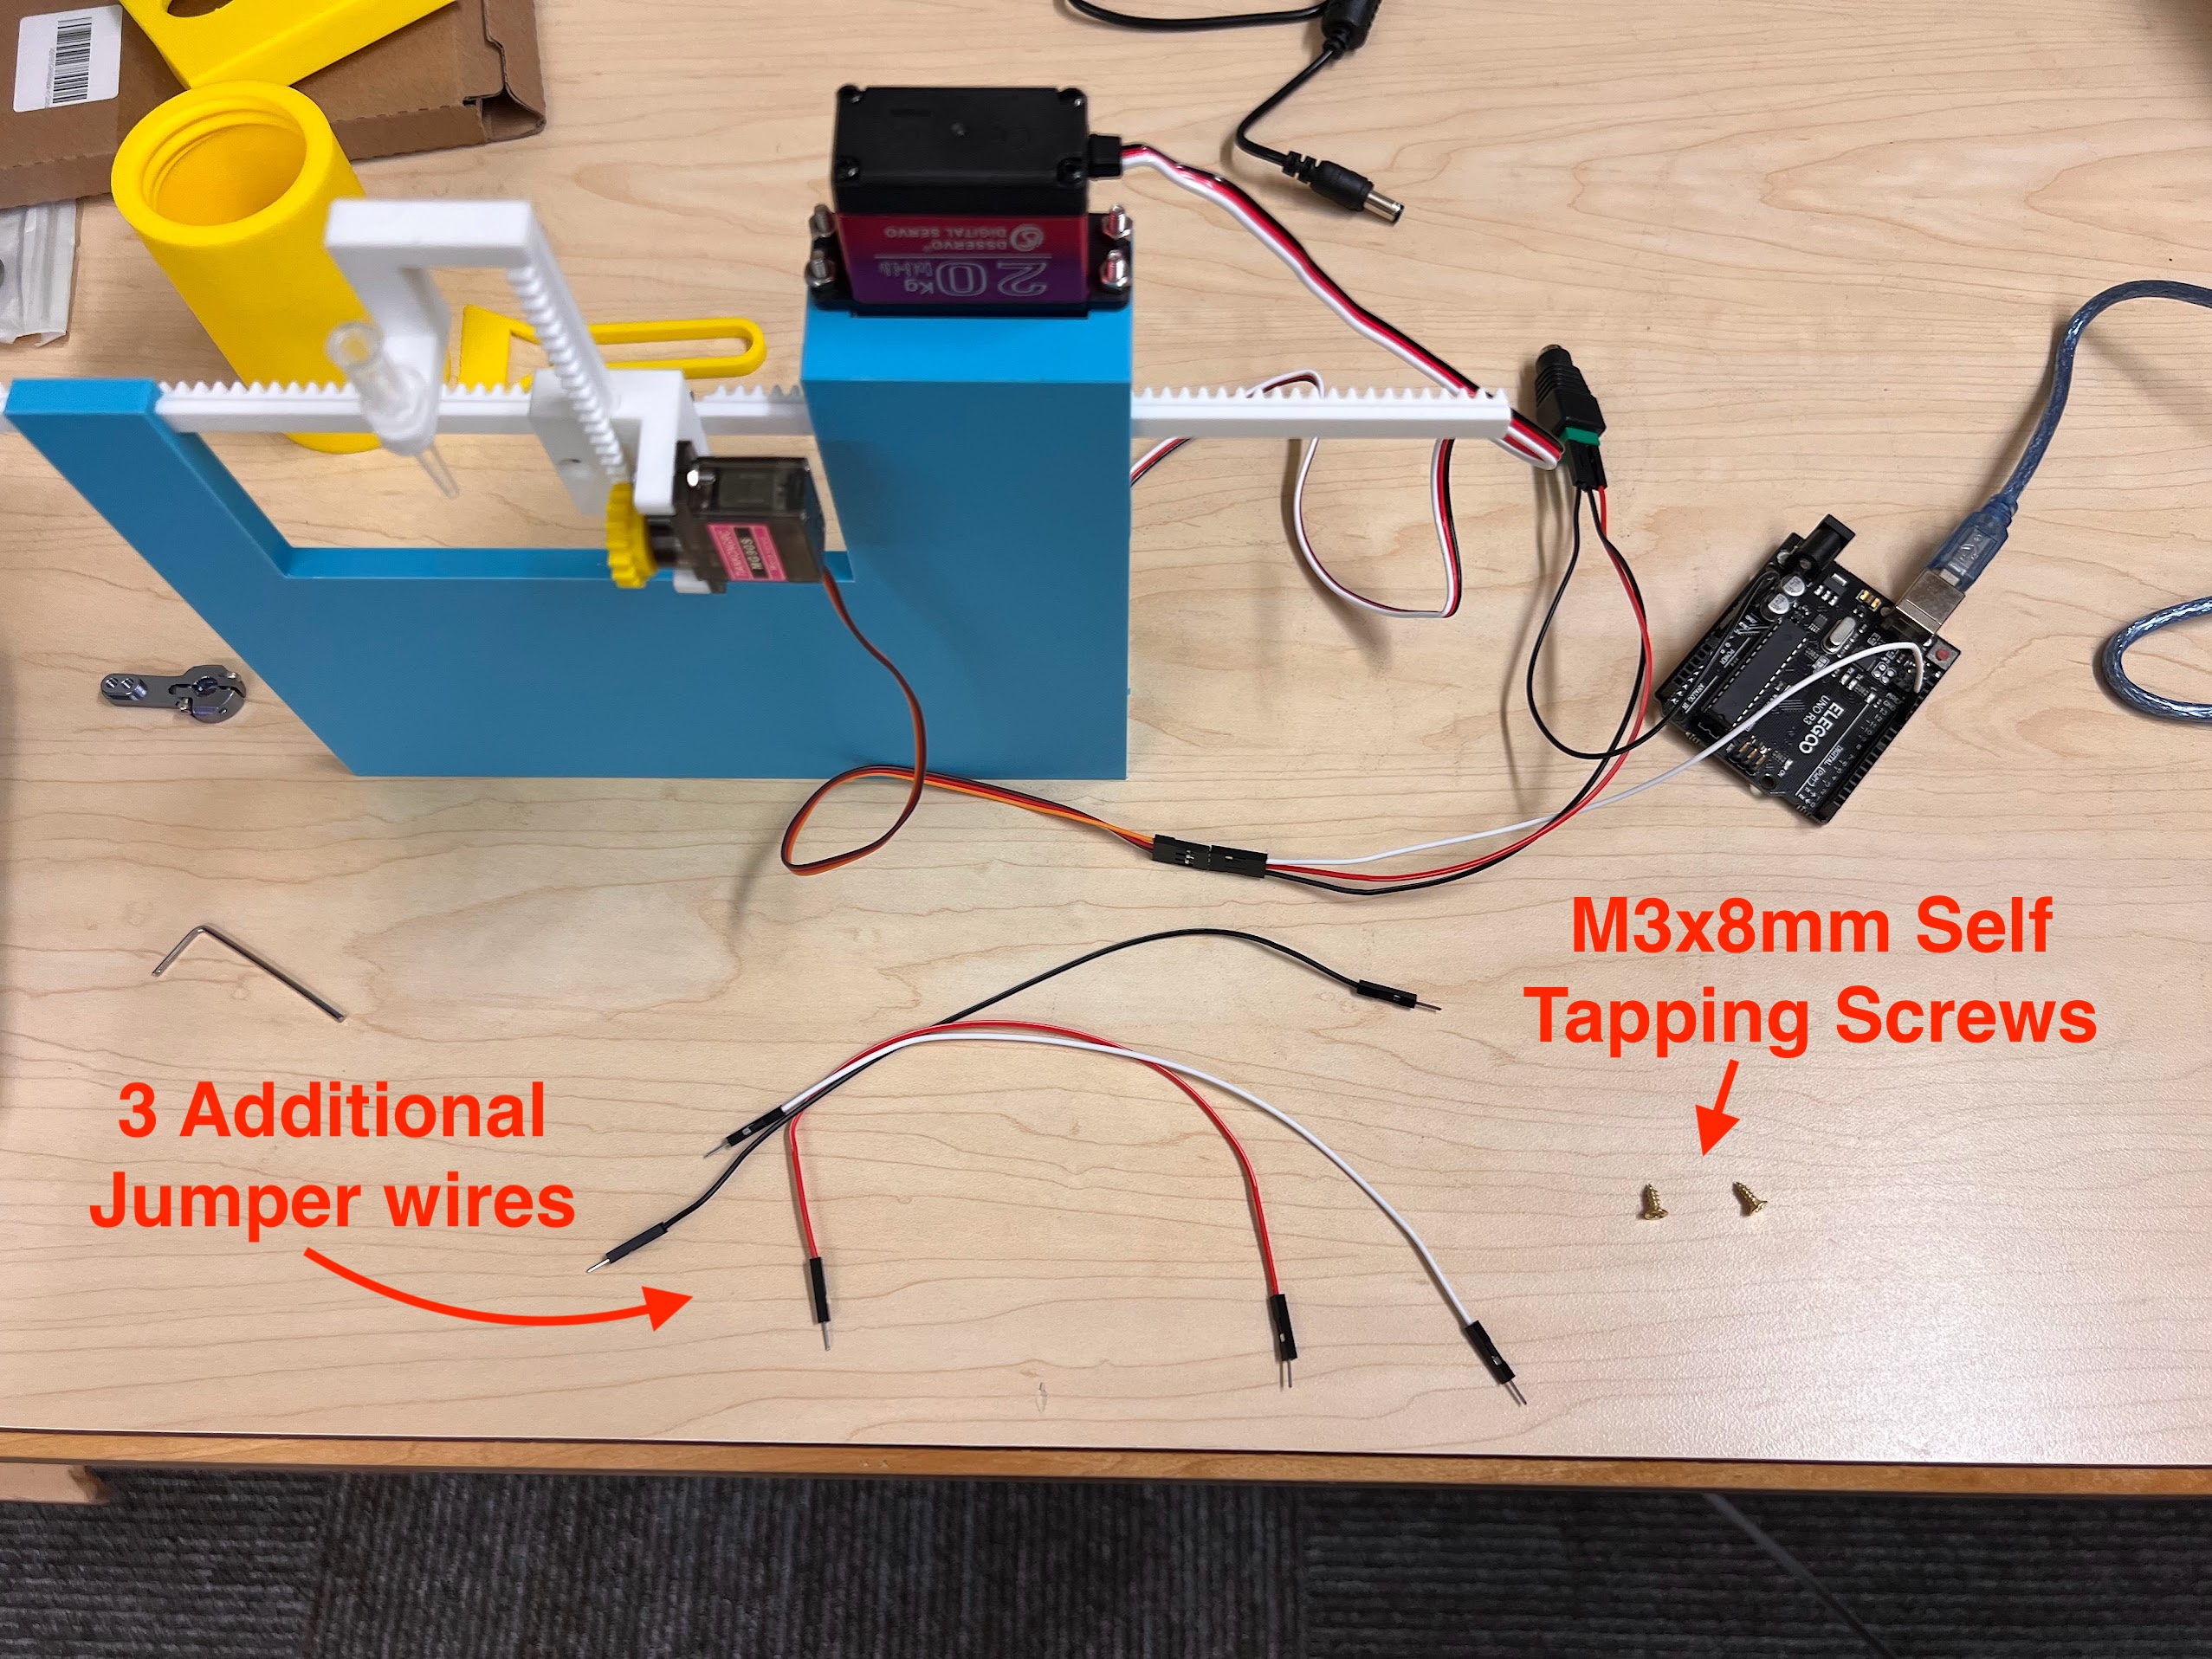
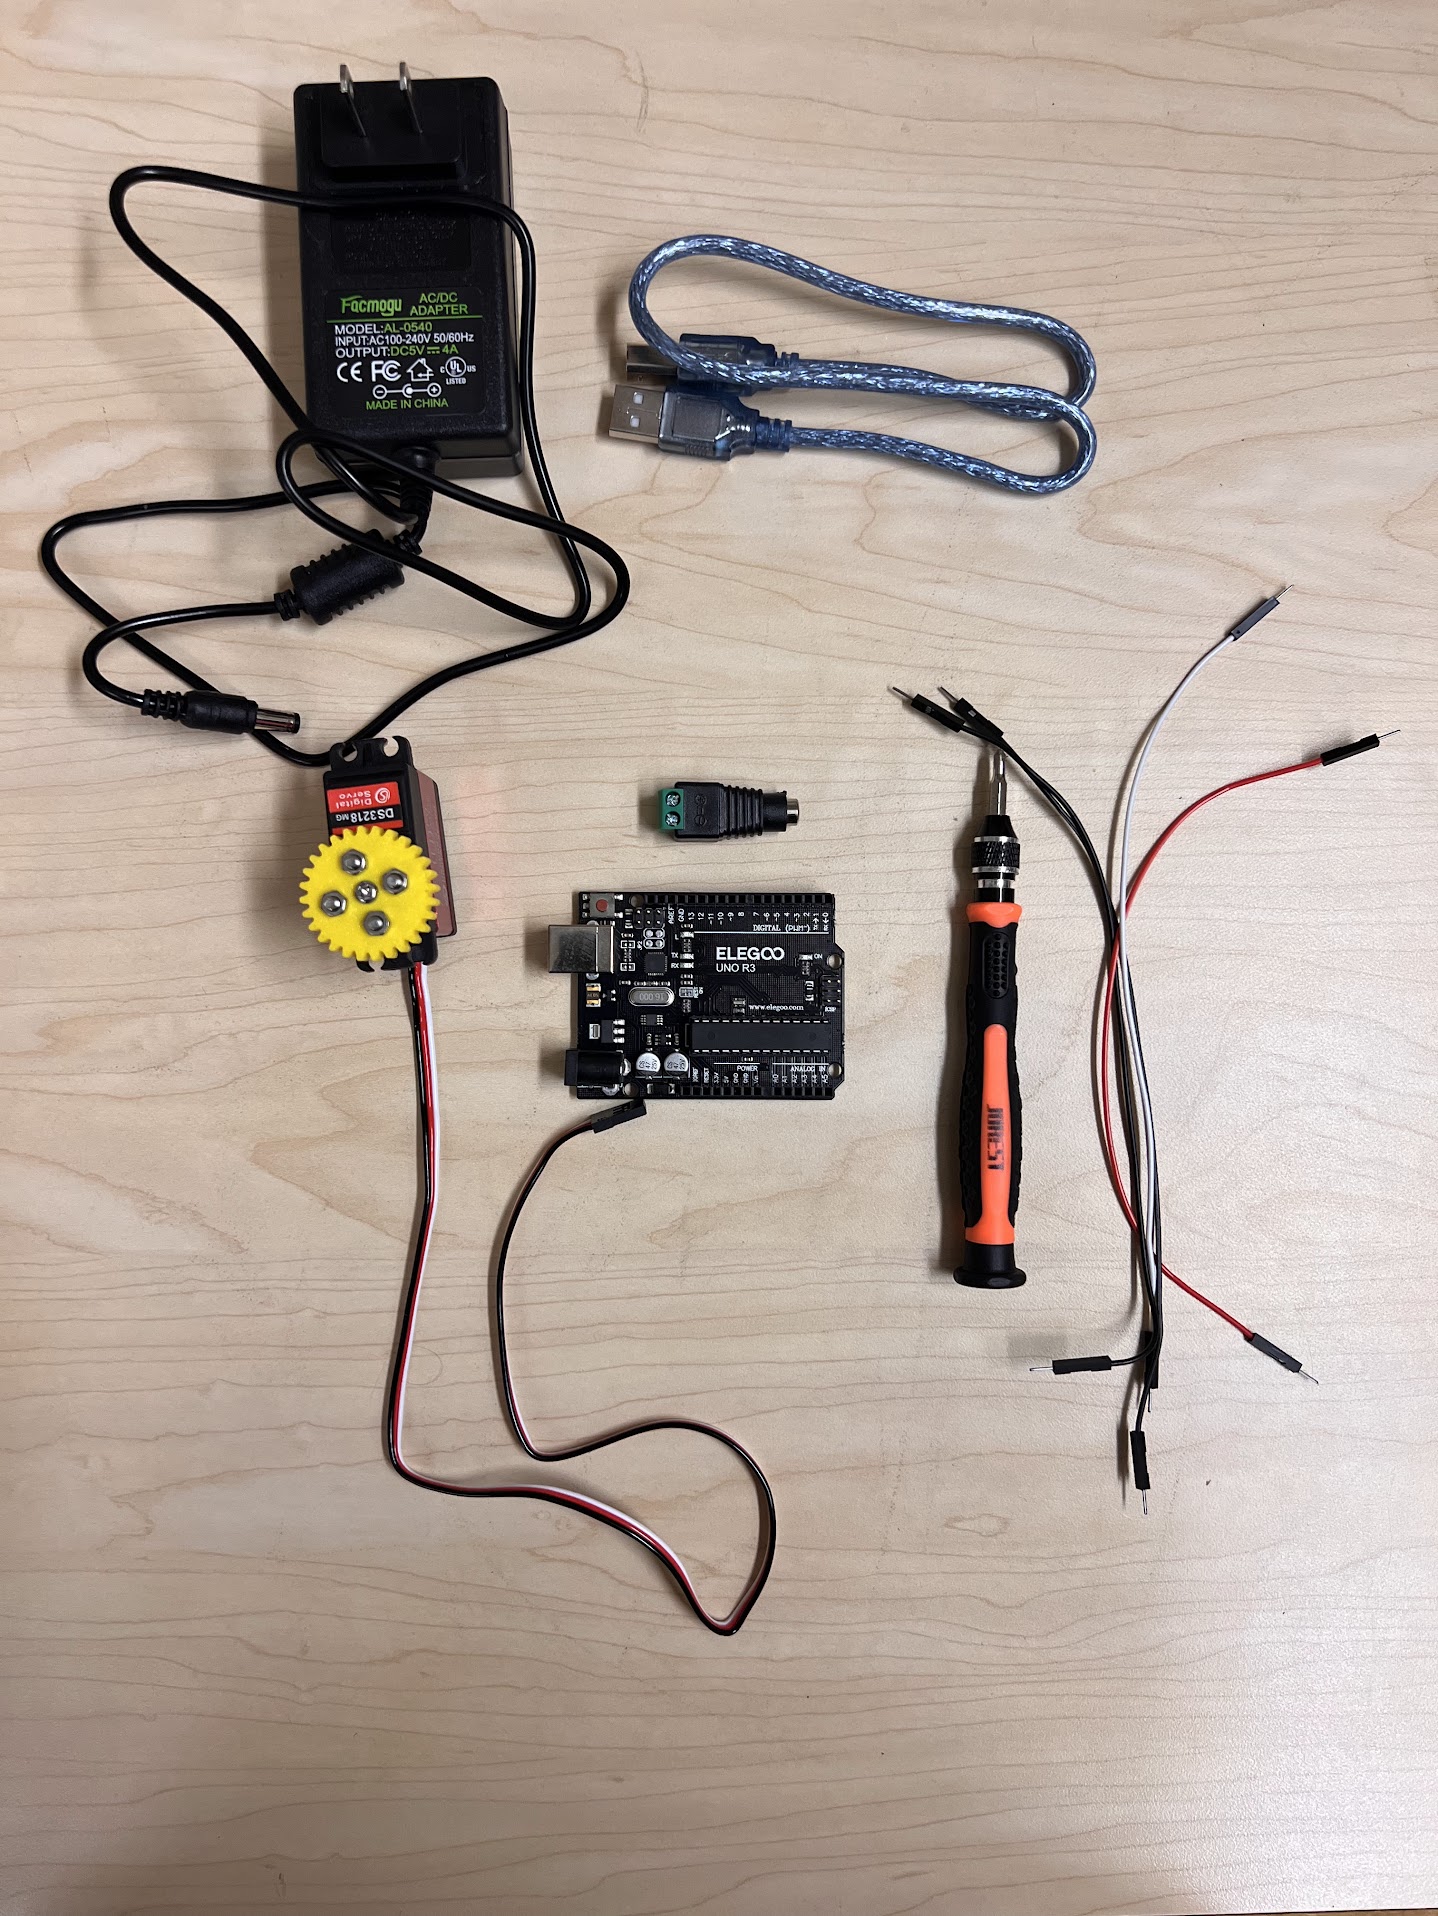
  • We will now connect our Servo to our UNO R3 Board and computer to test it. You will need the following components:
    • Female DC Barrel Breakout Screw Terminal
    • Male to Male: Red, White and Two Black Jumper Wires
    • Arduino UNO R3 Board and USB Cable
    • Servo with the Assembled Horn
    • 20W 5V Power Supply
    • Phillips Head Screw Driver.
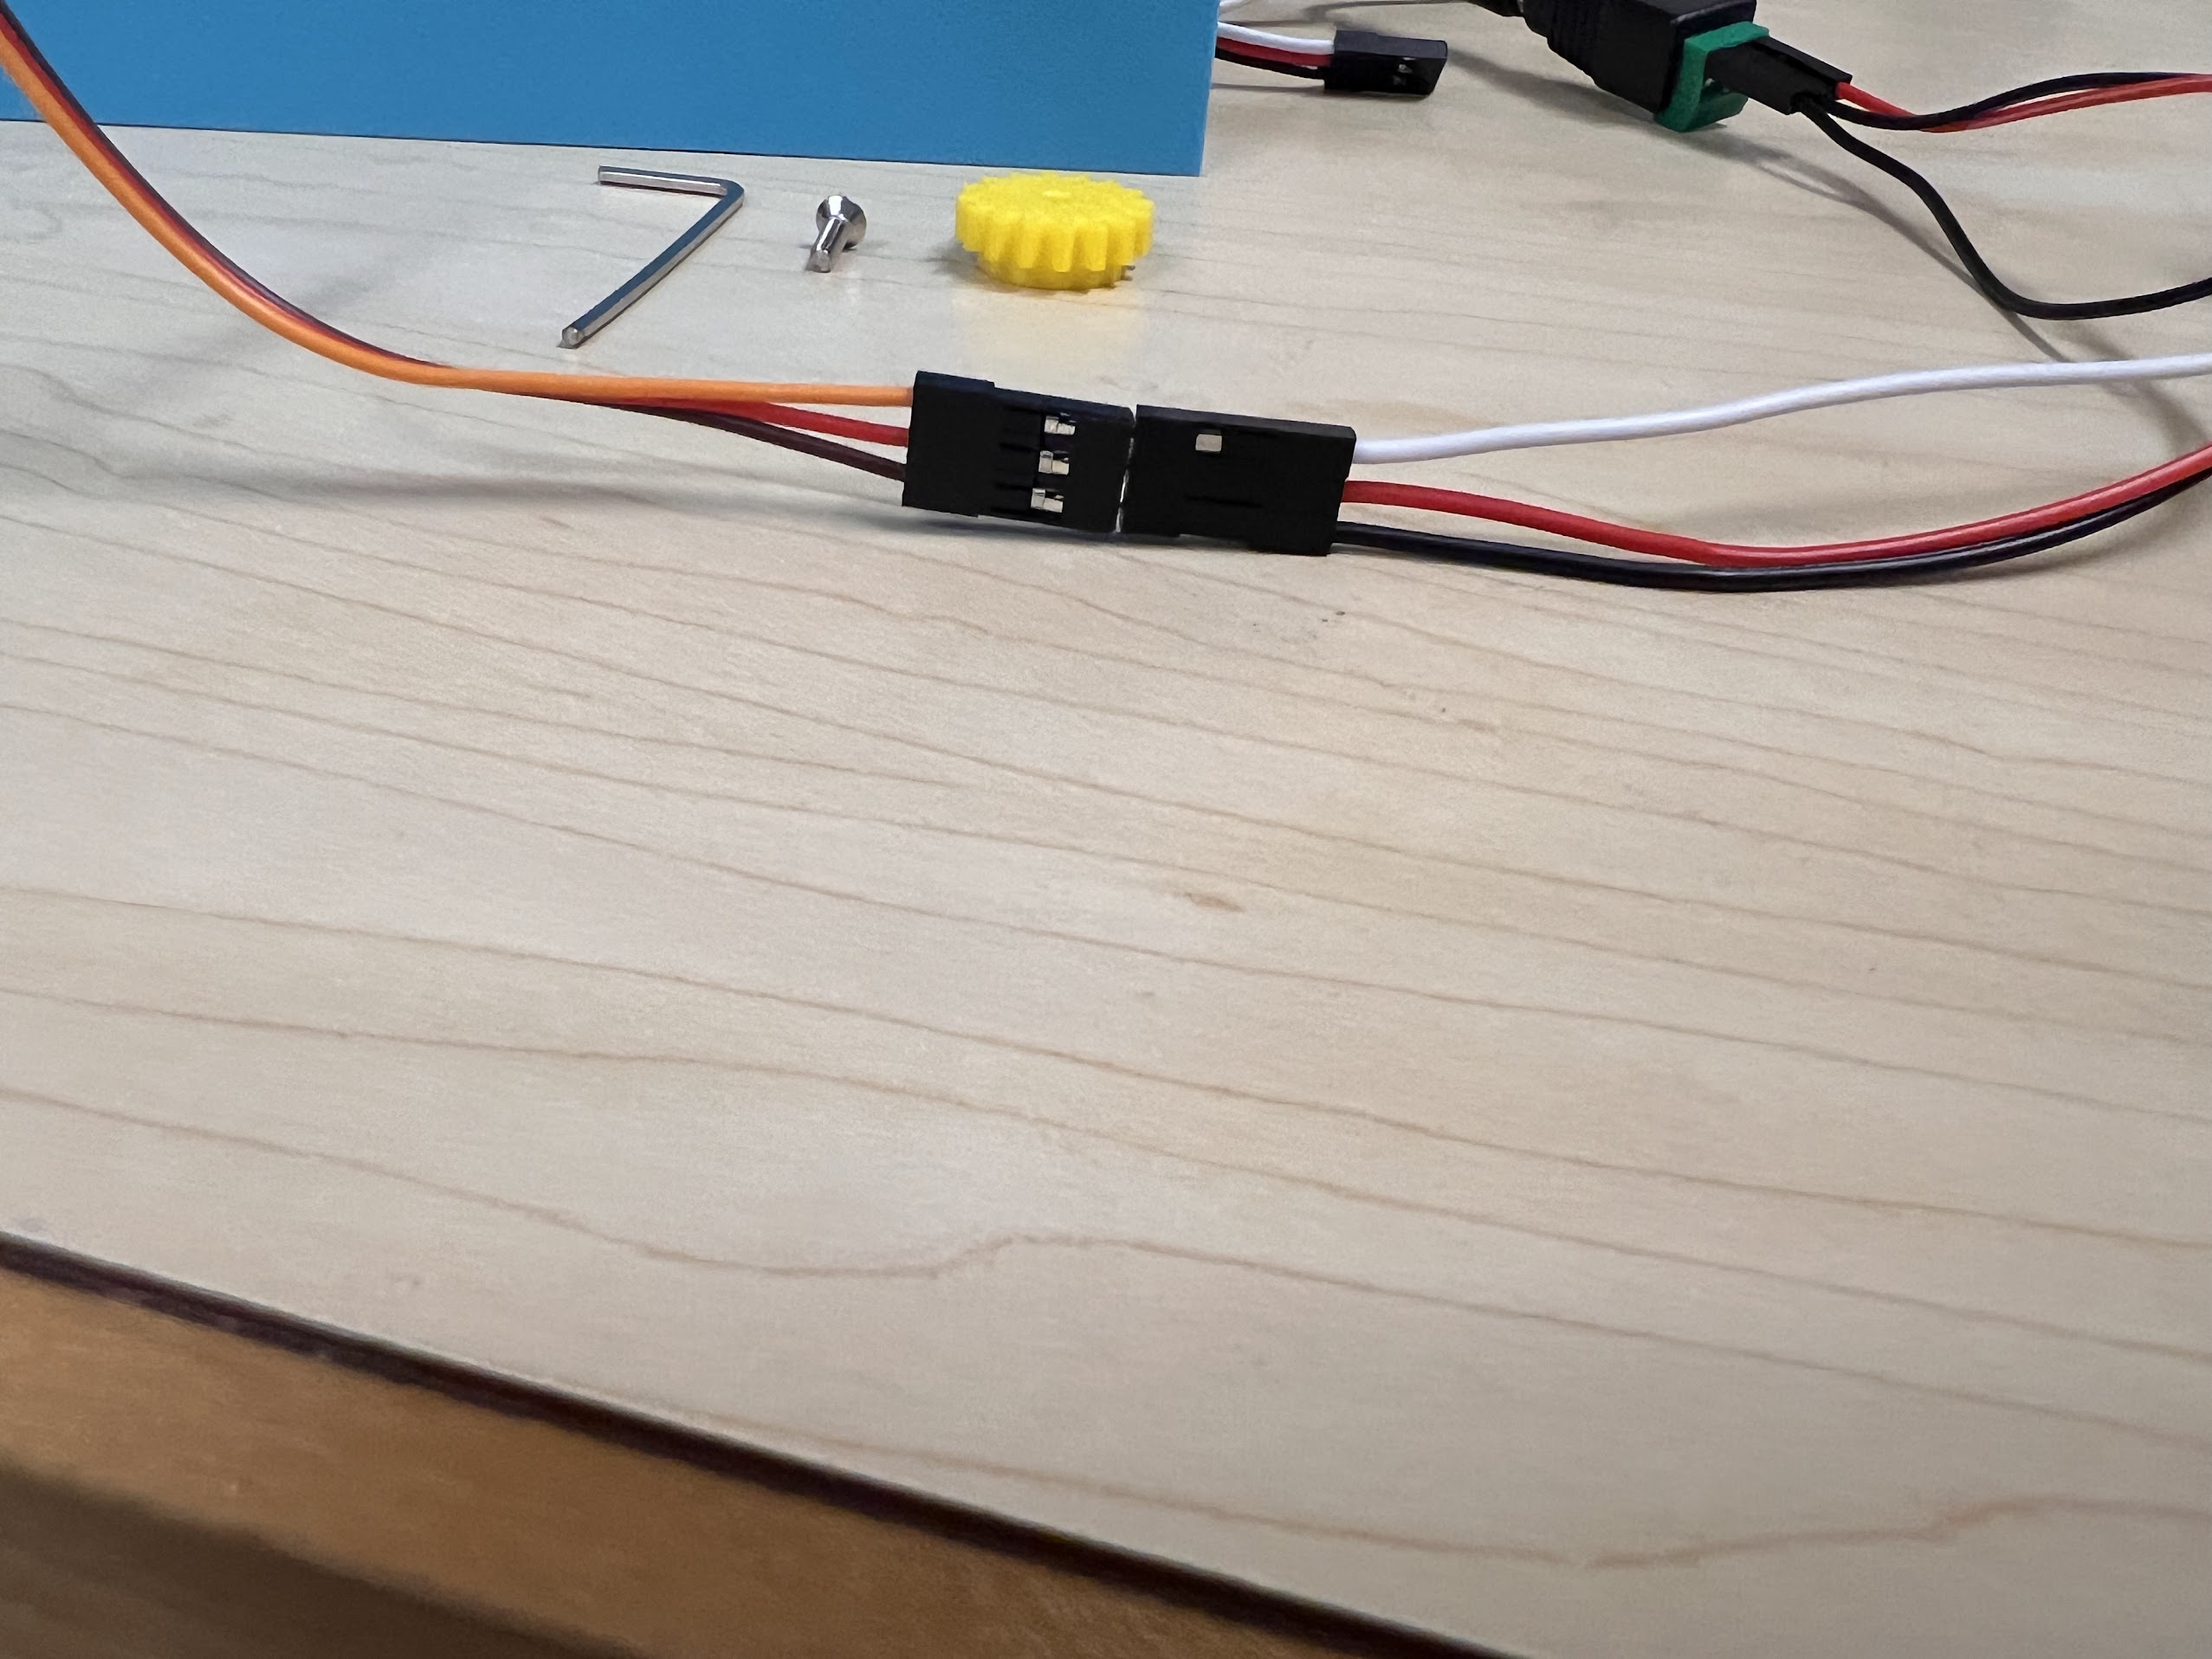
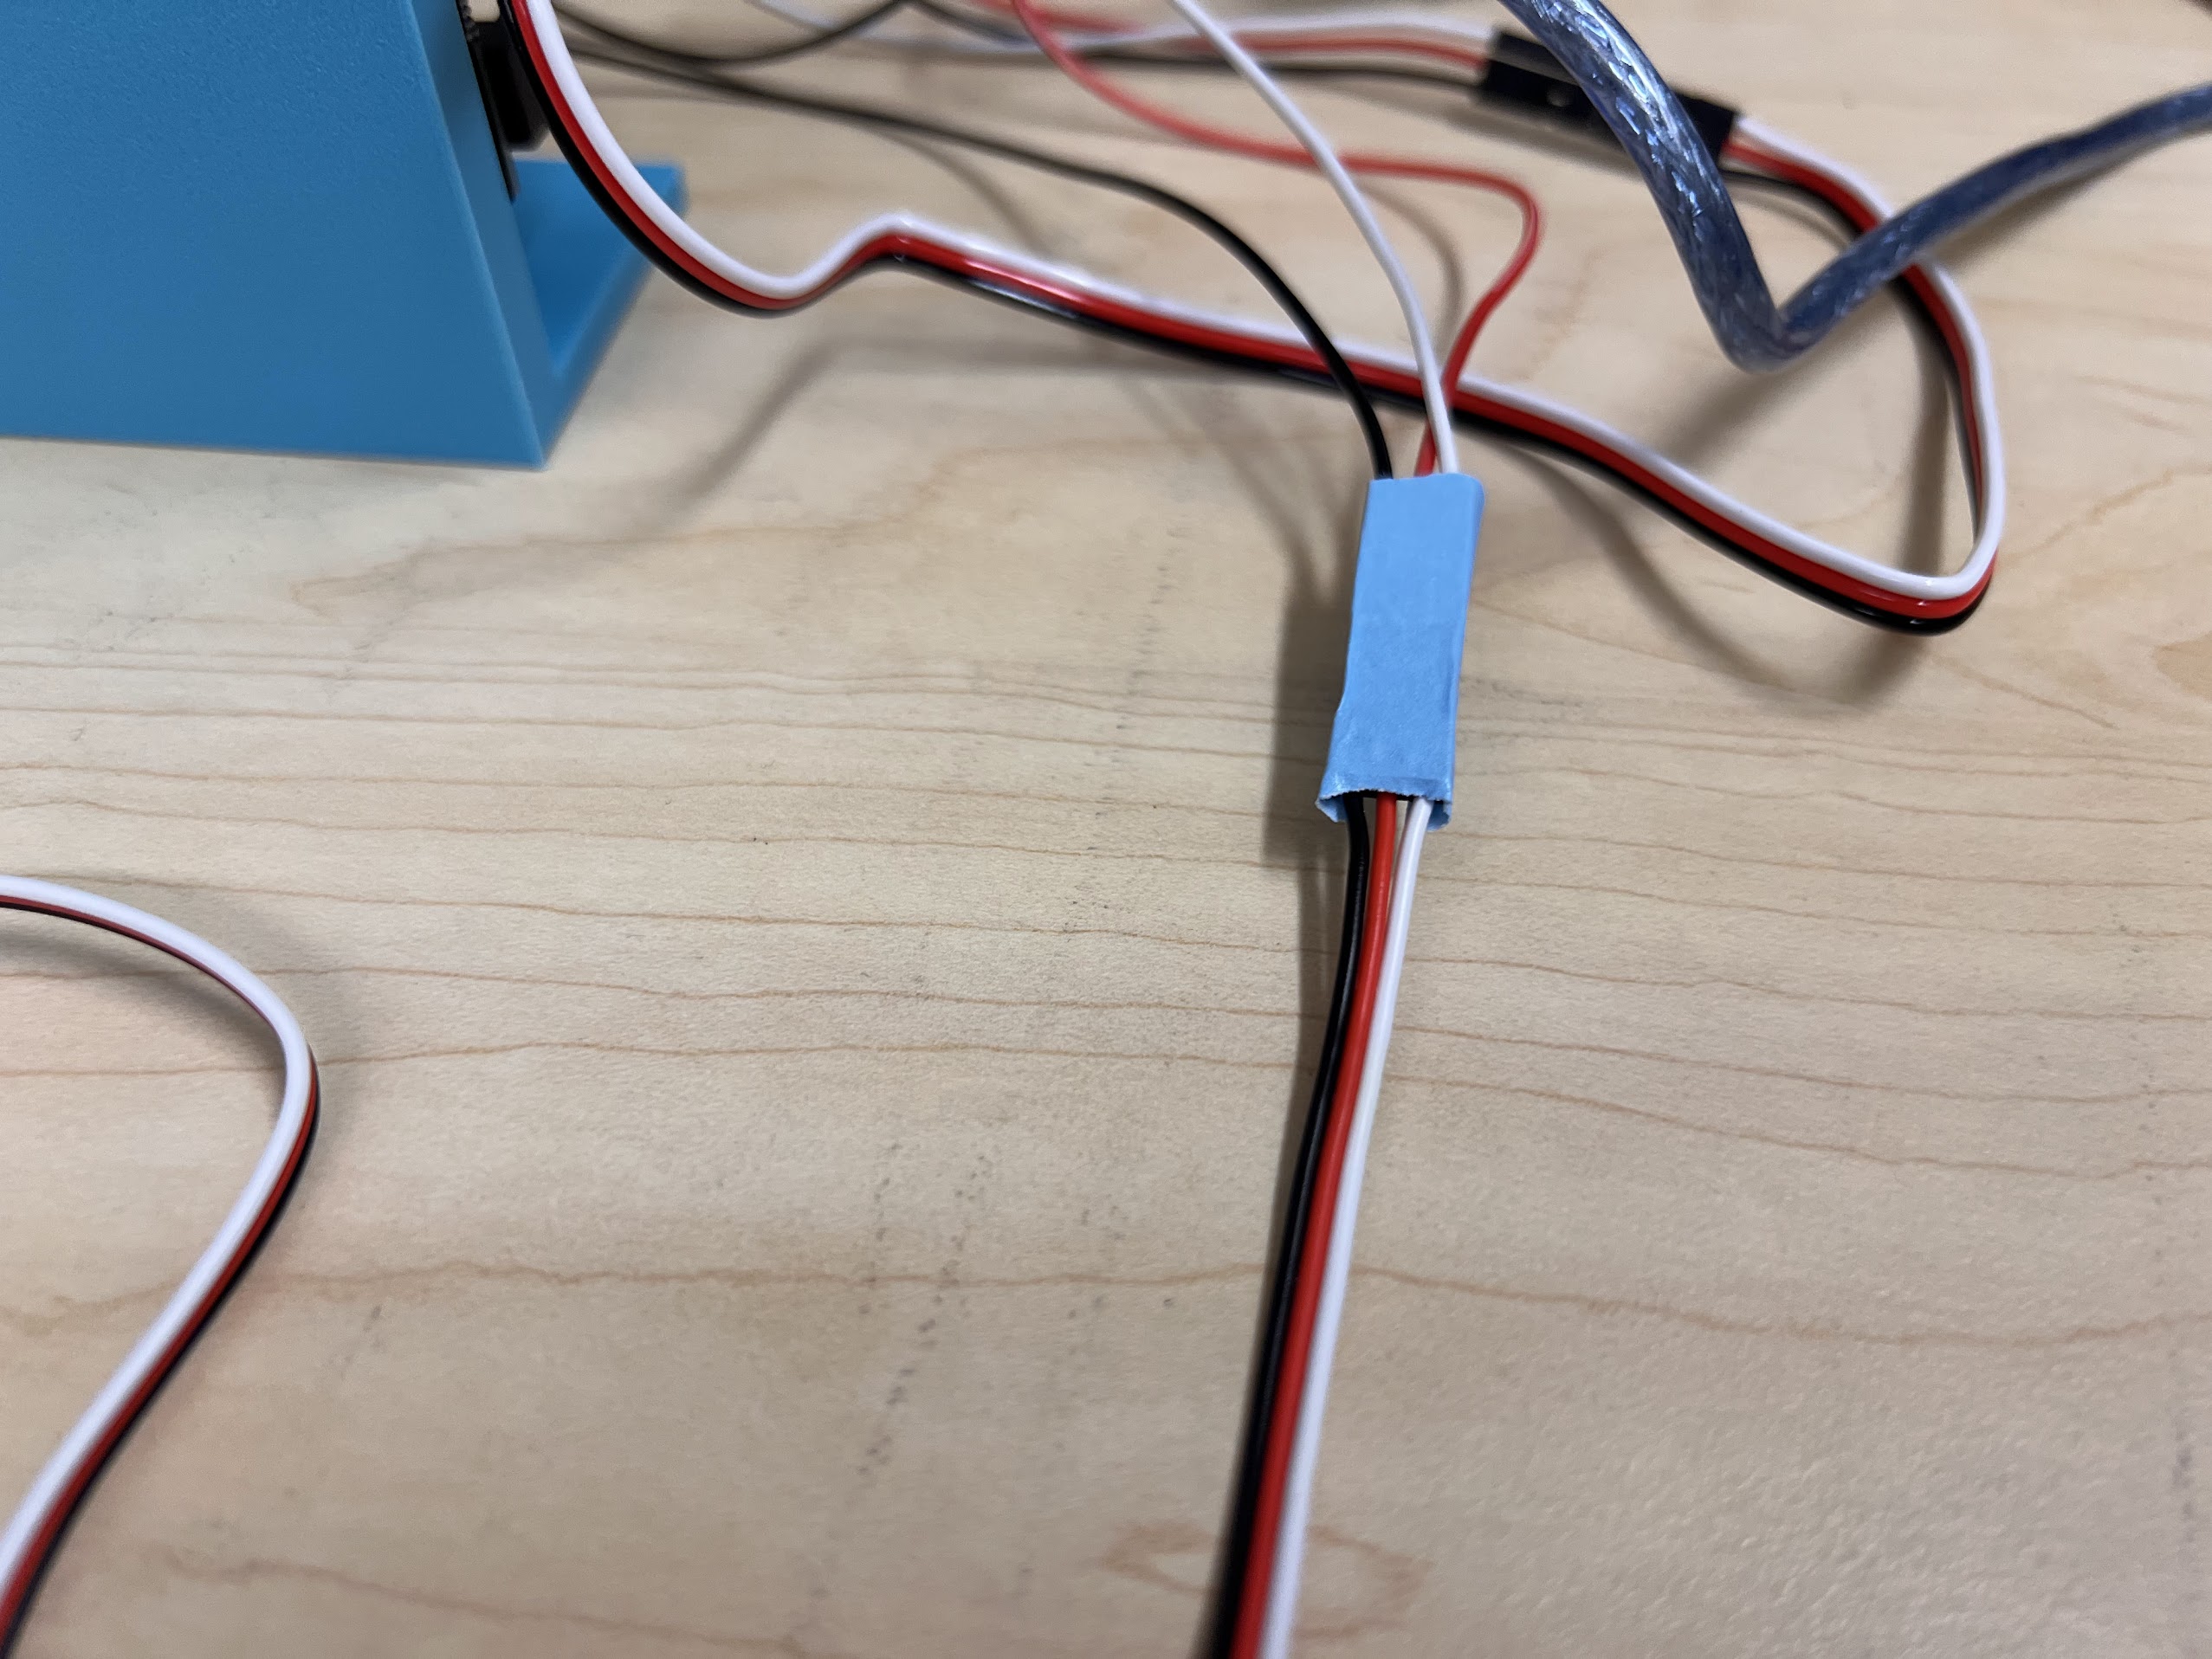
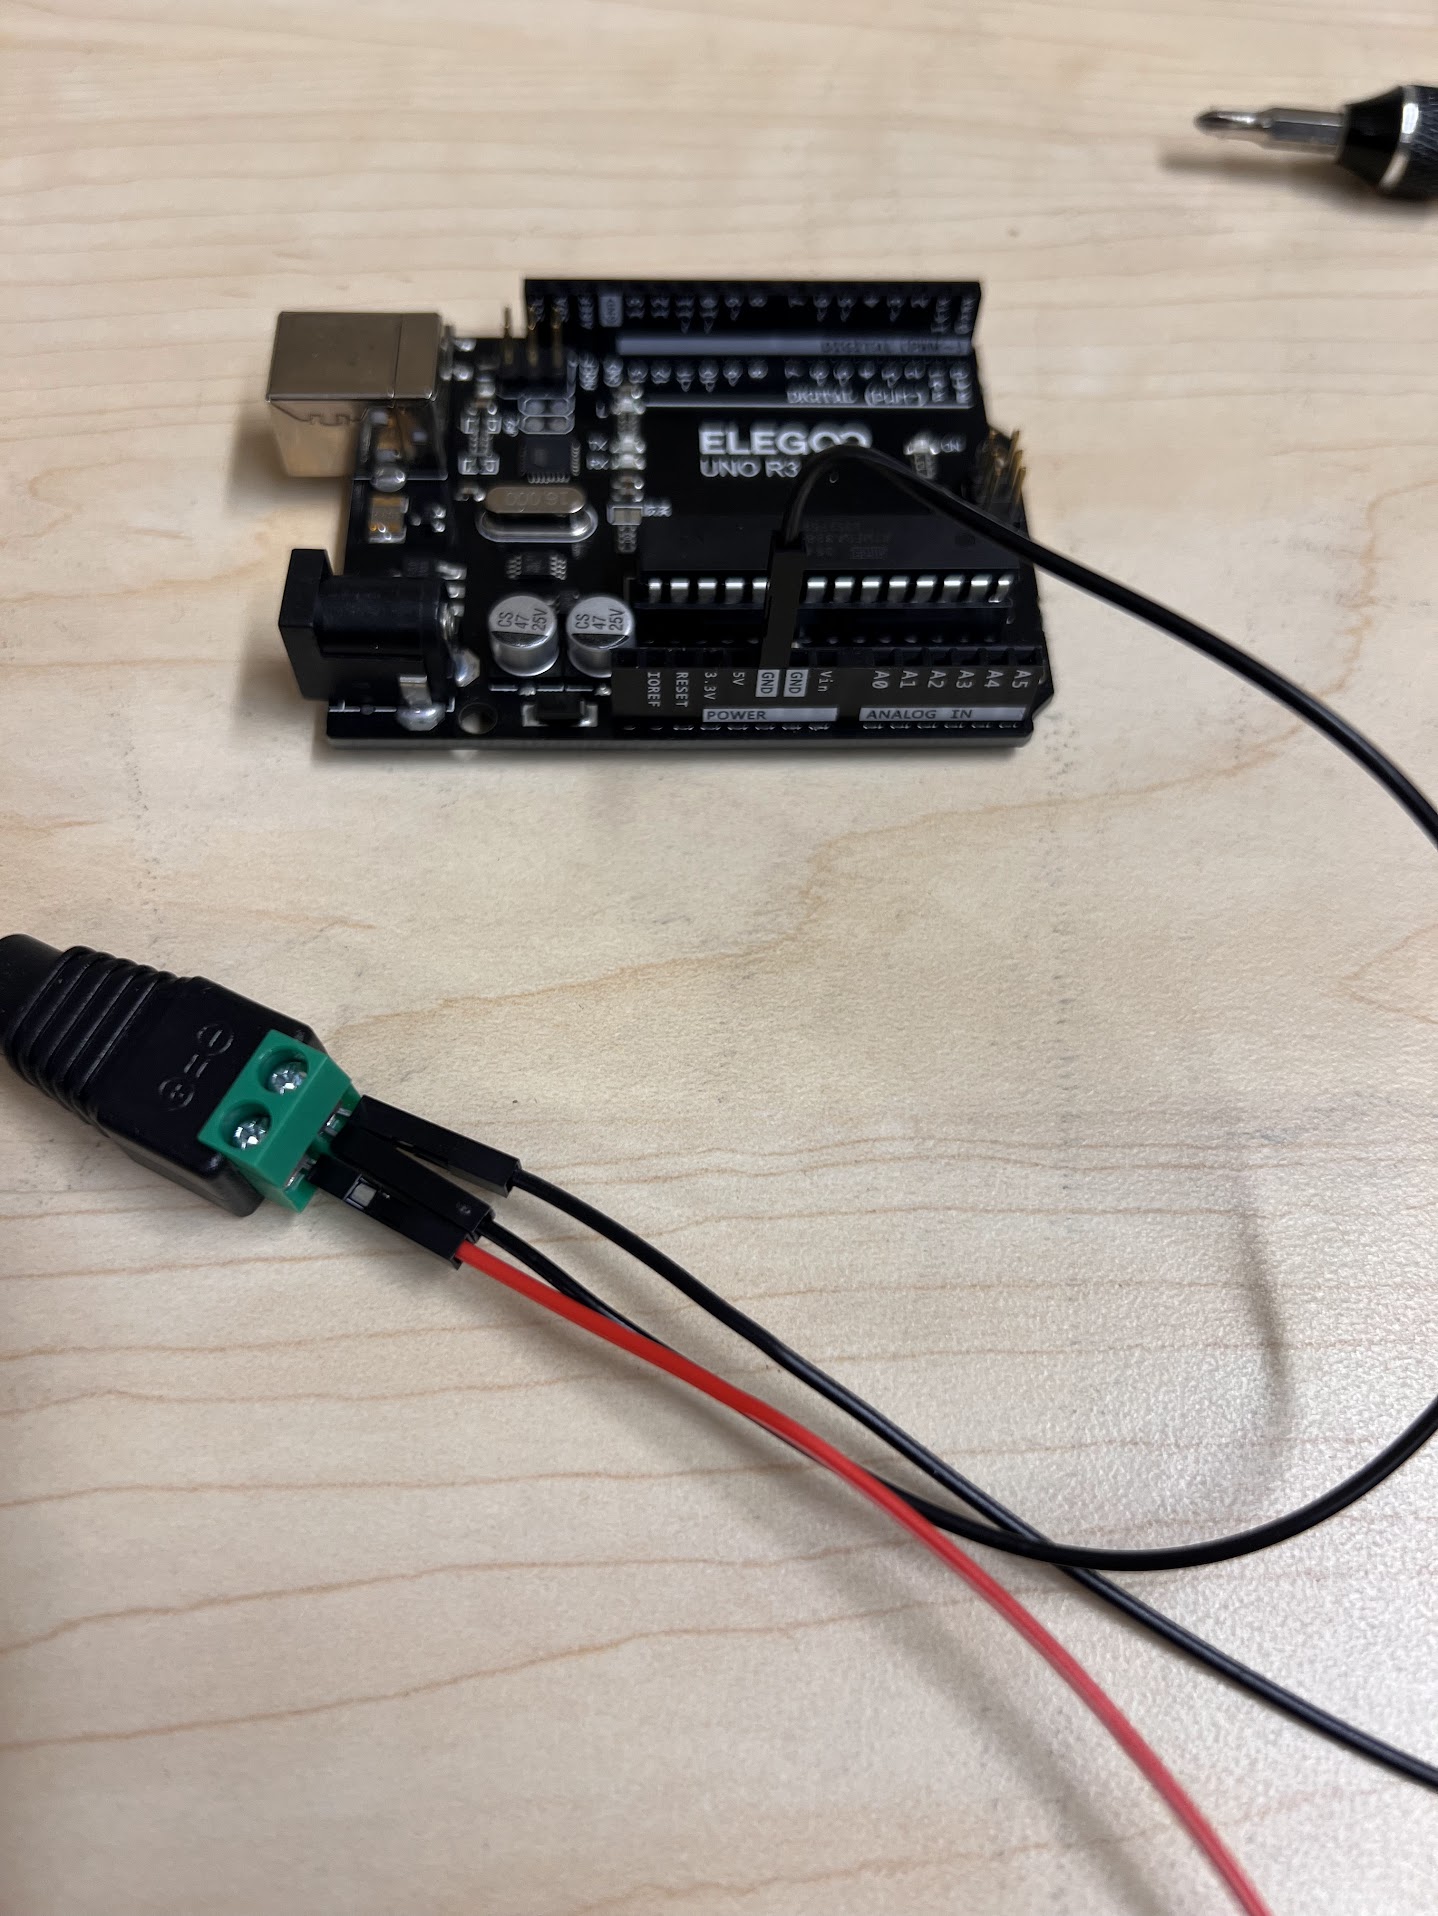
  • Attach the Red Jumper Wire to the +VE Screw Terminal and the Two Black Jumper Wires to the -VE Screw Terminal of the DC Barrel Connector.
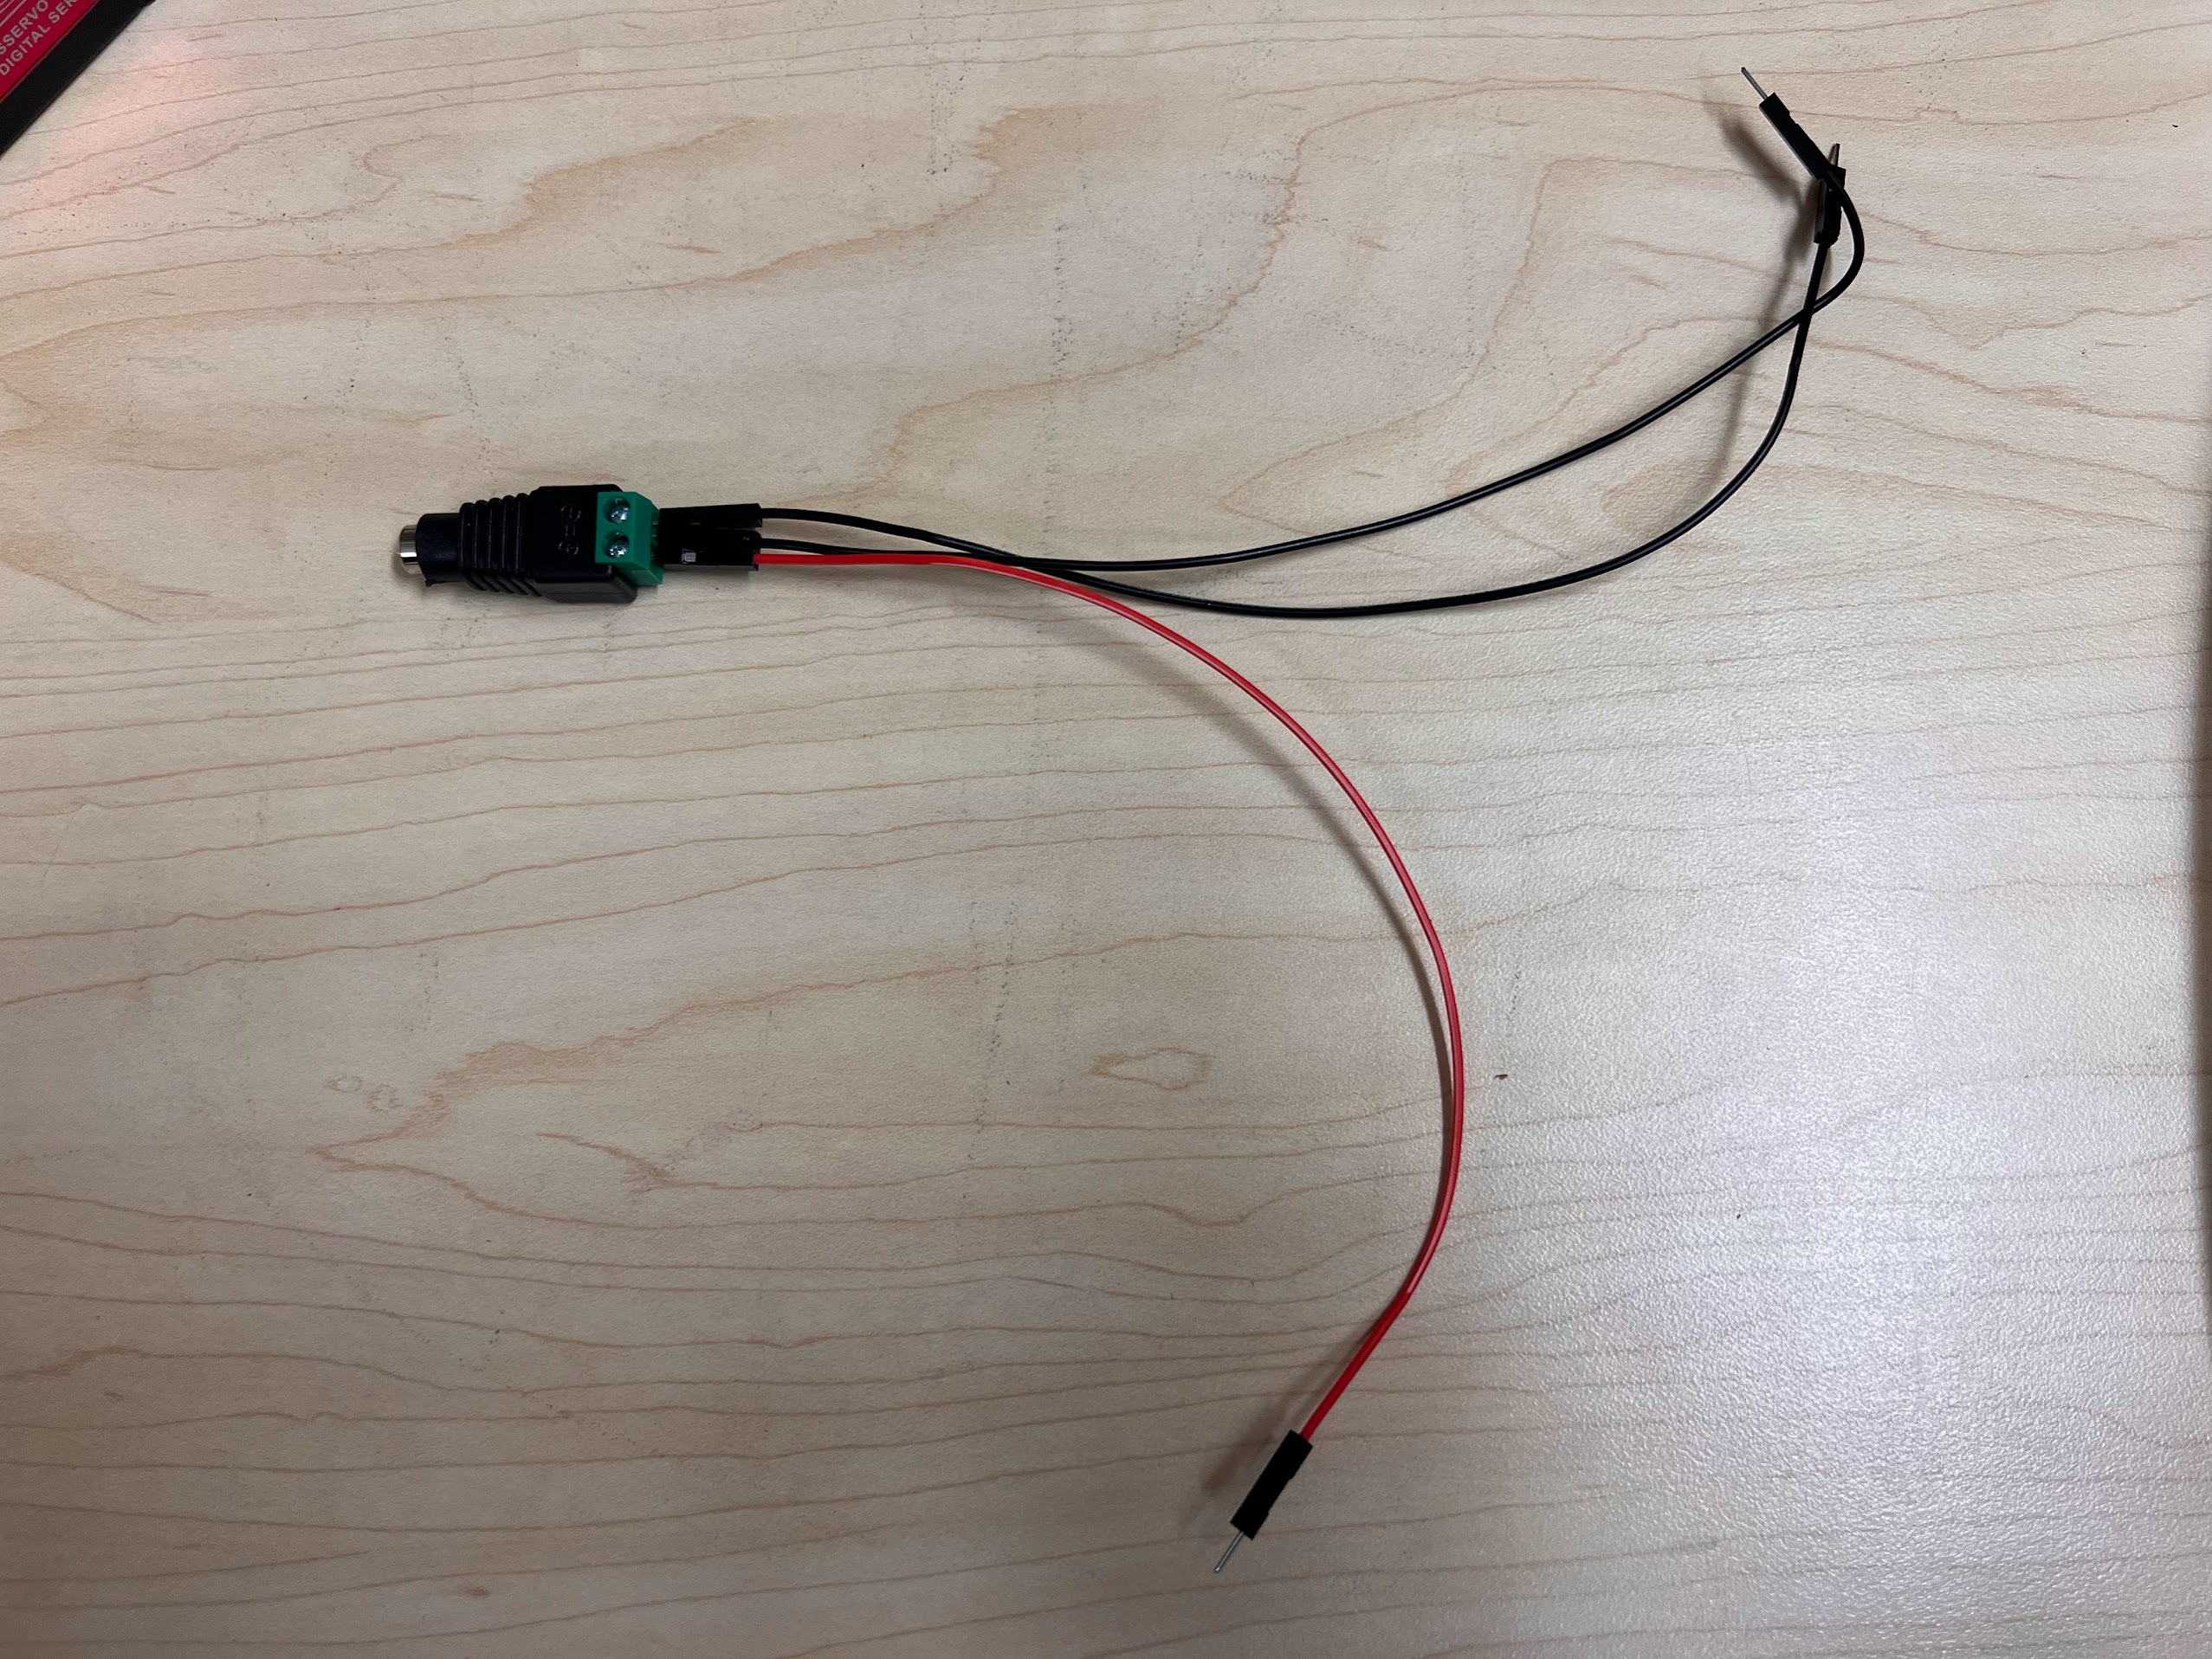
  • Attach the free end of one of the Black Jumper Wires to the GND Terminal on the UNO R3 Board.
  • Attach the other Black Jumer Wire to the Black Wire Female Terminal for the Servo.
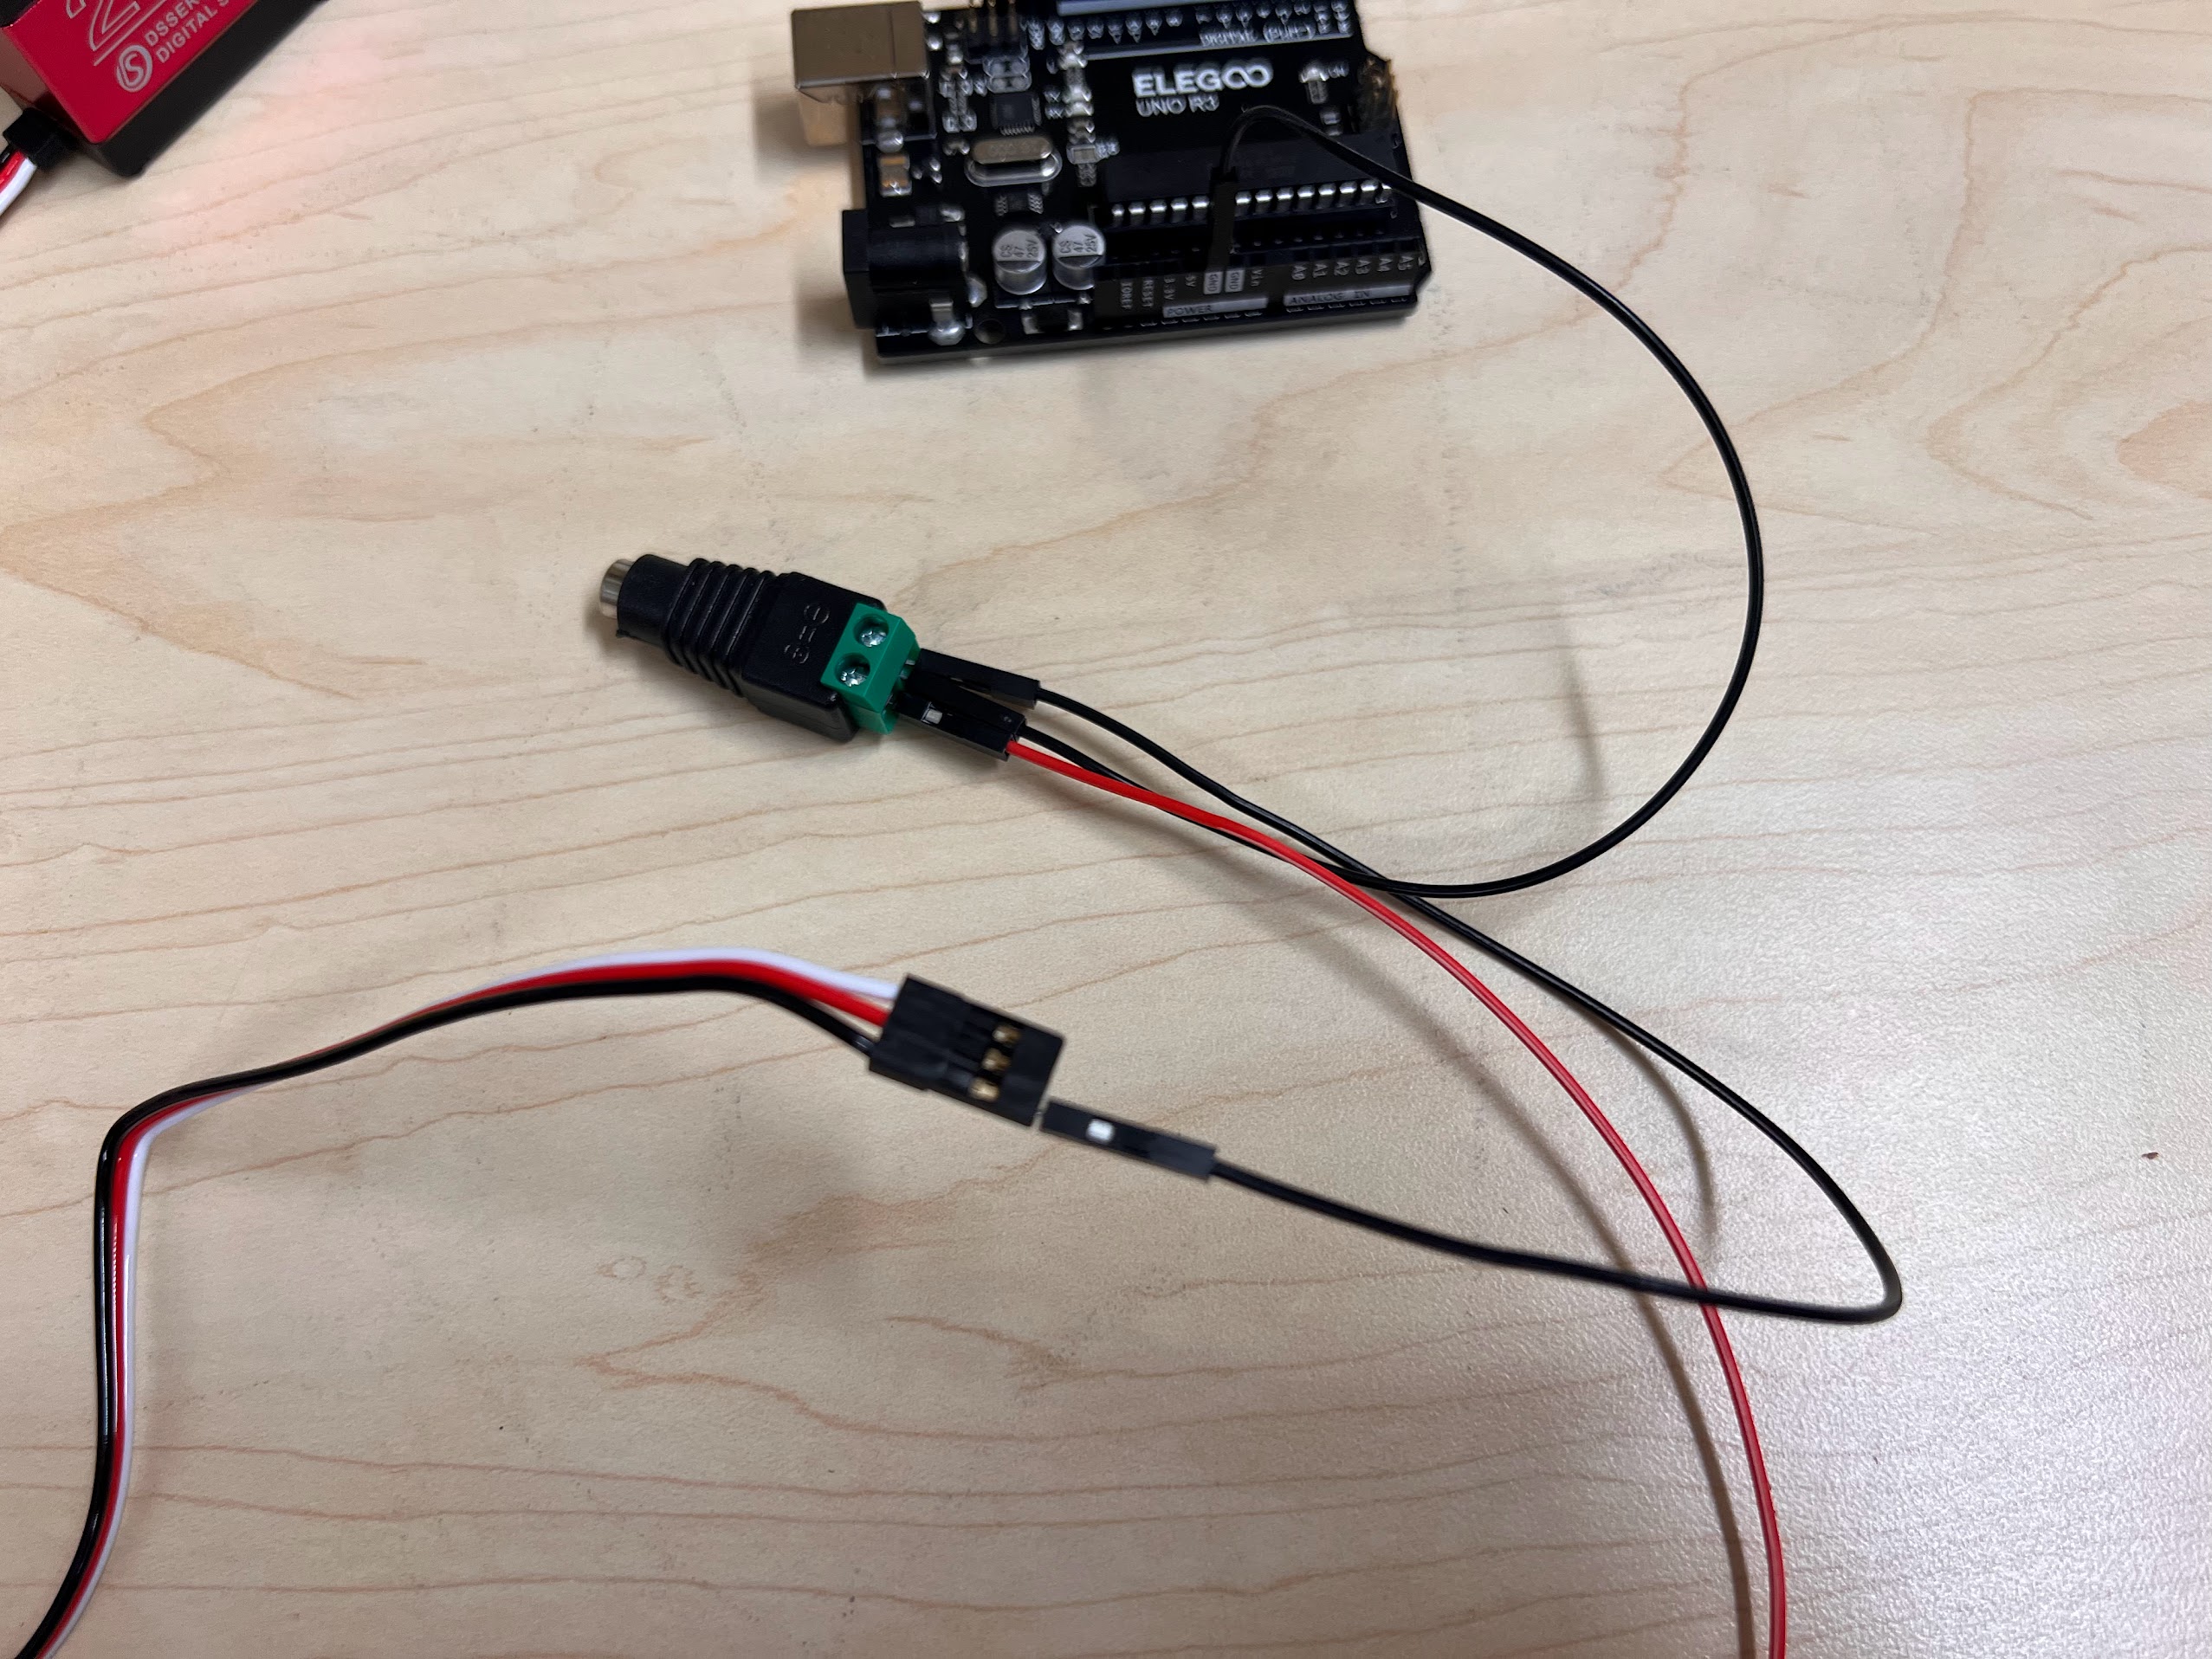
  • Attach the Red Jumper Wire to the Red Wire Female Terminal for the Servo.
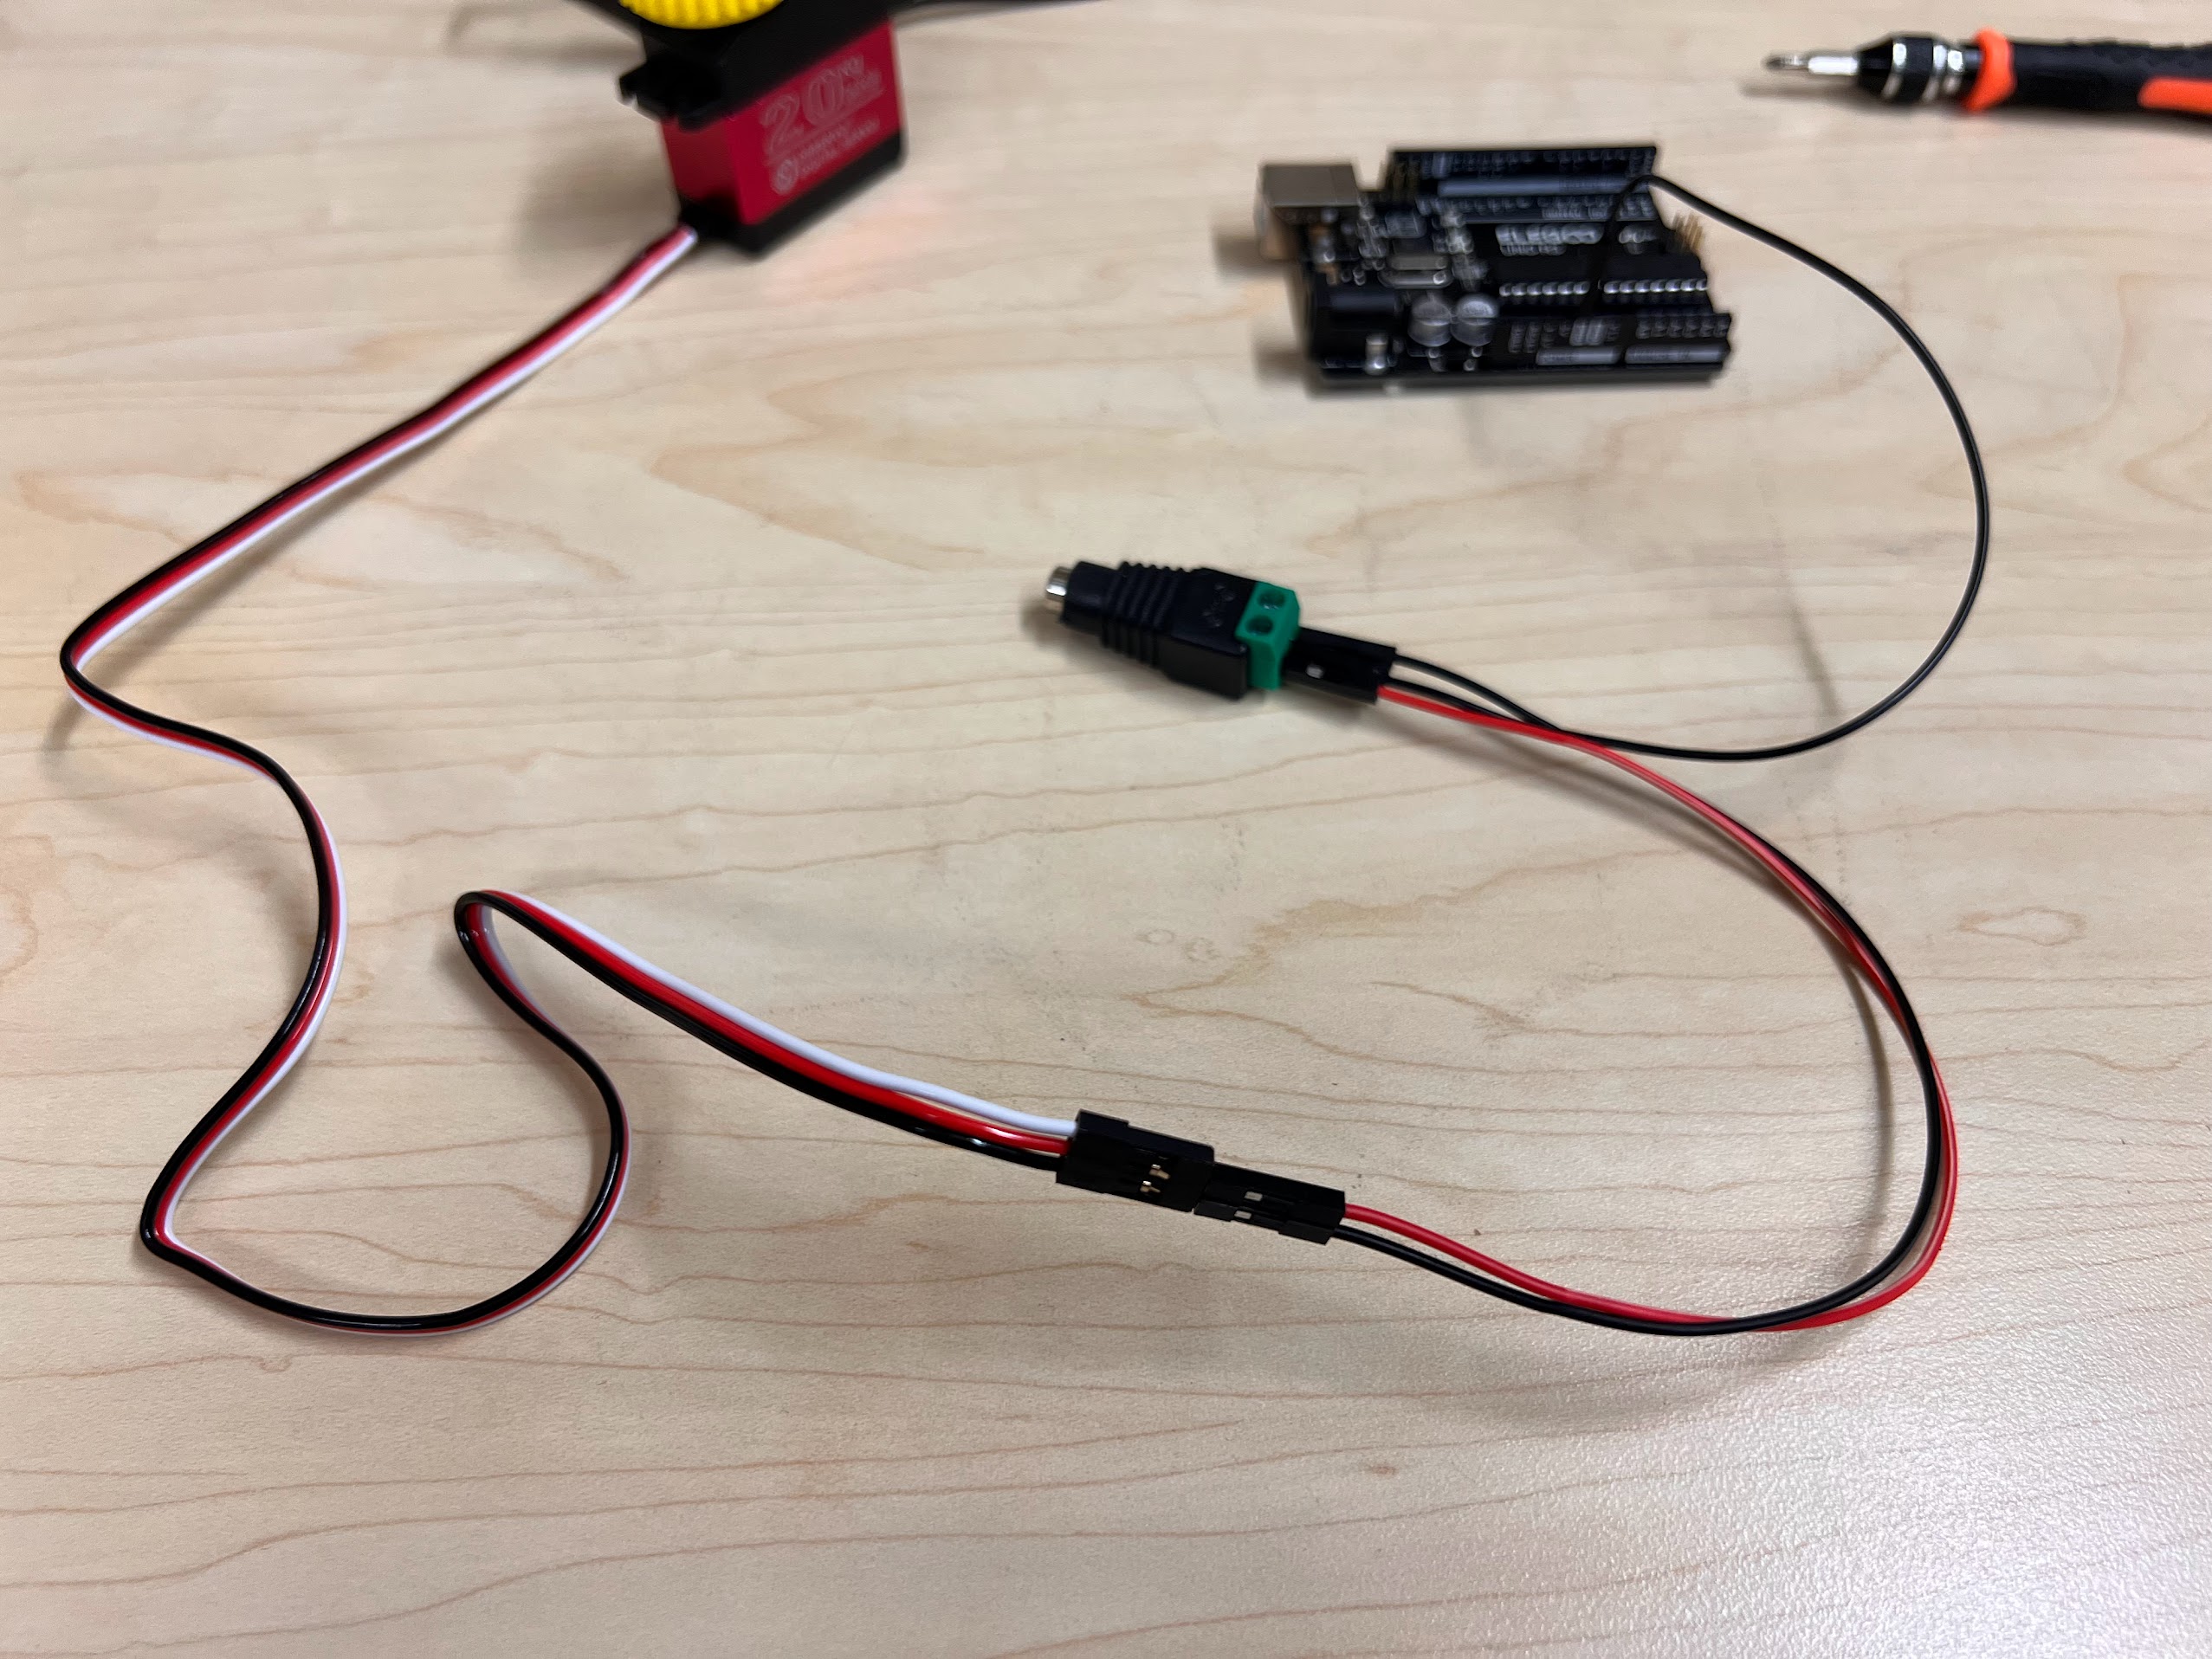
  • Attach one end of the White Jumper Wire to the White wire Female Terminal for the Servo, and the other end to Pin 11 on the UNO R3 Board.
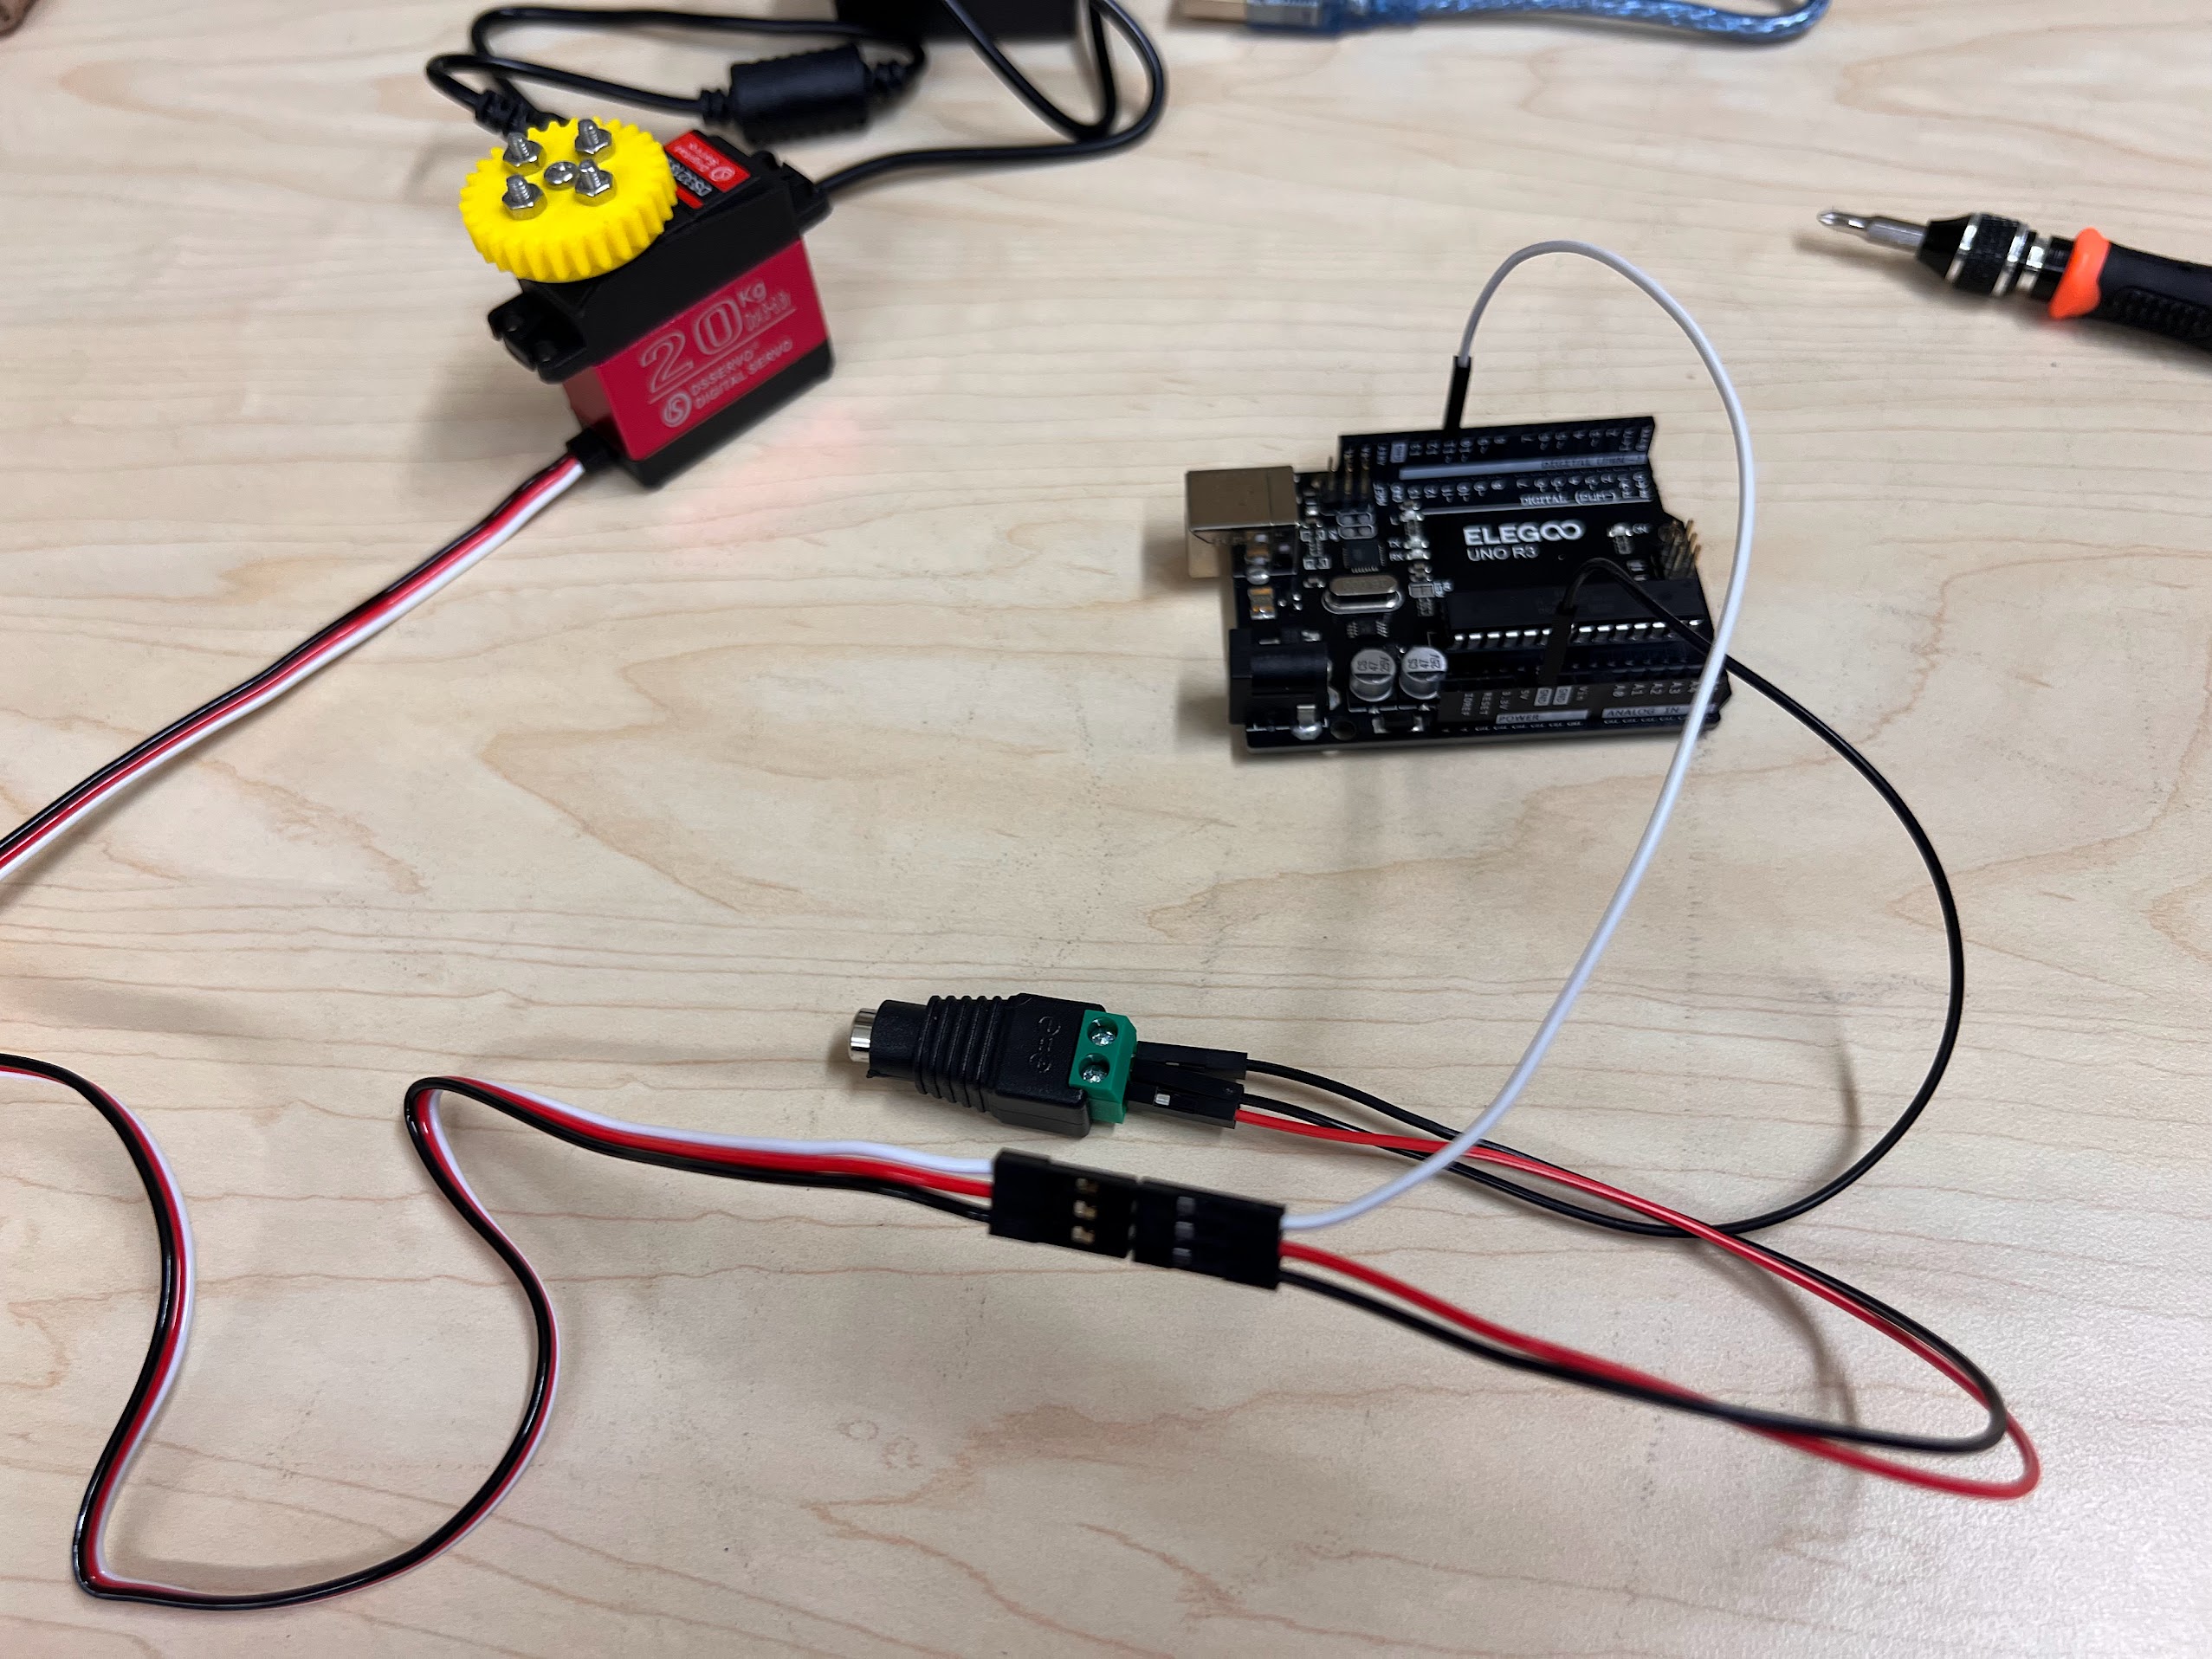
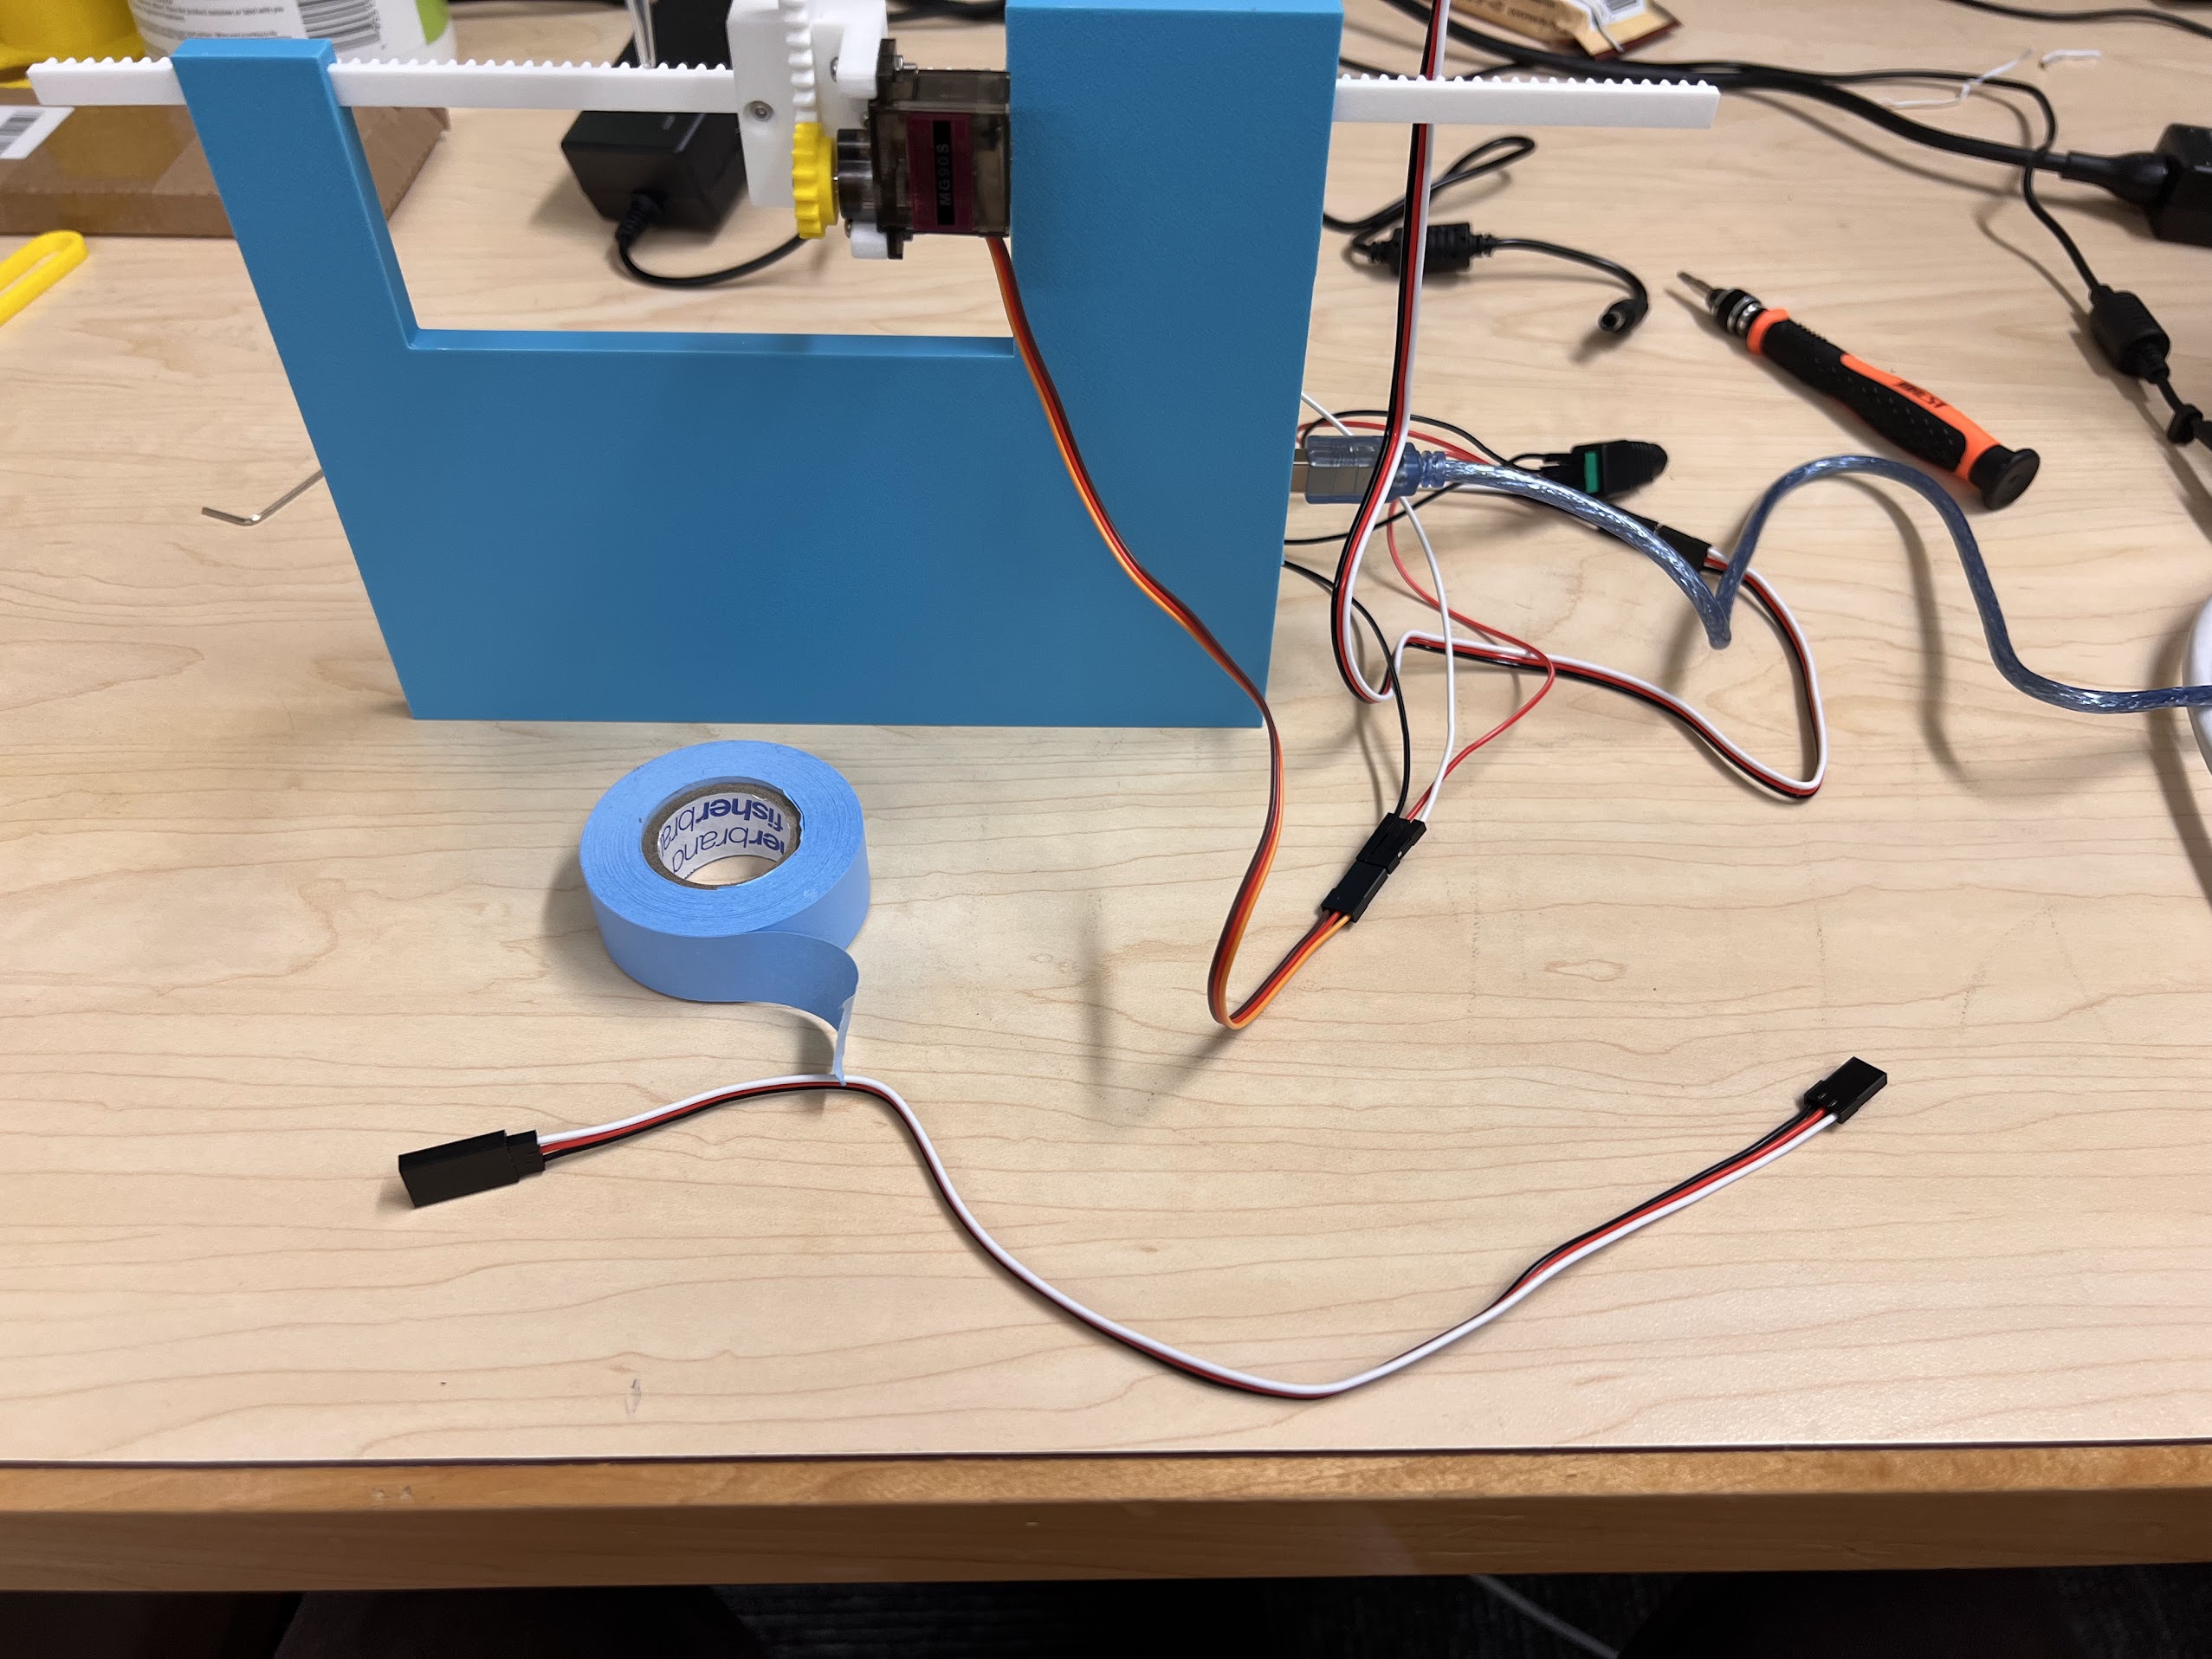
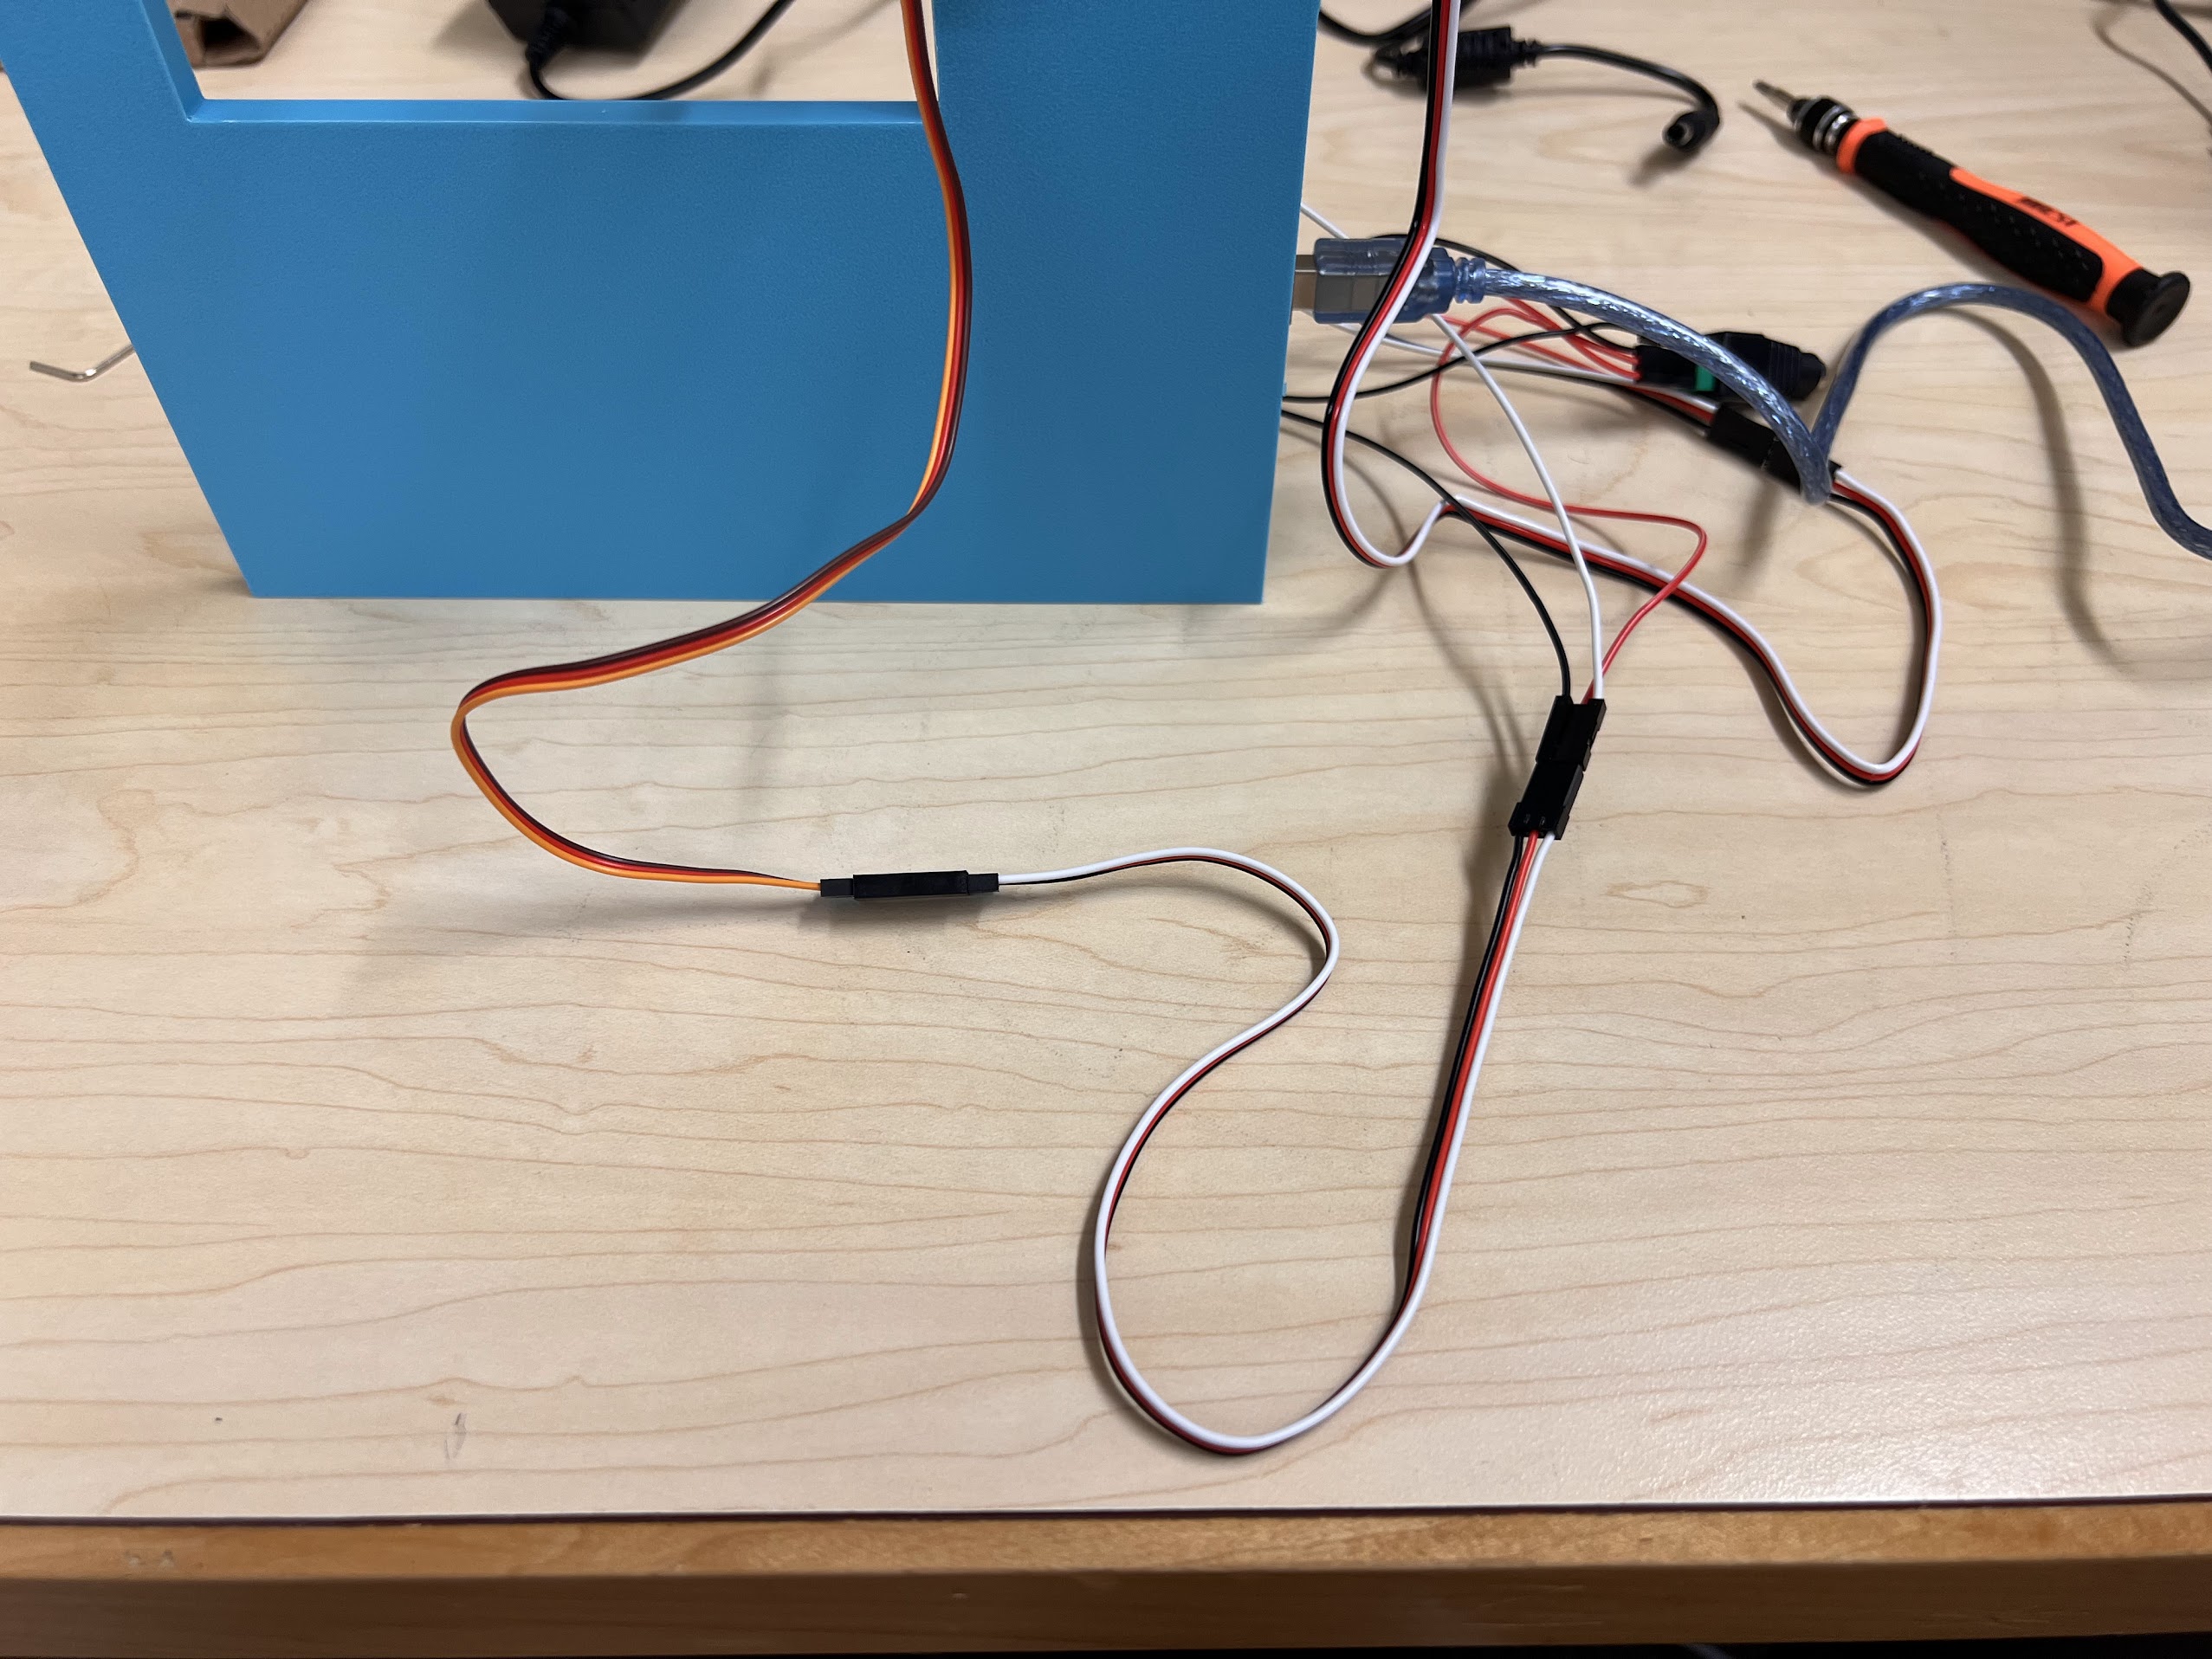
  • Now connect the UNO R3 to your computer via USB and the 20W DC Adapter to the DC Barrel Connector.
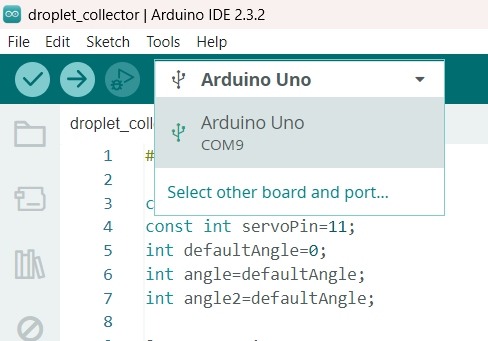
  • Using the Arduno IDE upload the droplet_collector sketch to the UNO R3 Board.
    • Execute the cell below to watch a video of the process.
In [1]:
%%HTML
<iframe width="800" height="600" src="https://www.youtube.com/embed/ZY7oguigeaw?si=GicKcmROvM5wW54X" title="YouTube video player" frameborder="0" allow="accelerometer; autoplay; clipboard-write; encrypted-media; gyroscope; picture-in-picture; web-share" referrerpolicy="strict-origin-when-cross-origin" allowfullscreen></iframe>

Attaching the Servo to the XY Robot Main Body

  • Disconnect or Remove the following:
    • Now disconnect the DC Power and USB.
    • Also disonnect the three jumper wires connected to your Servo.
    • Remove the Servo Horn.
  • You will need the following components to attach the Servo to the main body.
  • Execute the cell below to watch a video of the process.
In [2]:
%%HTML
<iframe width="800" height="600" src="https://www.youtube.com/embed/Swz0Y9IQSYM?si=0lKPx28TD1u4yCaH" title="YouTube video player" frameborder="0" allow="accelerometer; autoplay; clipboard-write; encrypted-media; gyroscope; picture-in-picture; web-share" referrerpolicy="strict-origin-when-cross-origin" allowfullscreen></iframe>

Attaching the second smaller servo mount to the XY Robot body

  • Disconnect or Remove the following:
    • Now disconnect the DC Power and USB.
    • Also disonnect the three jumper wires connected to your Servo.
  • You will need the following components to connect the smaller servo mount to your XY Robot Body.
  • Execute the cell below to watch a video of the assembly process.
    • Update: the video mentions a Six teeth gap. A four teeth gap for longer rail is much better.
In [3]:
%%HTML
<iframe width="800" height="600ß" src="https://www.youtube.com/embed/3rkkOVA7_hY?si=j4Cj_ArSvgFfxjcT" title="YouTube video player" frameborder="0" allow="accelerometer; autoplay; clipboard-write; encrypted-media; gyroscope; picture-in-picture; web-share" referrerpolicy="strict-origin-when-cross-origin" allowfullscreen></iframe>

Attaching Pipette Tips for Securing PTFE Tubing

  • We will use the same methodology for attaching the Pipette tip as described for the XYZ Robot.
  • The attached tip should look like this after overnight curing.

Positioning the Linear rail for the smaller servo

  • We need to connect the smaller servo to our circuit to attach the Linear rail.
  • Connect the Servo as follows and make sure the DC Power is connected.
    • Make sure the USB is also connected to your computer.
    • White Jumper connects to the Orange Wire header.
    • Black Jumper connects to the Brown Wire header.
    • Red Jumper connects to the Red Wire header.
    • You will also need:
      • A hex wrench.
      • Your 3D printed mini gear.
      • M2.5x6mm Screw
  • Execute the cell below to watch a video of the process.
In [4]:
%%HTML
<iframe width="800" height="600" src="https://www.youtube.com/embed/VJpTJnRzS0A?si=T2ip4jd6t5EH4I_d" title="YouTube video player" frameborder="0" allow="accelerometer; autoplay; clipboard-write; encrypted-media; gyroscope; picture-in-picture; web-share" referrerpolicy="strict-origin-when-cross-origin" allowfullscreen></iframe>

Final assembly

  • We will need the following components for the final assembly for our XY Robot.
    • We will connect the control (white jumper) for our second smaller servo to Pin 9 on the UNO R3 Board.
  • Execute the cell below to watch a video of the process.
In [5]:
%%HTML
<iframe width="800" height="600" src="https://www.youtube.com/embed/Y0F2rObZfUk?si=zKk_Nwn4RqftdBhV" title="YouTube video player" frameborder="0" allow="accelerometer; autoplay; clipboard-write; encrypted-media; gyroscope; picture-in-picture; web-share" referrerpolicy="strict-origin-when-cross-origin" allowfullscreen></iframe>
  • Next we will attach the 30cm Servo extension cable to our smaller servo and secure it in place.
  • Attach the extension cable as shown.
  • Secure the joint in place using Labelling Tape.

Positioning the XY Robot relative to the 50ml Ice Box

  • You will need 1/16" ID 0.5mm ID PTFE tubing {CAT NO. JR-T-4183-M25}
    • Email precision@vici.com for a Quote. Tell them your credit card details for payment.
  • Cut a 30cm Piece of PTFE Tubing using a Stanley Razor Blade.
  • Push the cut tubing to the position shown through the Pipette Tip on the Linear Rail.
  • Now put two 50ml Falcon Tubes in the positions shown.
    • Also make sure the sides of the Ice Box and the XY Robot Body are in the same plane.
  • You can help secure them in place, relative to each other, using Labelling Tape.

Controlling the XY Robot through Serial Commands Via Jupyter Notebooks

  • We can identify the COM Port by connecting and then disconnecting the UNO R3 Board via USB. By checking which new COM Port shows up in Arduino IDE.
    • In our case the port is COM9.
  • Close the Arduino IDE before moving to the next step.
    • Execute the cells below to test controlling the robot via Jupyter notebooks.
In [6]:
import serial
import time
smallDropletCollectionRobotCOM="COM10"
droplet_collector=serial.Serial(smallDropletCollectionRobotCOM,timeout=1,write_timeout=1)
time.sleep(5)
print(droplet_collector.name)
print(droplet_collector.get_settings())
print(droplet_collector.is_open)
if not droplet_collector.is_open:
    droplet_collector.open()
    time.sleep(5)
COM10
{'baudrate': 9600, 'bytesize': 8, 'parity': 'N', 'stopbits': 1, 'xonxoff': False, 'dsrdtr': False, 'rtscts': False, 'timeout': 1, 'write_timeout': 1, 'inter_byte_timeout': None}
True
In [7]:
class droplet_collection():
    in_tube=False
    current_time_delay_from_home=1000
    at_home=True
    def __init__(self,servo_angle1,servo_angle2,time_taken_from_home=1000):
        self.servo_angle1=servo_angle1
        self.servo_angle2=servo_angle2
        self.time_taken_from_home=time_taken_from_home
    def goToCoordinates(self):
        if droplet_collection.in_tube==False and droplet_collection.at_home==True:
            droplet_collector.write(("A"+str(self.servo_angle1)+"|W"+str(self.time_taken_from_home)+"|B"+str(self.servo_angle2)+"\n").encode())
            droplet_collection.in_tube=True
            droplet_collection.current_time_delay_from_home=self.time_taken_from_home
            droplet_collection.at_home=False
        elif droplet_collection.in_tube==False and droplet_collection.at_home==False:
            time_diff=abs(droplet_collection.current_time_delay_from_home-self.time_taken_from_home)
            droplet_collector.write(("A"+str(self.servo_angle1)+"|W"+str(time_diff)+"|B"+str(self.servo_angle2)+"\n").encode())
            droplet_collection.in_tube=True
            droplet_collection.current_time_delay_from_home=self.time_taken_from_home
            droplet_collection.at_home=False

        else:
            time_diff=abs(droplet_collection.current_time_delay_from_home-self.time_taken_from_home)
            droplet_collector.write(("B0|W500|A"+str(self.servo_angle1)+"|W"+str(time_diff)+"|B"+str(self.servo_angle2)+"\n").encode())
            droplet_collection.in_tube=True
            droplet_collection.current_time_delay_from_home=self.time_taken_from_home
            droplet_collection.at_home=False
    
    def goToCoordinatesFast(self):
        self.goToCoordinates()
        
    def goToCoordinatesSlowly(self):
        if droplet_collection.in_tube==False and droplet_collection.at_home==True:
            droplet_collector.write(("X"+str(self.servo_angle1)+"|Y"+str(self.servo_angle2)+"\n").encode())
            droplet_collection.in_tube=True
            droplet_collection.current_time_delay_from_home=self.time_taken_from_home
            droplet_collection.at_home=False
        elif droplet_collection.in_tube==False and droplet_collection.at_home==False:
            droplet_collector.write(("X"+str(self.servo_angle1)+"|Y"+str(self.servo_angle2)+"\n").encode())
            droplet_collection.in_tube=True
            droplet_collection.current_time_delay_from_home=self.time_taken_from_home
            droplet_collection.at_home=False

        else:
            #time_diff=abs(droplet_collection.current_time_delay_from_home-self.time_taken_from_home)
            droplet_collector.write(("Y0|X"+str(self.servo_angle1)+"|Y"+str(self.servo_angle2)+"\n").encode())
            droplet_collection.in_tube=True
            droplet_collection.current_time_delay_from_home=self.time_taken_from_home
            droplet_collection.at_home=False
        
    def goToCoordinatesKeepTubeUp(self):
        if droplet_collection.in_tube==False:
            droplet_collector.write(("A"+str(self.servo_angle1)+"\n").encode())
            droplet_collection.in_tube=False
            droplet_collection.at_home=False
            droplet_collection.current_time_delay_from_home=self.time_taken_from_home
        else:
            droplet_collector.write(("B0|W500|A"+str(self.servo_angle1)+"\n").encode())
            droplet_collection.in_tube=False
            droplet_collection.at_home=False
            droplet_collection.current_time_delay_from_home=self.time_taken_from_home
    def goHome(self):
        droplet_collection.droplet_collector_go_home()
    
    def droplet_collector_go_home():
        if droplet_collection.in_tube==False:
            droplet_collector.write(("H\n").encode())
            droplet_collection.in_tube=False
            droplet_collection.at_home=True
        else:
            droplet_collector.write(("B0|W500|H\n").encode())
            droplet_collection.in_tube=False
            droplet_collection.at_home=True

droplet_collection.droplet_collector_go_home()
good_collection_tube=droplet_collection(180,180,1000)
bad_collection_tube=droplet_collection(60,180,350)
  • Now we will move our Robot to either the Good or Bad Collection Tubes.
  • Moving to Good Collection Tube first.
In [8]:
time.sleep(5.0)
good_collection_tube.goToCoordinates()
  • The image below shows roughly what position we want the end of the PTFE to be at for the Good Collection Tube.
    • Adjust the vertical position of the PTFE Tubing or Rotate it so that your Tip position is similar.
    • We want the tip of the PTFE Tubing to be just a few millimeters above the wall of the 50ml Falcon Tube without Touching the wall.
  • Next we will move the XY Robot to the Bad Collection Tube.
In [9]:
time.sleep(5.0)
bad_collection_tube.goToCoordinates()
  • The image below shows approximately where you should expect the end of the PTFE tubing to be at for the Bad Collection Tube.
    • It should be fine as long as its somewhere inside the mouth of the Bad Collection Tube.
    • No need to adjust the Tubing position unless absolutely necessary.
    • The position of the Tubing is more important for the Good Collection Tube.
  • Now lets try moving to the Good Collection Tube slowly.
    • Its important to move slowly to prevent unneccessary vibrations that affect the Droplet Generation when operating the ChronoSeq Device.
In [10]:
time.sleep(5.0)
droplet_collection.droplet_collector_go_home()
time.sleep(5.0)
bad_collection_tube.goToCoordinatesKeepTubeUp()
time.sleep(5.0)
good_collection_tube.goToCoordinatesSlowly()
  • Execute the cell below to see the XY Robot in action when controlled via Jupyter notebook.
In [11]:
%%HTML
<iframe width="800" height="600" src="https://www.youtube.com/embed/gi6tJWHJPQo?si=jHh4roSvbA0x1nwC" title="YouTube video player" frameborder="0" allow="accelerometer; autoplay; clipboard-write; encrypted-media; gyroscope; picture-in-picture; web-share" referrerpolicy="strict-origin-when-cross-origin" allowfullscreen></iframe>
  • Now we will close our connection to our XY Robot.
In [12]:
time.sleep(10.0)
droplet_collection.droplet_collector_go_home()
time.sleep(5.0)
droplet_collector.close()