Protocol for Making ChronoSeq V5 Beads by Modifying Dropseq beads.
This protocol is for Making 3ml of Beads per time-tag. Ideal for production run using ChronoSeq Device.
Bead Modification Workflow |
|---|
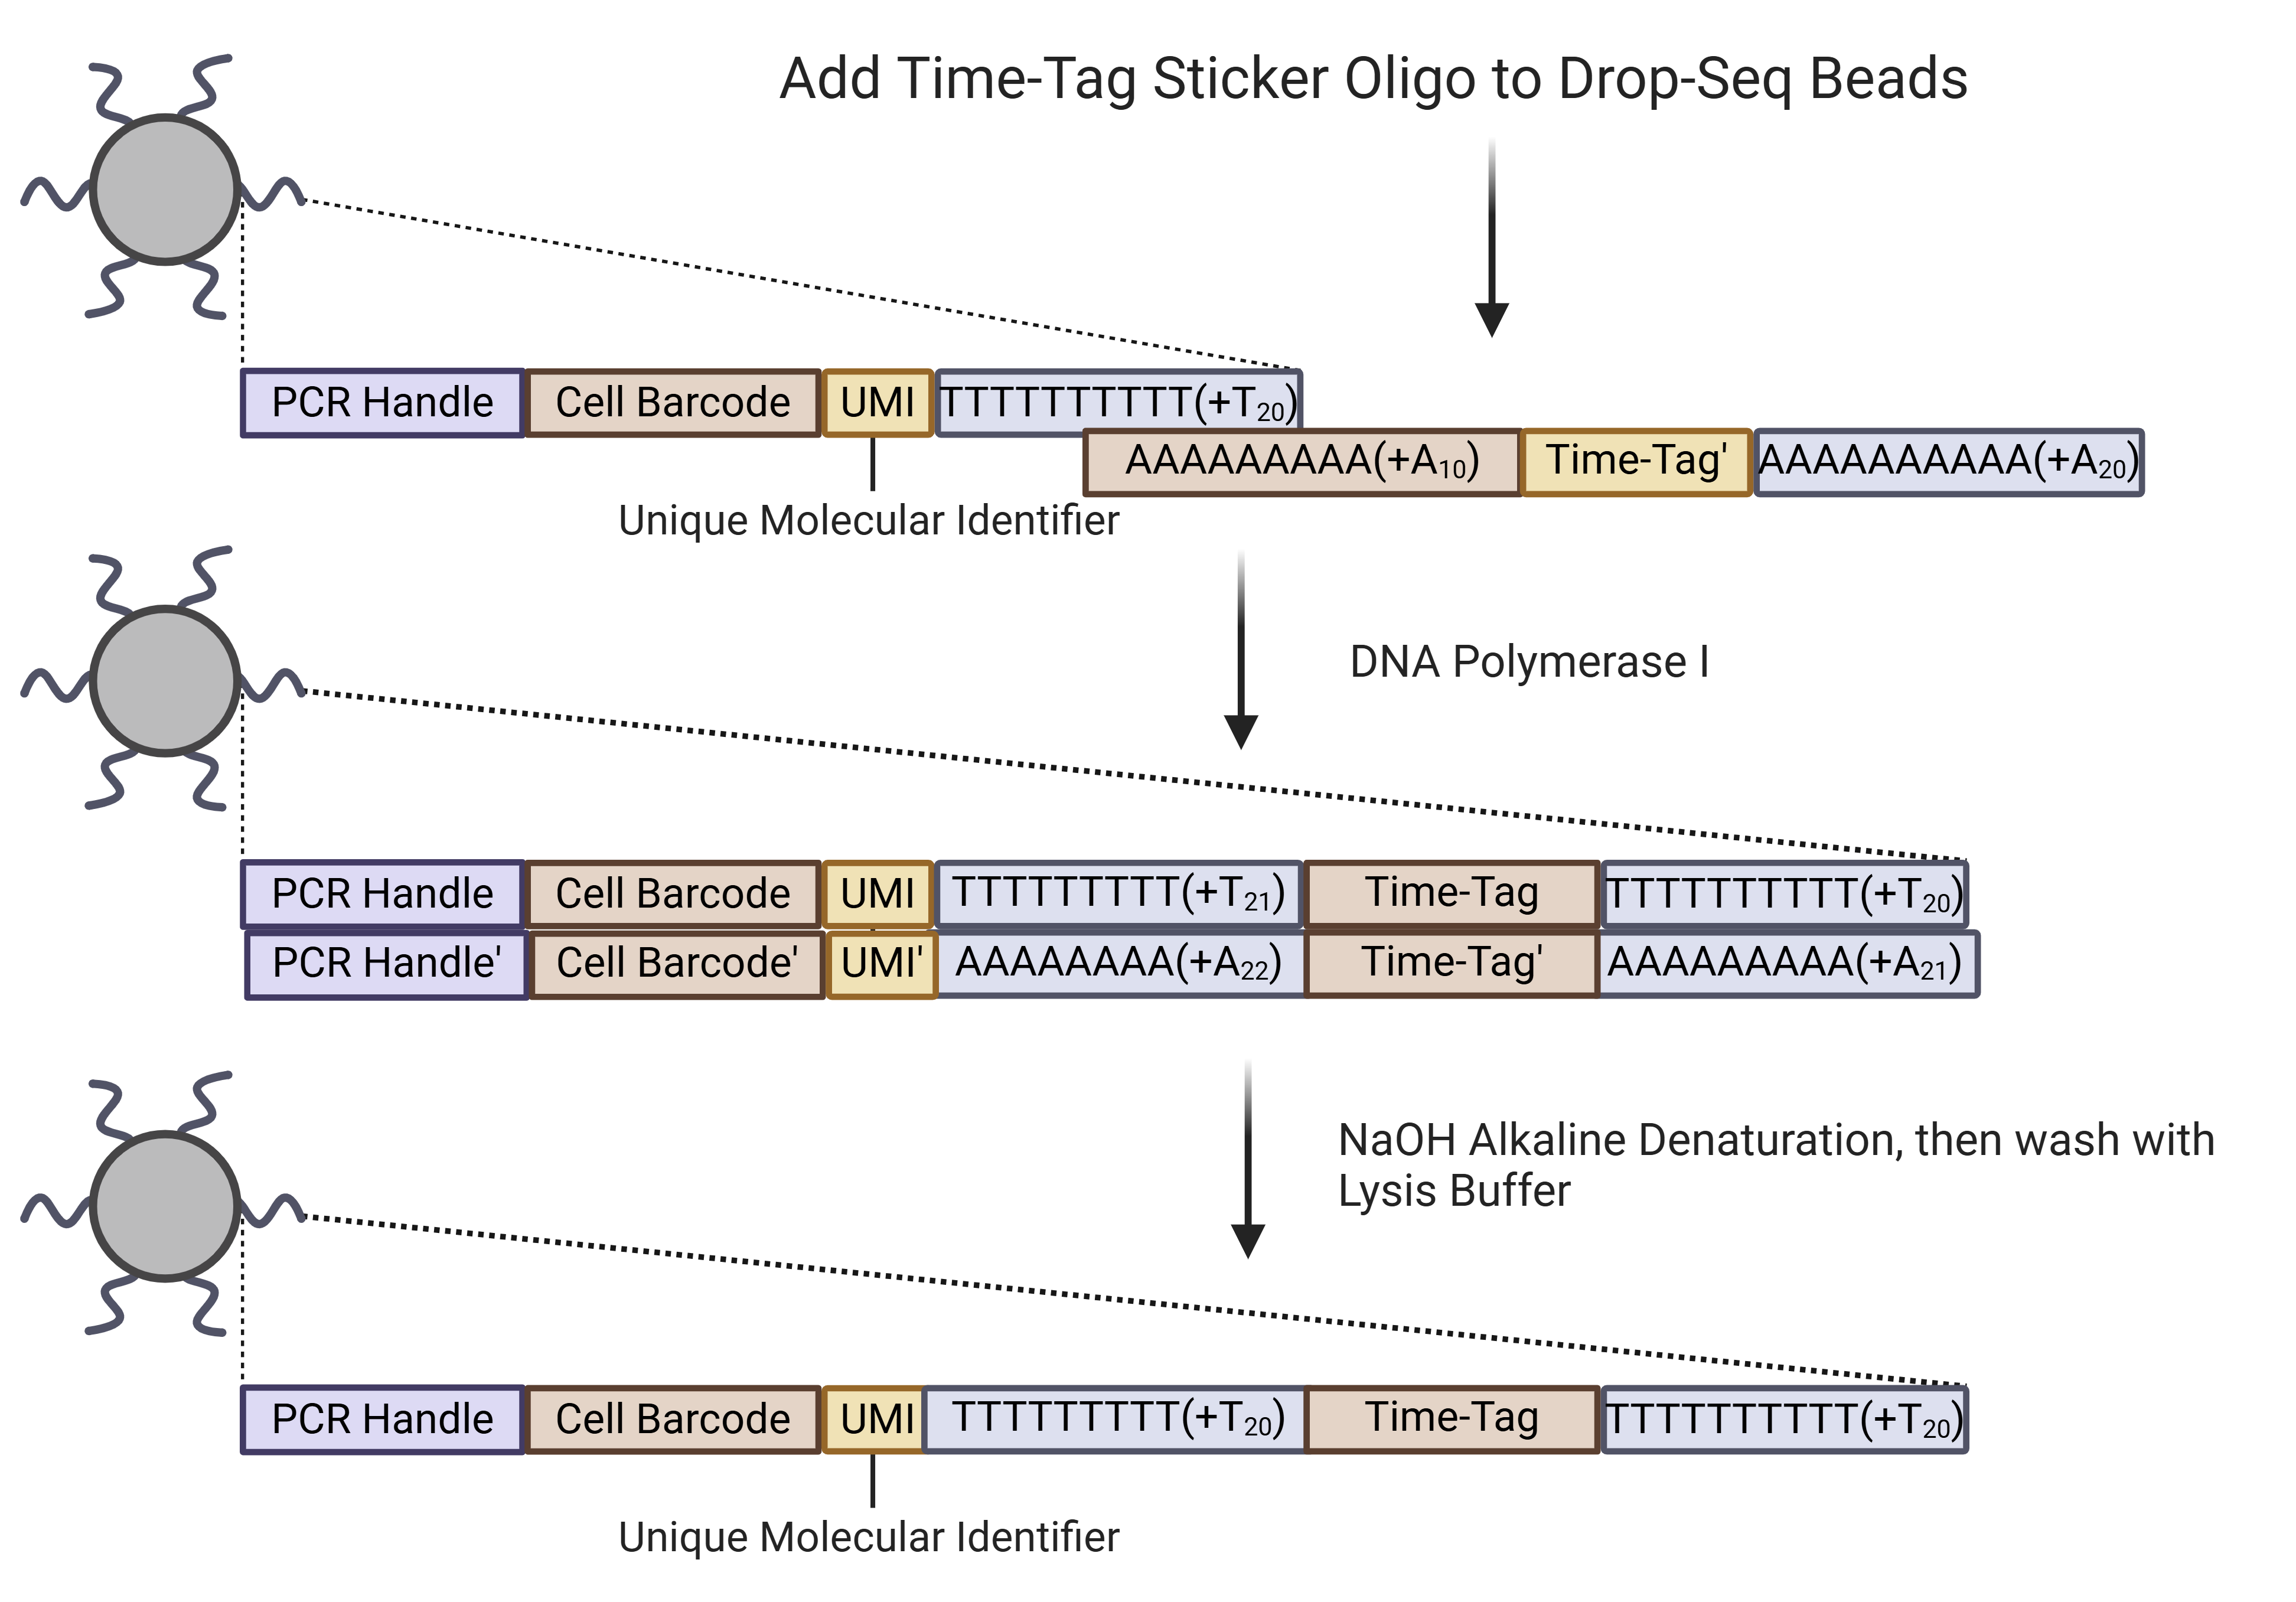 |
Sequences are added by using an oligo that binds to the existing PolyT region on Drop-seq beads. The 3’ end of the Drop-seq beads are then extended to the reverse compliment of the oligo using E. Coli DNA Polymerase I. Alkaline denaturation is used to make the double stranded DNA single-stranded. These beads are then resuspended in lysis buffer and can be used directly with our device.
Dropseq beads Properties and Sticker Sequence
- LGC Biosearch Technologies have started offering these beads.
- These beads have a longer UMI length of 14 instead of 8 for Chemgenes. The sequence for these beads is as follows:
- 5’–Bead–Linker-‐TTTTTTTAAGCAGTGGTATCAACGCAGAGTAC JJJJJJJJJJJJNNNNNNNNNNNNNN TTTTTTTTTTTTTTTTTTTTTTTTTTTTTT-‐3’
- They also claim better quality control and fewer particles that can cause a blockage in the Microfluidic Chip.
- You can order them here.
- Catalog Number: NX-SCB-200/18 million beads. Cost about 7000USD January 2025.
- We used about ~3ml of beads at @450beads/μl per Time-Tag
Time-Tagged Sticker Oligos for making ChronoSeq V5 Beads using Dropseq beads
All Oligos were ordered from IDT
- 25nmol Scale
- Standard Desalting
- SEQ1_TTGG: AAAAAAAAAAAAAAAAAAAAAAAAAAAAAA TNTHGHGB AAAAAAAAAAAAAAAAAAA
- SEQ2_CCTT: AAAAAAAAAAAAAAAAAAAAAAAAAAAAAA CDCDTNTB AAAAAAAAAAAAAAAAAAA
- SEQ3_GGAA: AAAAAAAAAAAAAAAAAAAAAAAAAAAAAA GHGHANAB AAAAAAAAAAAAAAAAAAA
- SEQ4_TTCC: AAAAAAAAAAAAAAAAAAAAAAAAAAAAAA TNTDCDCB AAAAAAAAAAAAAAAAAAA
- SEQ5_TTAA: AAAAAAAAAAAAAAAAAAAAAAAAAAAAAA TNTSANAB AAAAAAAAAAAAAAAAAAA
- SEQ6_TTTT: AAAAAAAAAAAAAAAAAAAAAAAAAAAAAA TVTVTVTB AAAAAAAAAAAAAAAAAAA
- SEQ7_CCAA: AAAAAAAAAAAAAAAAAAAAAAAAAAAAAA CDCKANAB AAAAAAAAAAAAAAAAAAA
- SEQ8_CCGG: AAAAAAAAAAAAAAAAAAAAAAAAAAAAAA CDCWGHGB AAAAAAAAAAAAAAAAAAA
- SEQ9_CCCC: AAAAAAAAAAAAAAAAAAAAAAAAAAAAAA CDCDCDCB AAAAAAAAAAAAAAAAAAA
- SEQ10_GGTT: AAAAAAAAAAAAAAAAAAAAAAAAAAAAAA GHGMTNTB AAAAAAAAAAAAAAAAAAA
- SEQ11_GGCC: AAAAAAAAAAAAAAAAAAAAAAAAAAAAAA GHGWCDCB AAAAAAAAAAAAAAAAAAA
- SEQ12_GGGG: AAAAAAAAAAAAAAAAAAAAAAAAAAAAAA GHGHGHGB AAAAAAAAAAAAAAAAAAA
Solutions and Buffers to Make
Use Distilled Water for all these Buffers. Please also filter using a 40μm Cell Strainer.
TE-SDS:
- 10 mM Tris HCl pH 8.0 + 1 mM EDTA
- 0.5% SDS
TE-TW:
- 10 mM Tris HCl pH 8.0 + 1 mM EDTA
- 0.01% Tween-20
IDTE Buffer:
- 10 mM Tris HCl pH 8.0 + 0.1mM EDTA
Buffer for Dissolving and Diluting Oligos Ordered from IDT
- 1M DTT:
- Dissolve 1.55g solid DTT in 10ml of Deionized Water. Hazardous Chemical Read SDS. Work in Fume Hood
More economical to make yourself from Solid DTT. Make 50ml or more at a time and store in 10ml Aliquots for upto an year. DTT is not stable at room temperature. Make this solution quickly and store at -20°C, unless you plan to use it immediately to make another Buffer.
- 10X NEB Buffer 2:
- 500 mM NaCl
- 100 mM Tris-HCl pH 7.9
- 100 mM MgCl2
- 10 mM DTT
Make in Bulk for Scaling up reaction. It is more economical than buying NEB Buffer 2. Make 100ml or more at a time and store in 11ml Aliquots for upto an year.
DTT is not stable at room temperature. Make this solution quickly and store at -20°C.
Best Practices:
- Remember to put back the reagents back to their storage location at 4°C or -20°C once you are done with using them.
- Get fresh new microtips/sterile-disposable pipettes after each step, unless mentioned otherwise.
- Important to avoid cross-contamination.
Equipment Used:
- Our lab uses the refrigerated Sorval ST8R Centrifuge. You can find CAD files to print some of the parts here.
- We bought the 50ml Inserts and Printed the Rest.
- You can modify the CAD files to print the 50ml Inserts as well.
- Use PLA or TPU for the prints.
- Microcentrifuge we used was the Fisherbrand™ accuSpin™ Micro 17/17R Microcentrifuge
- Labnet Nutating Mixer
- CELLTREAT Pipette Controller
- Labnet Vortex
- Eppendorf Pipettes 6-Pack
- VWR Scientific Products 1545 General Purpose Incubator (Discontinued Product)
- Pipette Tips:
- Larger Volume Pipettes:
- Disposable Sterile Falcon Tubes:
- Disposable Sterile 250ml GL45 Bottles, Individually Wrapped
Protocol for Bead Modification
💡 Tip: Our lab uses the refrigerated Sorval ST8R Centrifuge. You can find CAD files to print some of the parts here.
Preparation of Beads
- Use the instructions in this section to make 10μM stocks for the Sticker Oligos ordered from IDT, using the IDTE buffer.
- Each unit of Dropseq beads comes in a separate vial. Follow the ChronoSeq beads preparation protocol and suspend the Dropseq Beads from the Alcohol stock at -20°C to 1X Lysis buffer at 4°C.
- You will need about 3ml of beads @450beads/μl per Time-Tag for this protocol.
- Therefore, if you are making 4 Time-Tags you will need 12ml of Beads@450beads/μl suspended in 1X Lysis buffer for this protocol.
- Typically Chemgenes provides 6 million beads per vial so one vial should provide enough beads for making 4 separate Time-Tags.
- Other manufactures might provide different quantitites of beads per vial. Make the calculation and suspend the beads from each vial accordingly.
- We have tested this protocol with upto 3.2ml so far.
- 4ml might also work.
- Further testing and optimization of Reagent concentrations and reaction times might be needed for larger volumes.
- You will need about 3ml of beads @450beads/μl per Time-Tag for this protocol.
- Spin Down Dropseq beads with 450beads/μl suspended in 1X Lysis buffer.
- Turn on the UV and airflow for the Cell Culture Hood. Leave for 15 minutes.
- Inside the Cell Culture Hood: Shake Each Tube to make sure the beads are evenly suspended . For each Tube using a Sterile/Particle Free 5ml Pipette transfer 3ml of beads to a Sterile 50ml Falcon Tube.
- Put the main 50ml Tubes with Dropseq beads back in their storage location at 4°C once you are done.
- Turn off the Cell Culture Hood and move to your bench. Take the 50ml Tubes with 3ml beads at 450beads/μl with you.
This is a STOPPING STEP. You can store the Beads in 1X Lysis Buffer at 4°C and continue later.
DNA Polymerase I Isothermal Extension for Making ChronoSeq V5 Beads
- Get the 50ml Tubes with 3ml Dropseq beads suspended in 1X Lysis buffer.
- Set the incubator to 34°C
- Get the dNTP, 10μM Sticker Oligos and homemade NEB Buffer 2 from -20°C and leave on your bench to melt. Put on ice once melted.
💡 Tip: Make sure you have enough volume of dNTPs, Oligos and Buffer for your experiments.
- Get the DNA Polymerase I from -20°C and put it on ice.
- Make 1.25X NEB Buffer 2 and put on ice.
- Spin down the beads. The Centrifuge should be set to 2500xg for 1.5 minutes with Soft Deceleration Enabled.
- Remove 2 ml of Lysis buffer without disturbing the beads.
- Set your Electronic Pipette to its Fastest Setting.
- From now onwards always dispense liquid at Full Speed into the Tube.
- Dispense near the mouth of the Tube to avoid pushing air into the liquid.
- Do not immerse the Pipette into the liquid when dispensing.
- We want to avoid Vortexing to prevent the beads from breaking into smaller fragments.
- By dispensing at full speed we want the beads to mix well with the liquid as we are dispensing the liquid into the tube.
- Now wash the beads 3 Times with 5ml 1.25X NEB Buffer 2:
- Add 5ml 1.25X NEB Buffer 2.
- Spin down the beads. The Centrifuge should be set to 2500xg for 1.5 minutes with Soft Deceleration Enabled.
- Carefully remove as much Liquid possible without disturbing the beads.
- Add 5ml 1.25X NEB Buffer 2.
- Spin down the beads. The Centrifuge should be set to 2500xg for 1.5 minutes with Soft Deceleration Enabled.
- Carefully remove as much Liquid possible disturbing the beads.
- Add 5ml 1.25X NEB Buffer 2.
- Spin down the beads. The Centrifuge should be set to 2500xg for 1.5 minutes with Soft Deceleration Enabled.
- Estimate the Volume using a 5ml Pipette.
- Spin down the beads. The Centrifuge should be set to 2500xg for 1.5 minutes with Soft Deceleration Enabled.
- Remove liquid without distrubing the beads to make the final Volume 3.2ml.
- Now add:
- 200μl of a 10μM ChronoSeqV5 Sticker Oligo. Pipette up and down several times to mix well.
- Be careful not to mix Different Sticker Oligos together. Only one Sticker Oligo per 4ml Reaction.
- 200μl dNTP mix from NEB
- 390μl Distilled Water
- 10μl DNA Polymerase I . Use the P10 , Pipette up and down several times to mix well.
- 200μl of a 10μM ChronoSeqV5 Sticker Oligo. Pipette up and down several times to mix well.
- Gently swirl the Tube to allow proper mixing.
- Quickly spin down the Tube at 2500xg for 30seconds. NO SOFT DECELERATION
- Make sure the Caps for the Tubes are tightly closed to avoid any leaks during the reaction.
- Now Incubate at 34°C on a Nutating Mixer for 1.5 hours.
- Keep the Beads on Ice to slow down the reaction.
- Spin down the beads. The Centrifuge should be set to 2500xg @4°C for 1.5 minutes with Soft Deceleration Enabled.
- Keep the Beads on ice and only take one Falcon Tube out of the Ice at a time.
- Additional reactions can degrade the beads. Keeping them on Ice as much as possible help prevent degradation.
- These additional reactions can especially become a problem when you are making 12 Time-Tags at the same time.
- Spinning down all 12 Tubes for each Time-Tag can take a long time.
- If the Tubes are left at Room temperature during this time there is a high chance for these additional reactions.
- This may not be a problem if you are making 4 or fewer Time-Tags. As all the Tubes can be spun down at the same time with little waiting between steps.
- Without disturbing the beads remove 3ml of Buffer.
- Wash the beads once with TE-SDS and then twice with TE-TW:
- Add 10 ml of TE-SDS to the Tube.
- Vigorously shake the tube for 5 seconds
- Spin down the beads. The Centrifuge should be set to 2500xg @4°C for 1.5 minutes with Soft Deceleration Enabled.
- Carefully remove as much Liquid possible without disturbing the beads.
- Add 10ml of TE-TW.
- Gently swirl the Tube to allow proper mixing.
- Spin down the beads. The Centrifuge should be set to 2500xg @4°C for 1.5 minutes with Soft Deceleration Enabled.
- Carefully remove as much Liquid possible without disturbing the beads.
- Add 10ml of TE-TW.
This is a STOPPING STEP. You can store the Beads in TE-TW at 4°C and continue later.
- Wash the beads twice with Distilled Water:
- Spin down the beads. The Centrifuge should be set to 2500xg for 1.5 minutes with Soft Deceleration Enabled.
- Carefully remove as much Liquid possible without disturbing the beads.
- Add 10ml of Distilled Water.
- Spin down the beads. The Centrifuge should be set to 2500xg for 1.5 minutes with Soft Deceleration Enabled.
- Carefully remove as much Liquid possible without disturbing the beads.
- Add 10ml of Distilled Water.
- Spin down the beads. The Centrifuge should be set to 2500xg for 1.5 minutes with Soft Deceleration Enabled.
- Carefully remove as much Liquid possible without disturbing the beads.
Protocol for Converting dsDNA on the Beads to ssDNA using Alkaline Denaturation
- Sodium Hydroxide is a very dangerous Chemical it can melt your Skin and turn your body into Soap. You need to be extra careful.
- Wear Lab Coat, Safety Glasses, Face-Sheild, Double Nitrile Gloves and work in the Fume Hood.
- Tape the First Layer of Gloves to your labcoat to avoid exposing your skin accidentally.
- Execute the cell below to watch the video.
- Put on a second layer of gloves on top after you have taped the first layer.